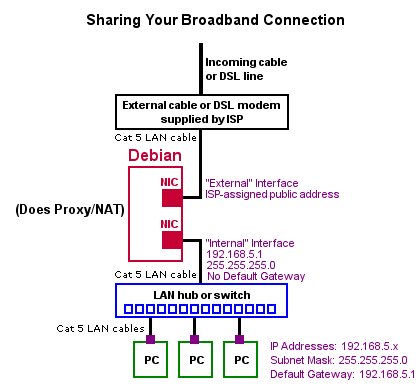
Preliminars Treballem en un ordinador amb dos NICs (dues targes Ethernet) i volem que l'ordinador actuï com a "proxy server". Al treballar amb dues targes alhora poden sorgir alguns problemes. L'ordinador assignarà un nom del tipus eth0, eth1, eth2 a cadascun dels dispositius de xarxa, però assignarà el nom de forma més o menys arbitrària depenent de quin driver carregui primer. Anem a veure que podem fer per a controlar millor la situació. Si fem sudo ifconfig tindrem tota la informació dels dispositius instal·lats, per exemple eth0 Link encap:Ethernet HWaddr 00:e0:53:03:21:b5 inet addr:192.168.1.19 Bcast:192.168.1.255 Mask:255.255.255.0 inet6 addr: fe80::2e0:53ff:fe03:21b5/64 Scope:Link UP BROADCAST RUNNING MULTICAST MTU:1500 Metric:1 RX packets:12178 errors:0 dropped:0 overruns:0 frame:0 TX packets:8726 errors:0 dropped:0 overruns:0 carrier:0 collisions:0 txqueuelen:1000 RX bytes:12417945 (11.8 MiB) TX bytes:945501 (923.3 KiB) Interrupt:22 Memory:fdeff000-fdeff0ff eth1 Link encap:Ethernet HWaddr 00:13:d3:52:59:9c inet addr:172.16.0.1 Bcast:172.16.0.255 Mask:255.255.255.0 inet6 addr: fe80::213:d3ff:fe52:599c/64 Scope:Link UP BROADCAST RUNNING MULTICAST MTU:1500 Metric:1 RX packets:5504 errors:0 dropped:0 overruns:0 frame:0 TX packets:8707 errors:0 dropped:0 overruns:0 carrier:0 collisions:0 txqueuelen:1000 RX bytes:434174 (423.9 KiB) TX bytes:8879583 (8.4 MiB) Interrupt:20 Base address:0x2000 lo Link encap:Local Loopback inet addr:127.0.0.1 Mask:255.0.0.0 inet6 addr: ::1/128 Scope:Host UP LOOPBACK RUNNING MTU:16436 Metric:1 RX packets:120 errors:0 dropped:0 overruns:0 frame:0 TX packets:120 errors:0 dropped:0 overruns:0 carrier:0 collisions:0 txqueuelen:0 RX bytes:9676 (9.4 KiB) TX bytes:9676 (9.4 KiB) La HWaddr correspon a la MAC de cada dispositiu. A mi al començament el primer dispositiu m'apareixia com a eth2 i el segon com a eth0. Per a canviar els noms fem sudo gedit /etc/udev/rules.d/70-persistent-net.rules i ens sortirà algo com ara: # PCI device 0x1904:0x2031 (sc92031) SUBSYSTEM=="net", ACTION=="add", DRIVERS=="?*", ATTR{address}=="00:e0:53:03:21:b5", ATTR{dev_id}=="0x0", ATTR{type}=="1", KERNEL=="eth*", NAME="eth0" # PCI device 0x10ec:0x8139 (8139too) SUBSYSTEM=="net", ACTION=="add", DRIVERS=="?*", ATTR{address}=="00:13:d3:52:59:9c", ATTR{dev_id}=="0x0", ATTR{type}=="1", KERNEL=="eth*", NAME="eth1" # USB device 0x:0x (cdc_ether) SUBSYSTEM=="net", ACTION=="add", DRIVERS=="?*", ATTR{address}=="00:0e:50:68:e1:af", ATTR{dev_id}=="0x0", ATTR{type}=="1", KERNEL=="eth*", NAME="eth2" Poseu els dispositius amb el nom que vulgueu i l'ordre que vulgueu. Fixeu-vos que els dispositius s'identifiquem amb la MAC. Per a configurar els paràmetres de connexió de cadascun dels dispositius fem sudo gedit /etc/network/interfaces Si volem assignar adreces IP estàtiques simplement haurem de tenir algo com ara: auto lo eth0 eth1 iface lo inet loopback iface eth0 inet static address 192.168.1.19 netmask 255.255.255.0 gateway 192.168.1.1 dns-nameservers 192.168.1.1 iface eth1 inet static address 192.168.2.1 netmask 255.255.255.0 En el meu cas, el dispositiu eth1 és el que estarà connectat a la LAN que estem a punt de crear. Fixeu-vos que no s'ha de definir ni gateway ni dns. Els ordinadors de la LAN tindran adreces de l'estil 192.168.2.x i hauran de de tenir els servidor DNS correspon al proveidor de ADSL, en el meu cas 192.168.1.1 (fixeu-vos que és l'adreça del router de la companyia que tingueu) Per a que tots aquests canvis sorgeixin efecte anirà bé reiniciar els dispositius fent sudo /etc/init.d/networking stop; sudo /etc/init.d/networking start Un cop ho tenim tot ben configurat, podem passar al següent pas. El Kernel i NAT El kernel és el que té la capacitat d'inspeccionar els paquets i modificar-ne les adreces (funció NAT). Necessitem una manera de dir-li al kernel el que ha de fer. Amb Debian Squeeze farem servir el comandament IPTABLES. Utilitzarem una serie de comandaments IPTABLES, i cadascun establira una regla que dictara que fer amb els paquets. El conjunt de comandaments IPTABLES estableix el que s'anomena una "ruleset" or "chain". El conjunt de comandaments necessaris, conjuntament amb uns quants comentaris es troba a continuació: #!/bin/sh Per a configurar bé aquest script només cal llegir els comentaris is substituir la informació que es demana. Aquest script el podem guardar amb el nom proxy.txt Després fem: sudo cp /home/ftp/pub/incoming/proxy.txt /etc/init.d/proxy.sh sudo chmod 755 /etc/init.d/proxy.sh per a copiar el fitxer en la carpeta adequada i fer-lo executable per a root. Per a que el procés es posi en marxa fem sudo /etc/init.d/proxy.sh i si tot està ben configurat, ja tindrem la mínima expressió d'un proxy server en marxa. Si necessiteu resoldre algun dubte, poseu-vos en contacte a través d'aquest enllaç. |
9. Proxy Server |

