Damn Small Linux (DSLv4.11RC2)
A tutorial for a web server implementation in an old reborn computer

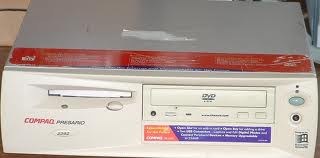
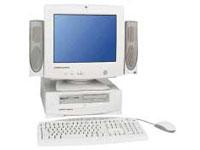 I have a Compaq Presario 2292 with a CPU
AMD-K6 3D that works at 333Mhz.
And a RAM memory of 128MB (maximum could be 256MB). The disk capacity is outstanding: 4GB! Impressive computer... don't you think so ???
Well, believe it or not, if you are reading this page is because my
Compaq Presario 2292 sent it to you. Yeah, my Compaq Presario 2292
is a fine web server still in service.
I have a Compaq Presario 2292 with a CPU
AMD-K6 3D that works at 333Mhz.
And a RAM memory of 128MB (maximum could be 256MB). The disk capacity is outstanding: 4GB! Impressive computer... don't you think so ???
Well, believe it or not, if you are reading this page is because my
Compaq Presario 2292 sent it to you. Yeah, my Compaq Presario 2292
is a fine web server still in service.
What is able to do an old computer with the right software? The best way to answer this question is to use one of the lightest Linux distributions: Damn Small Linux (DSL). This small creature is able to enter your old computer and bring it back to life all over again. In the official web page of Damn Small Linux (DSL) you can find basic information about this distribution and you can download the newest version (go for the release candidate). The stable one is from 2008 and the release candidate is a good version. A fresh install of DSL in the hard disk takes less than 14Mb of RAM memory and several hundred MB of the hard disk.
 DSL is then like an Atom Ant
(remember the atom ant???). It works with my damn old computer at a very reasonable speed (Much faster than Windows 95 was !!!). The number of applications and extensions you can add to a fresh install is more than enough to enjoy working in your old computer. So we should all thank so much to everyone who did an effort to develop DSL!!!
DSL is then like an Atom Ant
(remember the atom ant???). It works with my damn old computer at a very reasonable speed (Much faster than Windows 95 was !!!). The number of applications and extensions you can add to a fresh install is more than enough to enjoy working in your old computer. So we should all thank so much to everyone who did an effort to develop DSL!!!
DSL is based on Debian, but only some Debian packages can be safely and easily installed. Some programs that you can install with synaptic may not work properly. DSL is not user friendly for people who does not have experience in using Debian or any other Linux distro, mainly because of the lack of documentation. Anyway, facing problems in DSL is an entertaining task, and it is a good way of learning more about Debian and Linux.
My purpose was then to give a new life to my old computer and use it as a web server. And I succeeded thanks to a Hard Disk Install of DSL!. I had fun solving many problems. And I finally decided to collect all the useful information that I found by googling, and also the solutions to the problems that I solved. I hope this is useful to newbies like myself !!!
 Download the image .iso file and burn
it to a CD. I like the release candidate
dsl-4.11.rc2-syslinux.iso. Boot the CD and enter
Download the image .iso file and burn
it to a CD. I like the release candidate
dsl-4.11.rc2-syslinux.iso. Boot the CD and enter
dsl 2
at prompt to boot into text mode. Run cfdisk and prepare three partitions. I used:
- /dev/hda1 - 3Gb for image, set as linux type and bootable
- /dev/hda2 - 256Mb (double the amount of RAM) for swap, set type to 82 (type 82 means swap).
- /dev/hda3 - rest of drive for /home, mydsl, and backup/restore.
Write partitions. After writting the table to disk, a message will appear. If any error occurs, reboot and repeat the process. Otherwise you may have some trouble (the OS can not find the swap area, for instance). Exit cfdisk and format the partitions:
mke2fs /dev/hda1
mke2fs /dev/hda3
mkswap /dev/hda2
swapon /dev/hda2
Reboot (with the CD inside) into level 5 (just let it boot). Right-click on desktop and select Apps ->Tools->Install to Hard Drive. Answer the questions carefully: at image partition, enter -> hda1 (or the appropriate); at install from, enter -> l (that's L for Live CD); at format question, enter -> y. Select grub install, since later on we will modify the menu.lst file to change the cheat codes.
When install completes, the system will ask you to reboot and remove the CD. Hopefully, now we're successfully running off our HD install. Now, we'll edit the grub menu. Open a terminal window:
sudo su
mount /mnt/hda1
nedit /mnt/hda1/boot/grub/menu.lst
We edit the first boot option and we let it as follows:
title DSL
kernel /boot/linux24 root=/dev/hda1 quiet vga=normal acpi=force apm dma scsi frugal
Cheat codes are machine dependent. If these cheat codes are not good for your machine, you may reboot using any of the other entries in the GRUB menu. Save the changes and DO NOT FORGET:
umount /mnt/hda1
And reboot.
Check this paragraph fully before doing any more changes. Go to DSLpanel and enable the option Backup and Restore by adding the partion hda3. When you stop the computer, a backup of the folder /home/dsl/ (your home folder, you are user dsl by default!) and some configuration files will be saved in a backup.tar.gz file. When the computer boots, this file is used to restore the saved files. So, if the computer stops because of power outage, for instance, you will loose some of the changes in the system. In my opinion this is a bad idea in a Hard Disk Install as we are doing, so my advice is: forget this paragraph and do not backup any files (it is good that you know that this possibility exists though). It is of course good to backup your important files by yourself.
If you suffer a power outage or you make a hard reboot, you will not be able to restart the system so easily. The first time you reboot you will arrive to a command line. Reboot the system again by using sudo reboot in the command line and in the next reboot everything should be fine (it happen to me already 3-4 times).
Your computer is now ready for the next step.
We are interested now to install the following programs:
- Darkstat (very light program for a basic control of network traffic).
- Darkhttpd (very light and simple web server that really works fine).
- Arno-iptables-firewall (my favorite firewall).
- Tcpdump (standard command-line packet analyzer).
- Inadyn (free DynDNS client).
- Vncserver (to remote control the computer)
- Ethereal (The world's most popular network protocol analyzer)
The compilation and installation of these programs are the content of this section. If you are interested in compiling other programs, install all the extensions that we suggest in here (in sections 2.1 and 2.2) in the same order as we do (order is very important!).
2.1 Basic Extensions
Now we install basic and important extensions (extensions are programs, libraries or any kind of useful software to be used in DSL). Go to Apps -> Tools-> Upgrade to Gnu utils. Then go to Apps -> Tools -> Enable Apt. To install any other new extensions go to MyDsl -> MyDsl browser. The first time it will ask you to update the data base. YOU SHOULD ONLY INSTALL EXTENSIONS *.tar.gz or *.dsl !!! DO NOT INSTALL *.uci or other types in this kind of installation (you can use them in a FRUGAL install but we did a Hard Disk Install).
Using MyDsl browser, install the following extensions to manage Debian packages:
- dsl-dpkg.dsl
- synaptic.dsl
This synaptic allows to install or upgrade Debian Woody packages, but there are many packages that can not be installed in DSL. USE ALWAYS SYNAPTIC FROM THE COMMAND LINE, DO NOT USE THE ICON ON THE DESKTOP, otherwise you will miss important information. If you know what you are doing, you can force the installation of a package following the instructions of section 7.
2.2 Darkstat
Darkstat is a very light program that captures network traffic, calculates statistics about usage, and serves reports over HTTP. To compile programs like darkstat you should install the following extensions in the order they are listed below:
- gcc1-with-libs.dsl
- linux-kernel-headers.dsl
- libc6.dsl
- libc6-dev.dsl
- libncurses5.dsl (to compile drivers)
- libncurses5-dev.dsl (to compile drivers)
- kernelsource-2.4.31.dsl
- flex-bison-libtool.dsl (to compile darkstat)
Not all of them are necessary, but you will need them all in the the near future. Download libpcap-0.9.6.tar.gz (you may download it also from here) and install the library (needed to compile darkstat):
tar xvzf libpcap-0.9.6.tar.gz
cd libpcap-0.9.6
./configure --prefix=/usr
su -c 'make install-shared'
su -c 'rm /usr/lib/libpcap.so; ln -s libpcap.so.0.9.6 /usr/lib/libpcap.so'
su -c '/sbin/ldconfig'
We do not use the libpcap library in the extensions because it is not complete and does not allow us to compile darkstat. Download darkstat_3.0.713.orig.tar.gz from the Debian site or from this link (do not use 3.0.715 version in the web page of darkstat because it will not work out of the box in DSL). Compile it following the instructions contained in the package.
It is possible to use use the version 3.0.715 from the official site (also from here) if you replace the original file http.c by this one: http.c (also you can get it from this link). This version allows to sort on last-seen, which is a very interesting feature.
After installation, make sure you have the files /etc/init.d/darkstat and /etc/darkstat/init.cfg (In DSL, for unknow reasons, names are a bit different so rename the files). If you want to start darkstat using /etc/init.d/darkstat or using /etc/darkstat/init.cfg at boot time you need the file /lib/lsb/init-functions, which is not installed in the system. It is necessary to install it by hand downloading from Debian site (or taking it from a Debian system) or cliking here
(It is not possible to install lsb-corepackages because of broken dependencies). Then, edit the file /etc/init.d/darkstat and add the path /usr/local/sbin for the variable PATH and change the path for DAEMON to /usr/local/sbin.
Edit the file /etc/darkstat/init.cfg and make sure you have START_DARKSTAT=yes
and DIR="/var/lib/darkstat" and PORT="-p 667". Then run from a command line:
sudo update-rc.d darkstat defaults
This will install the necessary files to start at boot time after eth0 configuration (DHCP).
However, if you use a static IP, the program will probably not be able to start. In such case, edit the /opt/bootlocal.sh file and add the following line after eth0.sh :
/etc/init.d/darkstat start
And it will always successfully start. If you need to undo the update-rc.d process just type:
update-rc.d -f darkstat remove
And that's all. After restarting the system open a browser in http://localhost:667 and enjoy the information. You have some more information about darkstat in a Debian system in here.
2.3 Darkhttpd
We install a very light and reliable web server called darkhttpd (Monkey web server in DSL fails to serve pages with several images on it). Download the source: darkhttpd-1.8.tar.bz2 and compile it following the instructions contained in the package. It is a very simple process. Install the resulting executable file in the same folder as darkstat (/usr/local/sbin). It can be good to create the file for logging:
sudo touch /var/log/access.log
We can start the server with the following command line example:
sudo darkhttpd /var/www/htdocs --port 80 --maxconn 10 --log /var/log/access.log --chroot --pidfile httpd.pid --daemon
Syntax is explained in the web page and in the file included in the package that we downloaded, but the syntax is quite self-explanatory.
2.4 Arno's Iptables Firewall
I am familiar with arno-iptables-firewall and I explain now how to use it in DSL. Download from the Debian website the package arno-iptables-firewall_1.9.2.k.orig.tar.gz.Install the extensions iptables.dsl and curl.tar.gz with MyDsl Browser. Install from synaptic the packages gawk, iproute, dnsutils, sysklogd.Sysklogd is better than syslogd used in DSL (but it will be heavier and it will allow us to get logs!). Since we will have a lot of logs from the webserver and other programs (this one included), it may be necessary to install logrotate to manage the log files. I explain that in section 11.
Unpack the package arno-iptables-firewall_1.9.2.k.orig.tar.gz. and follow the simple instructions for installation. You have further information about this firewall in this tutorial. When you start the firewall, you may ignore the error messages about some modules not being found in the system. You can check with sudo iptables -L that all the necessary rules are well established. I tested my firewall and it works completly fine. In section 10, I use arno-iptables-firewall to set up a proxy server.
DSL has its own firewall that you can install as an extension, rcfirewall.dsl, that may be more than enough for a basic setup. However, I was not able to get any logs at all from the firewall and I like controlling who, when, through which port, etc is getting blocked. Anyway I am familiar with arno-iptables-firewall. It can be a question of taste!
Update:This is a list of not found modules: nf_conntrack, nf_conntrack_ftp, xt_conntrack, xt_limit, xt_state, xt_multiport, xt_TCPMSS, xt_DSCP, nf_nat_ftp.
This is the list of working modules: ip_tables, ip_conntrack, ip_conntrack_ftp, ipt_conntrack, ipt_limit, ipt_state, ipt_multiport, iptable_filter, iptable_mangle, ipt_REJECT, ipt_LOG, ipt_TCPMSS, ipt_DSCP, ip_nat_ftp, iptable_nat.
2.5 Tcpdump
From tcpdump web, go to http://www.tcpdump.org/release/ and download tcpdump-3.9.8.tar.gz. Follow the usual instructions to compile and install it. You should have no trouble at all if you already installed the libpcap library as suggested in section 2.2. After the installation, the tcpdump binary is in /usr/local/sbin folder, together with darkstat and darkttppd.
To run the program at boot time I first created the file /usr/local/sbin/tcpdump.sh (executable!) with the following content:
----------------------------------------------------------------------------------------
TIME="$(date +%F_%T)"tcpdump port 80 -i eth0 -ns 0 -w /home/dsl/tcpdump/box_$TIME.cap -C 10 -W 3 &
-----------------------------------------------------------------------------------------
This makes tcpdump to listen to eth0, port 80, and generate a file with a name like box_'Date-and-time'.cap. The files generated by tcpdump will have a maximum size of 10MB and it will be rotated 3 times. You can choose the parameters that suits your needs. Then edit /opt/bootlocal.sh and add the following command:
/usr/local/sbin/tcpdump.sh &
See section 4 for more comments about bootlocal.sh
2.6 Ethereal
To compile Ethereal, we need to install GTK+, or the GIMP Toolkit, which is a multi-platform toolkit for creating graphical user interfaces.
The gtk+2.X from the extensions does not allow me to compile Ethereal
and it can not be reinstalled from synaptic. So we install version 1.2.10.
We download the file gtk+-1.2.10.tar.gz from
this page or from this link. To install the library you just need to follow the usual steps
indicated in the package. If you have trouble with ./configure, add the option --host=i586-pc-linux-gnu.
After installing the gtk+ library, we proceed to compile Ethereal. We download the source from this page and choose the file ethereal-0.99.0.tar.bz2 (you may download it from this link). Use ./configure with the options --disable-gtk2 and --disable-ipv6. After compiling the program (it takes more than one hour) and installing it, run from the command line:
sudo ldconfig
to "re-create the bindings and the cache for the loader of dynamic libraries ("ld"). You may want to run ldconfig after an installation of new dynamically linked libraries on your system. (It is also re-run every time you boot the computer). Otherwise the program does not start because it can not find some libraries.
Ethereal runs smoothly in my computer and I may easily check the information provided by tcpdump. It is better to capture with tcpdump rather than with Ethereal, because Ethereal likes RAM memory too much...
2.7 Inadyn
INADYN is a free DynDNS client. It gives the possibility to have your own fixed hostname registered on the internet, although your IP might be changing. It checks periodically whether the IP address stored by the DNS server is the real current IP address of the machine that is running INADYN. You can install it from myDSL browser (inadyn.dsl). To run it using NO-IP you can create an executable file like this /usr/local/sbin/inadyn.sh:
/usr/sbin/inadyn --background --log_file /var/log/inadyn.log --update_period_sec 1800 --dyndns_system default@no-ip.com -u username -p password -a www.yourweb.com
This will update your IP every 30 minutes. To start this service at boot time include the corresponding instruction in /opt/bootlocal.sh (see section 4 to know more).
2.8 VNC server
If you use several computers at the same time, it is a good idea to remote control them from a single client computer. You can install vncserver from myDSL browser: vnc4x-1.4.6.dsl This program will install two very nice icons in the desktop. My advice is not to use any of them. Define a password by using the program vncpasswd in a terminal. To start vncserver from boot, edit the file .Xinitrc (see section 5 for more information) and add:
vncserver :1 -name BOX -geometry 1680x1050 -depth 16 2>/dev/null &
This will allow you to open a connection from port 5900 + 1 (open that port in your firewall!). Choose whatever you need for -geometry depending on the screen you are using in the client computer. Notice that you will not be using the graphic's card of your old computer. You will be using the client's graphic card, so controling your computer from a remote client can be faster than using the old computer directly!
 When you start the client in a Debian system using xtightvncviewer -fullscreen 192.168.x.x:1 in
the command line, you get a fluxbox desktop with a scary gray background, no icons, no system information. If it is the first time to
use fluxbox, just right click with your mouse anywhere in the desktop
and you get a menu that gives you access to everything. Explore a bit by yourself to be able to configure things:
When you start the client in a Debian system using xtightvncviewer -fullscreen 192.168.x.x:1 in
the command line, you get a fluxbox desktop with a scary gray background, no icons, no system information. If it is the first time to
use fluxbox, just right click with your mouse anywhere in the desktop
and you get a menu that gives you access to everything. Explore a bit by yourself to be able to configure things:
- To get a fast desktop, choose a black background (in fluxbox desktop you choose the "simple" background).
- Then choose xtdesktop icons.
- Finally you can open a terminal and type torsmo to get system information on the top, right corner of the screen (see image on the right).
Notice that:
- The default desktop in vncserver is fluxbox, but the default desktop in DSL is jwm.
- The default desktop in vncserver is determined in the file /home/dsl/.vnc/Xstartup.
- The default desktop in DSL is determined in the file /home/dsl/.desktop
Now you have everything set up and ready to work!
I wanted to have a complete basic setup in my old computer, and I wanted sound to work, even if it was not essential. Solving this took me a while although the solution was pretty simple. To use xmms after a fresh install was impossible. The system detects no sound card because my computer has a built-in ESS1869 chip. To start getting sound open a terminal and type:
sudo modprobe sb
This command tells the system to use Sound Blaster drivers (I was lucky this worked for my chip!). This way I can get nice music from CD reproduction, but sound from music files sounds horrible. After including this instruction in the /opt/bootlocal.sh file and restarting the system, I checked /var/log/kernel.log file and I found the following interesting information.
Nov 5 15:32:49 box kernel: Soundblaster audio driver Copyright (C) by Hannu Savolainen 1993-1996
Nov 5 15:32:49 box kernel: sb: No ISAPnP cards found, trying standard ones...
Nov 5 15:32:49 box kernel: SB 3.01 detected OK (220)
Nov 5 15:32:49 box kernel: ESS chip ES1869 detected
Nov 5 15:32:49 box kernel: sb: Interrupt test on IRQ7 failed - Probable IRQ conflict
In such case it is necessary to carefully check the BIOS. The interrupt test indicates that something is already using IRQ7. In my case the parallel port (for the printer) had IRQ7 assigned. And the sound system had IRQ5 assigned. Changing this, assigning IRQ7 to the sound system and IRQ5 to the parallel port solved the problem.
Those programs are called from the file /opt/bootlocal.sh. A sample of the content of this file is the following:
#!/bin/bash
# put other system startup command here
#/sbin/syslogd
/etc/init.d/sysklogd start
modprobe sb
loadkeys es
/opt/eth0.sh &
/opt/eth1.sh &
/etc/init.d/darkstat start &
/usr/local/sbin/tcpdump.sh &
/usr/local/sbin/inadyn.sh &
The instruction "loadkeys" allows to configure the keyboard to your own language.
Those programs are called from /home/dsl/.Xinitrc. To get rid of dillo at the start up and execute our own .sh files I altered the following code (compare with the original):
if egrep -qv lowram /proc/cmdline 2>/dev/null; then
# dillo /usr/share/doc/dsl/getting_started.html &>/dev/null &
fi
vncserver :1 2>/dev/null &
torsmo 2>/dev/null &
The program torsmo displays information of the system in right top corner of the screen.
DSL includes two TinyX servers from XFree 4.3.0: Xvesa, and Xfbdev. They are named as X + driver name, for example Xvesa for the Vesa driver. The configuration is contained in the file /home/dsl/.Xserverrc. For a USB mouse:
exec /usr/bin/X11/Xvesa -mouse /dev/input/mice,5 -screen 1024x768x32 -shadow -nolisten tcp -I &>/dev/null
If you want to install "better?" drivers, try the extensions Xvesa.tar.gz or Xchips.tar.gz. Change the content of the file like this:
exec /opt/bin/Xvesa -mouse /dev/input/mice,5 -screen 1024x768x32 -shadow -nolisten tcp -I &>/dev/null
In my case, when trying to use the new drivers, the scrolling wheel stopped working, so I decided not use them.
There are limitations to apt in DSL. If you can not use synaptic, you may have better luck by downloading the .deb package and installing it manually with dpkg.
dpkg -i --force-all file.deb
Do this at your own responsability!
![]() First of all, in my opinion, it is better to use fluxbox desktop rather than jwm, which is the default desktop. You can change the desktop by editing the file .desktop and changing jwm by fluxbox. Then you do ctr+alt+del and
type xinit to restart the desktop environment.
First of all, in my opinion, it is better to use fluxbox desktop rather than jwm, which is the default desktop. You can change the desktop by editing the file .desktop and changing jwm by fluxbox. Then you do ctr+alt+del and
type xinit to restart the desktop environment.
There are two different set of icons, dfm and xtdesk. You can change also which set you use by editing the .desktop file. It is easier to manage the icons if you choose xtdesk, which is the default choice in this 4.11rc2 version. The program xtdesk load or reloads the icons (xtdesk type) on the desktop. So, if for any reason, the icons go away, just open a terminal and type xtdesk to have them back. This happens to me everytime I use the vncserver from a client.
To manage the icons, use the program icontool.lua, which is a very simple and intuitive program. In the desktop, the default xtdesk icons are (on the image on the left you can see more icons that I added later on):
ATerminal: Bash shell (command line)
Emelfm: GUI for navigating the directories.
xZGV: for viewing graphics files
Beaver: text editor, but not a good one. It is so slow when scrolling text or finding words!!! Forget it and install Nedit instead (from MyDSL browser).
Firefox: web browser. It is heavy for a slow computer like mine.
Siag: spreadsheet
XMMS: for playing audio and video files.
DSL panel: points you to important functions.
axyFTP: FTP client
Sylpheed: email client
mtPaint: for creating images.
Dillo: lightweight web browser
MyDSL: for installing additional applications
Ted: primitive word processor for RichText documents
Xpdf: for reading pdf files.
9. "Please mount media containing optional dir and try again"
If you get this annoying message (some people report dozens!) when you try to shutdown your computer, it may be because you installed extensions *.uci in your computer. To solve this problem:
- Use the uci tool in the system menu to unmount the *.uci programs (if they remain mounted).
- Erase all the *.uci files you downloaded. If you do not know where they are, you open a terminal and type: sudo find / -name '*.uci'
- *.uci files are mounted in /opt so erase all the folders corresponding to the programs.
- Open the file /tmp/mydsl.map and replace the name of the *.uci files by the word free.
This procedure worked for me. Consequences on your system are your responsability.
10. Two network cards (to setup a proxy server for a small LAN)
It is possible to work with as many network cards as your computer may allow. You can go to the control panel -> netcardconfig and configure the ip addresses, broadcast addresses and so on for each card. In my case, I have two cards, so I could have the computer working also as a proxy server. The configuration of every card is saved by netcardconfig to a file /opt/ethX.sh. In my case those files have the following content:
eth0.sh
#!/bin/bash
pkill pump
ifconfig eth0 192.168.1.14 netmask 255.255.255.0 broadcast 192.168.1.255 up
route add default gw 192.168.1.1
eth1.sh
#!/bin/bash
pkill pump
ifconfig eth1 192.168.11.1 netmask 255.255.255.0 broadcast 192.168.11.255 up
route add default gw
In my setup eth0 corresponds to the external card and eth1 is connected to an internal network (a switch with computers whose ip address is 192.168.11.X and dns 192.168.1.1). Then you may configure the arno-iptables-firewall to enable NAT and SNAT.
Logrotate is designed to ease administration of systems that generate large numbers of log files. It allows automatic rotation, compression, removal, and mailing of log files. Each log file may be handled daily, weekly, monthly, or when it grows too large. You may install logrotate from synaptic (it will install cron too, but do not do it!).
The logrotate command may be called daily by the cron scheduler. But in my computer, for unknown reasons, cron doesn't work. Also, the cron program from the control panel does not work properly (CPU goes to a 100% activity forever). So I did the following:
- I installed another program called fcron that works with no trouble at all.
- Then I forced the installation of the logrotate package without its dependencies (without cron and mailx, among others). Those dependences are not needed at all for logrotate to work properly.
Let's do it step by step!
11.1 Compilation, Installation and Configuration of fcron
You can download fcron from this webpage. I downloaded the file fcron-3.0.6.src.tar.gz. Fcron is well documented. To compile and install the program you can follow the installation process suggested by the authors. It is the standard process. Just two hints:
i) Run ./configure with the following options:
./configure --with-pam=no --with-selinux=no --with-fcrondyn=no --with-username=dsl --with-groupname=dsl
ii) After running ./configure add the group dsl,
sudo groupadd dsl
and add the user dsl to the group dsl:
sudo usermod -g dsl dsl
If you need further help with this issue, check in here. When running make you will have to answer some simple questions and the compilation process will be fast and successful.
After make install, you will have fcron up and running. Then you have write a very simple configuration file, that we call /etc/fcrontab, like the one it follows (very similar to crontab):
------------------------------------------------------------------------------------------------------------------------------------------------------------------------------------------------------------# Minute Hour Day-of-Month Month Day-of-Week (Mon 1 - Sun 7) command
14 1 * * 7 /usr/sbin/logrotate /etc/logrotate.conf
-------------------------------------------------------------------------------------------------------------------------------------------------------------------------------------------------------------
The stars "*" means "any". So this file configuration file is telling fcron to execute the command every week, on Sunday at 01:14. We shall tell fcron that we wish to use this configuration file using the following command:
sudo fcrontab /etc/fcrontab
The program fcrontab reads the file and tells fcron, so it and takes effect immediatly. Easy!!!!
11.2 Installation and configuration of logrotate
To install logrotate, we download the .deb file from a special web page where you can find packages of every version of Debian. Debian is wonderful, isn't it??? You can download the package logrotate_3.5.9-8_i386.deb from here. Now we install it without its dependences (we do not wish to install cron or mailx). To do that we follow section 7 and execute the following command:
sudo dpkg -i --force-all logrotate_3.5.9-8_i386.deb
and that's it. Installation is finished. Now we need to talk about the configuration. Fcron will call logrotate early on Sunday (if you followed section 11.1) so it is good to do the configuration before Sunday! The logrotate command reads the following files:
- The logrotate configuration file /etc/logrotate.conf
- Files in the logrotate configuration directory /etc/logrotate.d. Most of the programs installed on any system create a configuration file for logrotate in /etc/logrotate.d.
In DSL a /etc/logrotate.conf file like the one that follows is needed:
-----------------------------------------------------------------------------------------------------------------# see "man logrotate" for details
# rotate log files weekly
weekly
# keep 4 weeks worth of backlogs
rotate 4
# create new (empty) log files after rotating old ones
create
# uncomment this if you want your log files compressed
#compress
# packages drop log rotation information into this directory
include /etc/logrotate.d
# no packages own wtmp, or btmp -- we'll rotate them here
/var/log/wtmp {
missingok
monthly
create 0664 root utmp
rotate 1
}
#system-specific logs may be configured here
--------------------------------------------------------------------------------------------------------------
This is the file /etc/logrotate.d/sysklogd that I use:
---------------------------------------------------------------------------------
/var/log/syslog
/var/log/mail.info
/var/log/mail.warn
/var/log/mail.err
/var/log/mail.log
/var/log/daemon.log
/var/log/kern.log
/var/log/auth.log
/var/log/user.log
/var/log/lpr.log
/var/log/cron.log
/var/log/debug
/var/log/messages
/var/log/firewall.log
{
rotate 4
weekly
missingok
notifempty
compress
delaycompress
sharedscripts
postrotate
/usr/bin/killall -HUP syslog
endscript
}
----------------------------------------------------------------------------------
(To restart a process: /usr/bin/killall -HUP name of process)
Do not forget to create a configuration file for logrotate in /etc/logrotate.d for each program that generates log files. For instance, for darkhttpd:
-------------------------------------------------------------------------------------------------------------------------------
/var/log/access.log
/var/log/error.log
{
rotate 4
weekly
missingok
notifempty
compress
delaycompress
postrotate
skill darkhttpd && darkhttpd /var/www/htdocs --port 80 --maxconn 10 --log /var/log/access.log --chroot --pidfile httpd.pid --daemon
endscript
}
-------------------------------------------------------------------------------------------------------------------------------
It is needed to stop each program and restart it. Otherwise, the program will keep writting in the rotated file instead of writting in the new fresh file. There are exceptions, like arno-iptables-firewall, that do not need to be restarted, because they write logs through sysklogd (which is of course restarted!)
How to test logrotate config file
Finally, you can experiment with the log rotation (outside of the usual fcron job) by forcing an
execution of the logrotate program:
sudo logrotate -f /etc/logrotate.conf
Get into the /var/log folder to check if everything went fine.
Take into account the following
Logrotate writes in the file /var/lib/logrotate/status which files have been rotated and when they have been rotated. When more than a week has passed from the last rotation, files are rotated (keep this in mind if you rotated the files "manually" in the test we suggested before). In my case I rotated the files "manually" before installing fcron. I defined an icon using icontool.lua, and when I push it, it executed the command sudo /usr/sbin/logrotate /etc/logrotate.conf. It only rotates the files if a week has passed from the last rotation.
Although this is not really needed for a web server, it can be good to have a good web browser and a printing server (see next section to install CUPS). Firefox is one of the default web browsers in DSL, but it is a bit too heavy and printing options are poor. Opera 9.10 is fully operational but lighter than Firefox. And you can print web pages easily with the required options to get a good result. To install Opera 9.10 is really simple. You can download it from Opera's web page or from this link. You may unpack using the following in the command line:
sudo tar xvzf opera-9.10-20061214.1-static-qt.i386-en.tar.gz
And you are ready to check how well the browser works for you.
cd opera-9.10-20061214.1-static-qt.i386-en
opera -geometry 1200x768+200+200
The geometry options tells how big is the initial window and the position of the upper left corner. Choose a suitable geometry for your system. If you are happy you can install Opera with the following command:
sudo ./install.sh
You can use the program icontool.lua to get an icon on the desktop with the command line options that suits your needs. In the packege there are several icons. Use the one with 48x48 pixels (you have to copy the icon in the folder ~/.xtdesktop)
We will install a printing server. This makes it possible to have a printer connected in our system and share it with all the computers in the same network. It will also allow us to print web pages or any other files to PDF. This is an interesting point, at least for me. To achieve this goal we will compile CUPS and CUPS-PDF from source (please read section 2 to install some necessary extensions to compile programs). We download CUPS source from its web page or from this link. To compile and install CUPS it we follow the standard procedure indicated in the README and INSTALL files inside the package. The compilation takes a while, but I could compile CUPS with now trouble at all. When the compilation is finished we may start the printing server in the command line:
sudo /etc/init.d/cupsd start
You may start adding your printer to CUPS opening your favorite web browser and going to http://localhost:631. At this point we may be interested to add a "PDF virtual printer", so we may convert any file into a PDF document. To do that we download the source of CUPS-PDF from its web page or from this link. Compilation and installation is really fast (just follow the instructions of the file README in the package). Then you need to do a couple of changes (took me several hours...) in the /etc/cups-pdf.conf file, in the section PDF Conversion Settings:
- The actual path of GhostScript is /usr/local/bin/gs.
Then add the command GhostScript /usr/local/bin/gs - The location of temporary files during GhostScript operation is /tmp.
Then add the command GSTmp /tmp
If you like having your printed PDF files in a /home/dsl/PDF folder, go to the section Path Settings, and add the following command
Out ${HOME}/PDF
Restart CUPS with the command:
sudo /etc/init.d/cupsd restart
You may start adding your PDF virtual printer to CUPS opening your favorite web browser and going to http://localhost:631. Go to the "CUPS for administratators" and then to "Adding printers and classes". Select "PDF virtual printer". Then choose any name for Location and click on sharing. In "Make" choose "Generic". After this you can choose your default settings (paper size and so on). And that's it! Cross your fingers, and print any web page to PDF. Wish it works for you!
BetaFTPD is the default FTP server in DSL. BetaFTPD can be considered a ftpd replacement for Unix/Linux. In addition to being fast (because it's single-threaded), it is very small (the executable is about 30 kB uncompressed). FTP servers for Unix are generally multithreaded, starting one new process for every new user that connects. Needless to say, this is a major waste of memory and CPU time. Most people think multithreading automatically means extra speed. I'm sorry, unless you have a multiprocessor machine, no. BetaFTPD is a very light and single-threaded FTP server that provides fastest file transfer using minimal resources. It is very easy to compile, install and use. Everything takes less than 5 minutes!!!
BetaFTPD project was alive for a short time, unfortunately. However, the Puppy Linux comunity took the source of the latest (unstable) version 0.0.8 and did a great work improving the code and enhancing security. Main changes are:
- Users only have access to their home directory.
- Fixed a bug that could reset the "download only" mode for anonymous when changing logging state.
- Tweaked some file permissions.
- Denies shell access to user "ftp".
Then, this version of BetaFTPD can be a good replacement for the default version in DSL. Also, this version of BetaFTPD can be used for a fast setup of an FTP server in a trusted network using any Linux distro (for instance, Debian). If you need high security please use my tutorial to install vsftpd.
We can take the source from Puppy Linux Forums or directly from this link. Unpack the file and read the README file. I suggest to run the configure script with the following options:
./configure --enable-xferlog --enable-upload --enable-shadow --enable-fork --enable-ascii --enable-dcache --enable-message
After that you may compile the source code and get the binary:make
And install the binary in the folder /usr/sbin by running
sudo make install
You may start the daemon with two options:
- -contain. It was added to restrict user navigation to their home directories instead of full machine access as in the original server.
- -restrict. Restrict anonymous users from uploading files. Other (passworded) users DO have upload rights.
sudo betaftpd -contain -restrict
If you need to kill the daemon use:
sudo skill betaftpd
You can access now from a client computer using your user name and password. Actually, everyone who has a user account in the server may access from a client computer using his username and password.
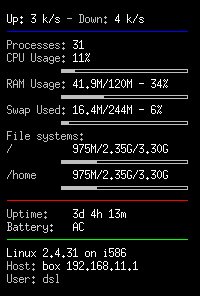
 After installing every program in this tutorial, and using them at the same time: darkstat, darkhttpd, iptables-firewall, betaftpd, tcpdump, vncserver and inadyn, the total RAM memory use is only 20.1MB. If I have a VNC client connected (using a 1680x1050:16 fluxbox desktop) the RAM memory use goes up to 29.7MB. For a webserver 64MB of total RAM memory is more than enough. I run the computer with 128MB, so I have enough for everything I intend to do. The
full installation that I did needs less than 1GB of the hard disk (total space is 4GB in my computer). I also installed some other programs that I will mention below: GIMP, Nvu, GNU Scientific Library, Nedit, xgraph and scite. Some take more space than others.
After installing every program in this tutorial, and using them at the same time: darkstat, darkhttpd, iptables-firewall, betaftpd, tcpdump, vncserver and inadyn, the total RAM memory use is only 20.1MB. If I have a VNC client connected (using a 1680x1050:16 fluxbox desktop) the RAM memory use goes up to 29.7MB. For a webserver 64MB of total RAM memory is more than enough. I run the computer with 128MB, so I have enough for everything I intend to do. The
full installation that I did needs less than 1GB of the hard disk (total space is 4GB in my computer). I also installed some other programs that I will mention below: GIMP, Nvu, GNU Scientific Library, Nedit, xgraph and scite. Some take more space than others.
Those numbers are absolutely impressive. And I can tell, with all those processes going on, I can use Gimp to edit some images, for instance, designing new icons for some shortcuts I am interested in or taking the following screenshot to show memory use with the program top (see image on the right after a fresh reboot and no VNC client connected). I can't still believe it!!!
So if you have an old computer, work with, sell it or donate it to others who may still use it. Many people could still use it for educational and professional purposes in poor areas all around the world. With DSL, you can use or teach about text editors, spreadsheets, databases... whatever! You can teach programming in C language with gcc and write programs using the scite editor. You can teach HTML by using any editor, or helping yourself with Nvu-gtk2-0.50.dsl(a heavy program that you may install as an extension and that it looks like Kompozer). And of course you can teach so much about LINUX, how to set up a LAN, ftp servers, webservers, internet, whatever!!! It is also possible to compile and install with no trouble at all the latest version of the GNU Scientific Library of mathematical functions, so you may carry out all sort of mathematical calculations and perform graphical representations with the program xgraph that you may install through synaptic.
I should not be so surprised of all this taking into account that I did my Ph.D in a computer like this one... sometime ago... It is easy to forget that so much can be done with so little. At that time I heard of Linux a few times although I used a few Unix systems. These days I only use Linux (I am a proud user of Debian).
PDT. Some basic resources that you should read:
- DSL wiki.
- DSL is a 50MB distribution created especially for underpowered machines. It is a bootable CD distribution, but is easily installed on the CD. DSL is unusual, with lots of gotchas. These articles get you past those gotchas.
- DSL in Wikipedia.
- DSL forums.