Amateur Astrophotography
Skywatcher Skymax Maksutov-Cassegrain f = 1500mm / D=127mm F12 SynScan AZ GOTO
Skywatcher Skyhawk Newtonian f= 500mm (450mm) / D=114mm F4
Skywatcher Explorer 130PDS Newtonian, f=650mm / D=130mm F5 with Skywatcher Mount EQ5 Pro SynScan GoTo

Am I crazy? No! I am not even the first one. If you own a planetary camera with a small sensor, you need a telescope with a small focal length to take pictures of big objects like galaxies and nebulae. A telescope finder is small telescope with a short focal length. Then, we can use it to take pictures of big objects, like Orion Nebula, for instance.
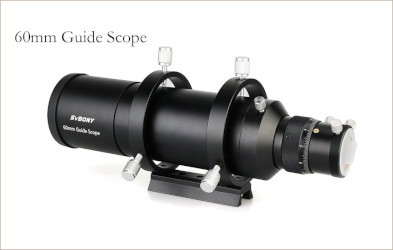
This means we need to buy a new finder, but do not worry, just 51 euro in Aliexpress (near to 90 euro in Amazon!). My choice: SVBony achromatic finder SV106, with 60mm aperture and 240mm focal length. It is impossible to get a higher price quality relationship with this instrument.
Let's see what limits we have with a such a small aperture and focal length. First thing we worry is about resolution. How good are the images in the focal plane?
Let's make some calculations. The diffraction pattern of a circular aperture of 60mm diameter at the focal plane, 240mm from the aperture, has a size of 1.22 x focal_length x Wavelength / Diameter. This is about 1.22 x 240mm X 550e-6 mm / 60mm = 2.7 um. That's a fantastic number! Separation of pixels in the camera is 2.9 um. Usually the REAL diffraction pattern will be bigger, at least two times bigger. But this just means we are going to get a perfect sampling of the image and we are going to take full advantage of the maximum resolution of the instrument. Just fine! Incredible!
Taking into account that the size of the sensor is 5.640mm x 3.181mm, the field of view is going to be: 1º 21' x 46'. Enough to take some really nice pictures of the Universe.
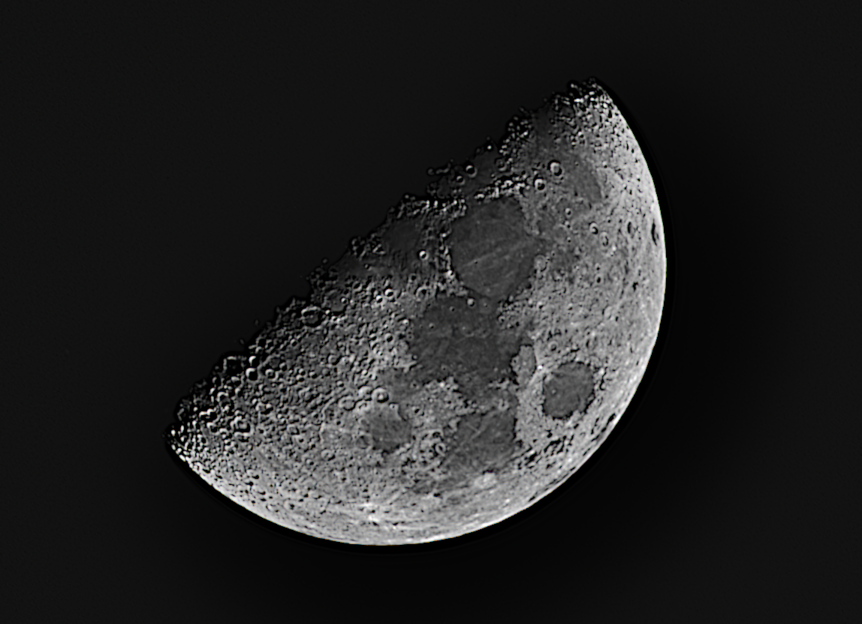
Let's get started with the following picture of the moon after processing with Autostakkert and GIMP, to show this is an instrument we can work with:
Some people, using cheap eyepieces complain about chromatic aberration (also people trying to sell more expensive stuff). But you must take into account that in this instrument, the ratio between the focal length and diameter is pretty big = 4. Usually we say this is and F4 instrument. Then, unless you are using very high quality eyepieces, you are going to enjoy a huge chromatic aberration generated mostly in the eyepieces.
The SV106 works with an achromatic doublet, and the focal length is quite short. This means that chromatic aberration will still be there, and it will be noticeable if we use our super planetary camera. Our camera has a very small detector, so we will see no coma, no field curvature. Some spherical aberration may affect us. That said, the resulting images will still be very enjoyable with plenty of detail. It is very fun to push an instrument like this to the limits and the get the very best of it. I can tell you something: please check the first pictures ever taken of Orion Nebula. With our little telescope we are going to get better results than most astronomers in the past.
There are much better finders, Sky-watcher offers apochromatic finders with 50mm aperture with a cost of 200 euros or more. It is my belief that at an amateur entry level we need no better than SVBony to start taking pictures of objects like galaxies and nebula. You should check the instruments used in the past to make important discoveries in Astronomy. So let's fully enjoy the SVBony 106 and let's get the best from it.
To stack deep space images with Autostakkert can be a problem because we take frames every several seconds, which means the objects move in the sky and rotate. For instance taking pictures of Orion Nebula every 12s... after 100 images Orion has rotated quite a lot, and Autostakkert does not include derotation.
There is a wonderful, simple and intuitive, and also free program called DeepSkyStaker, or DSS, that includes derotation by automatically determining the position of the stars. Then, analyzing a lot of images and selecting the better ones (75-50%), and finally stacking them, it is possible to get images with good SNR and impressive details. I am ready now to get the best possible images with my setup.
Orion Nebula
Orion Nebula is a nice target to start with. It is easy to locate and it's quite bright. Let's see some nice pictures.
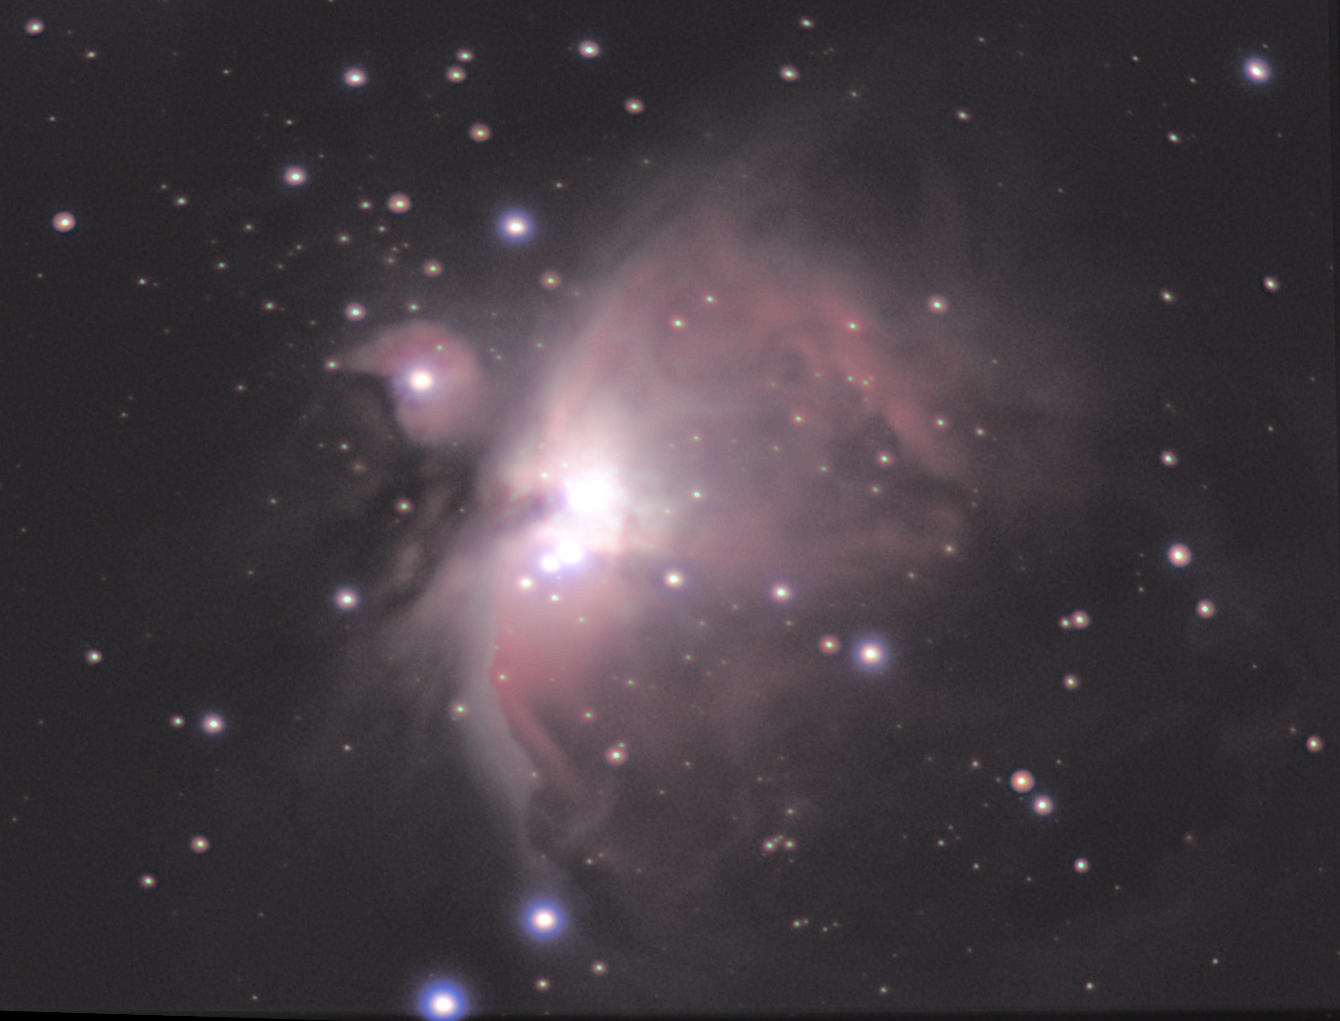
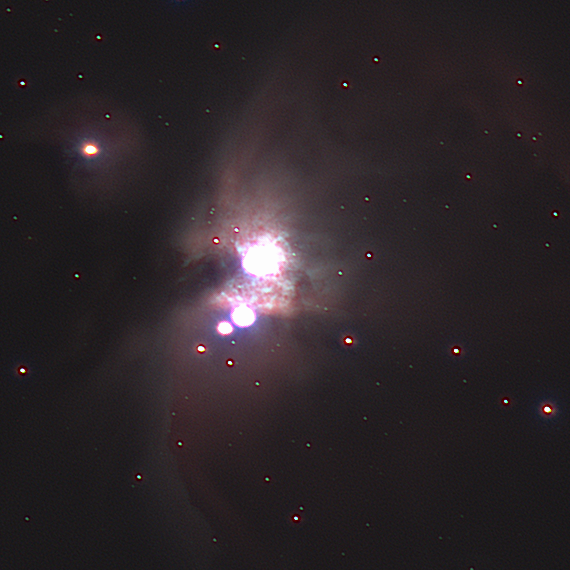
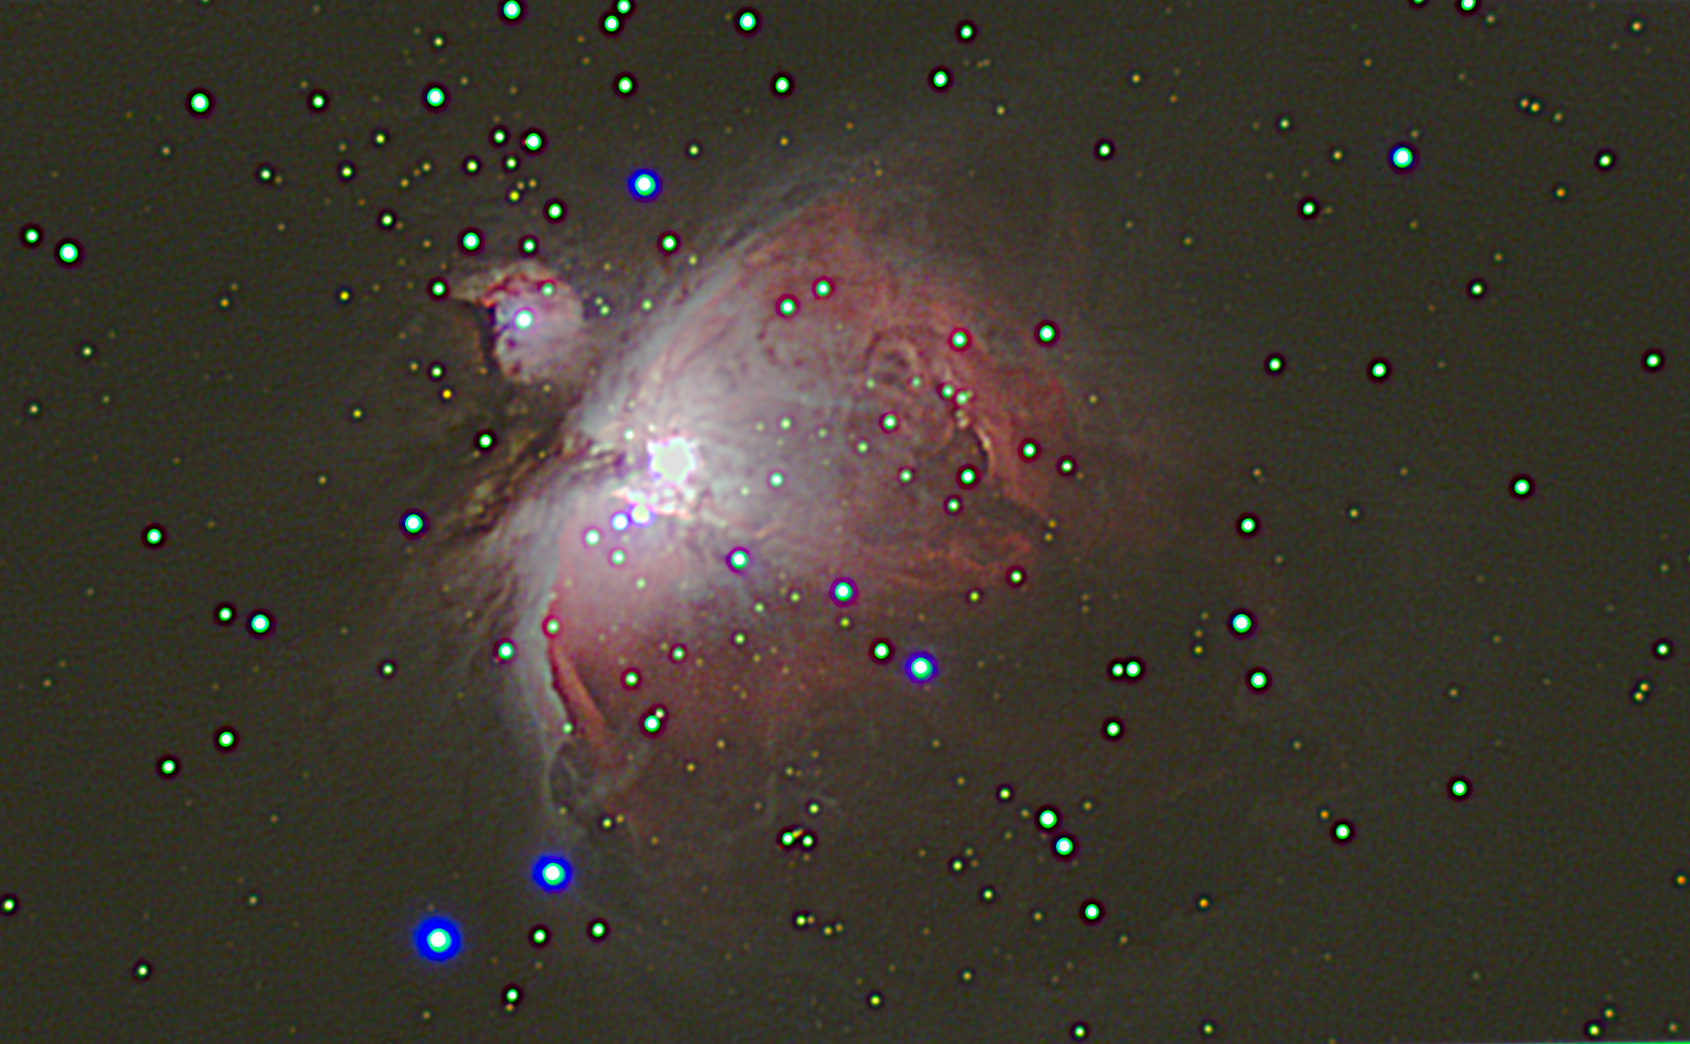
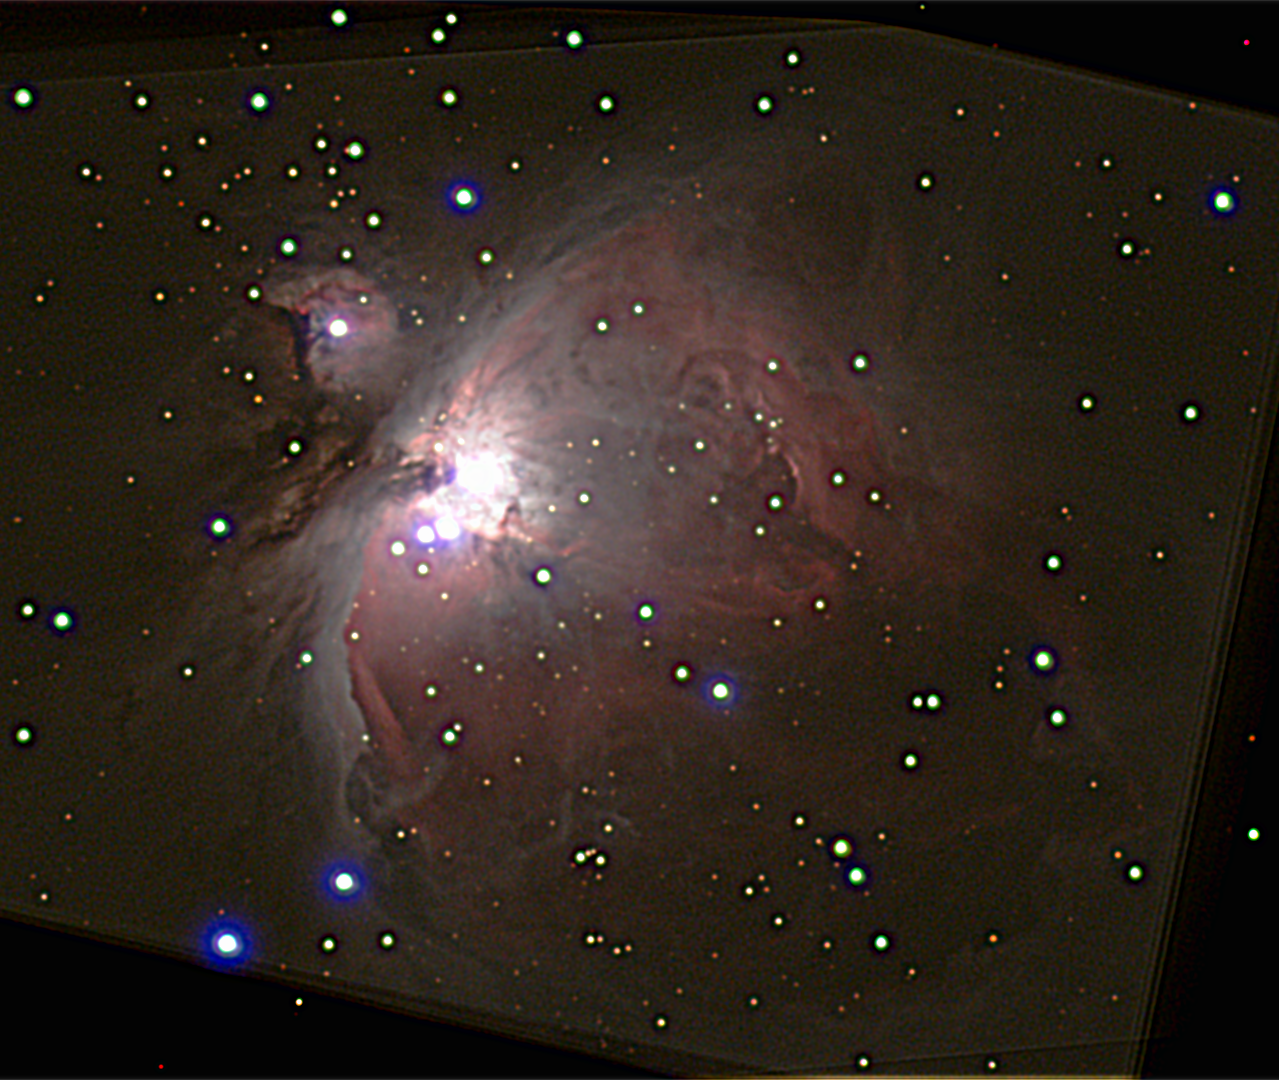
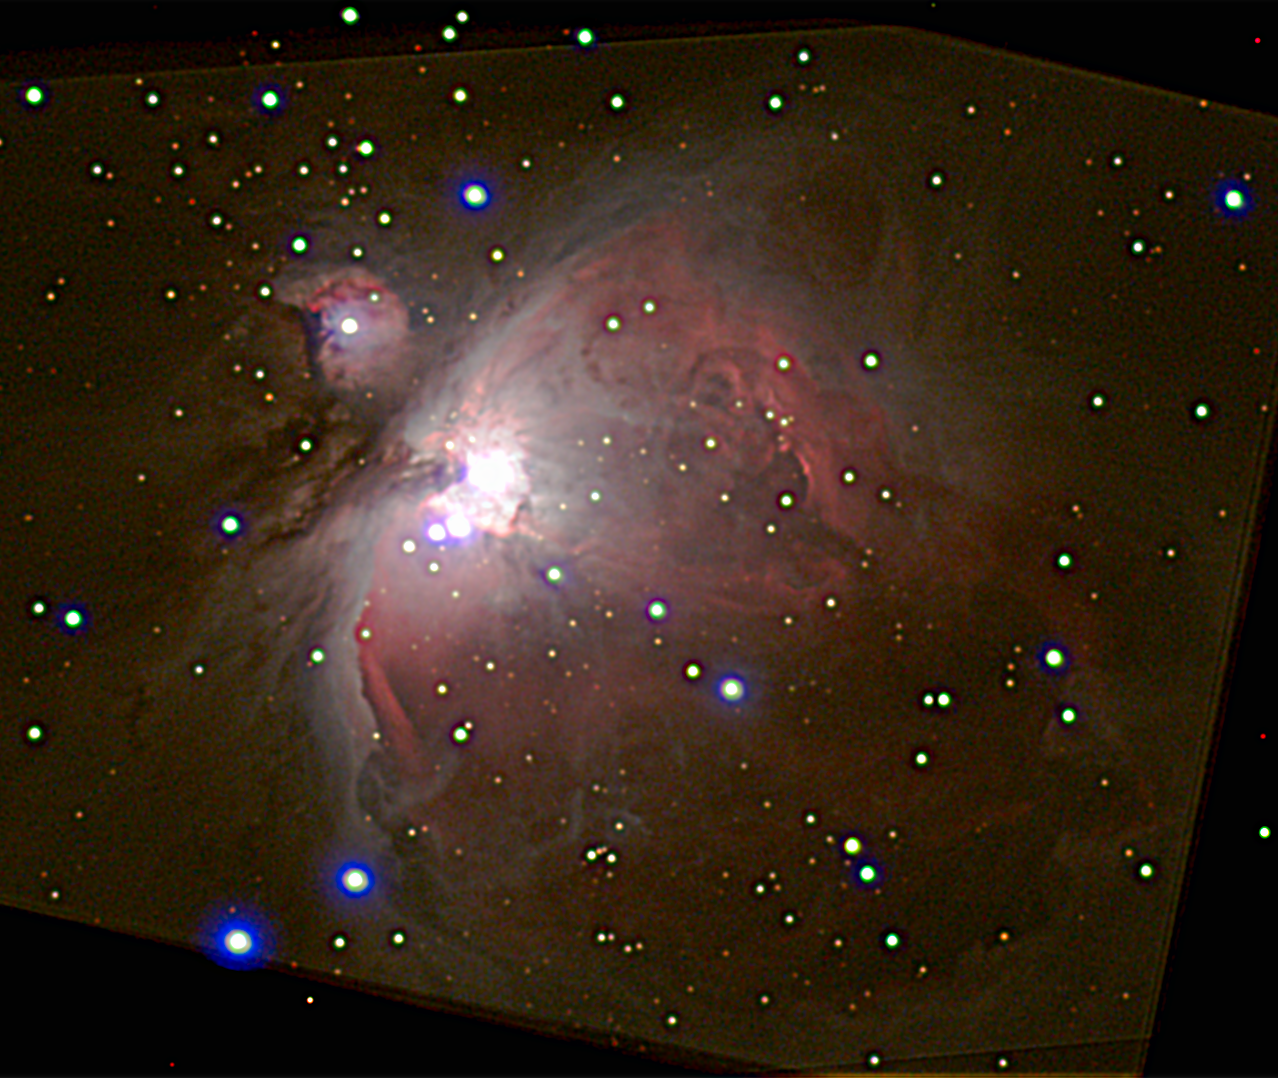
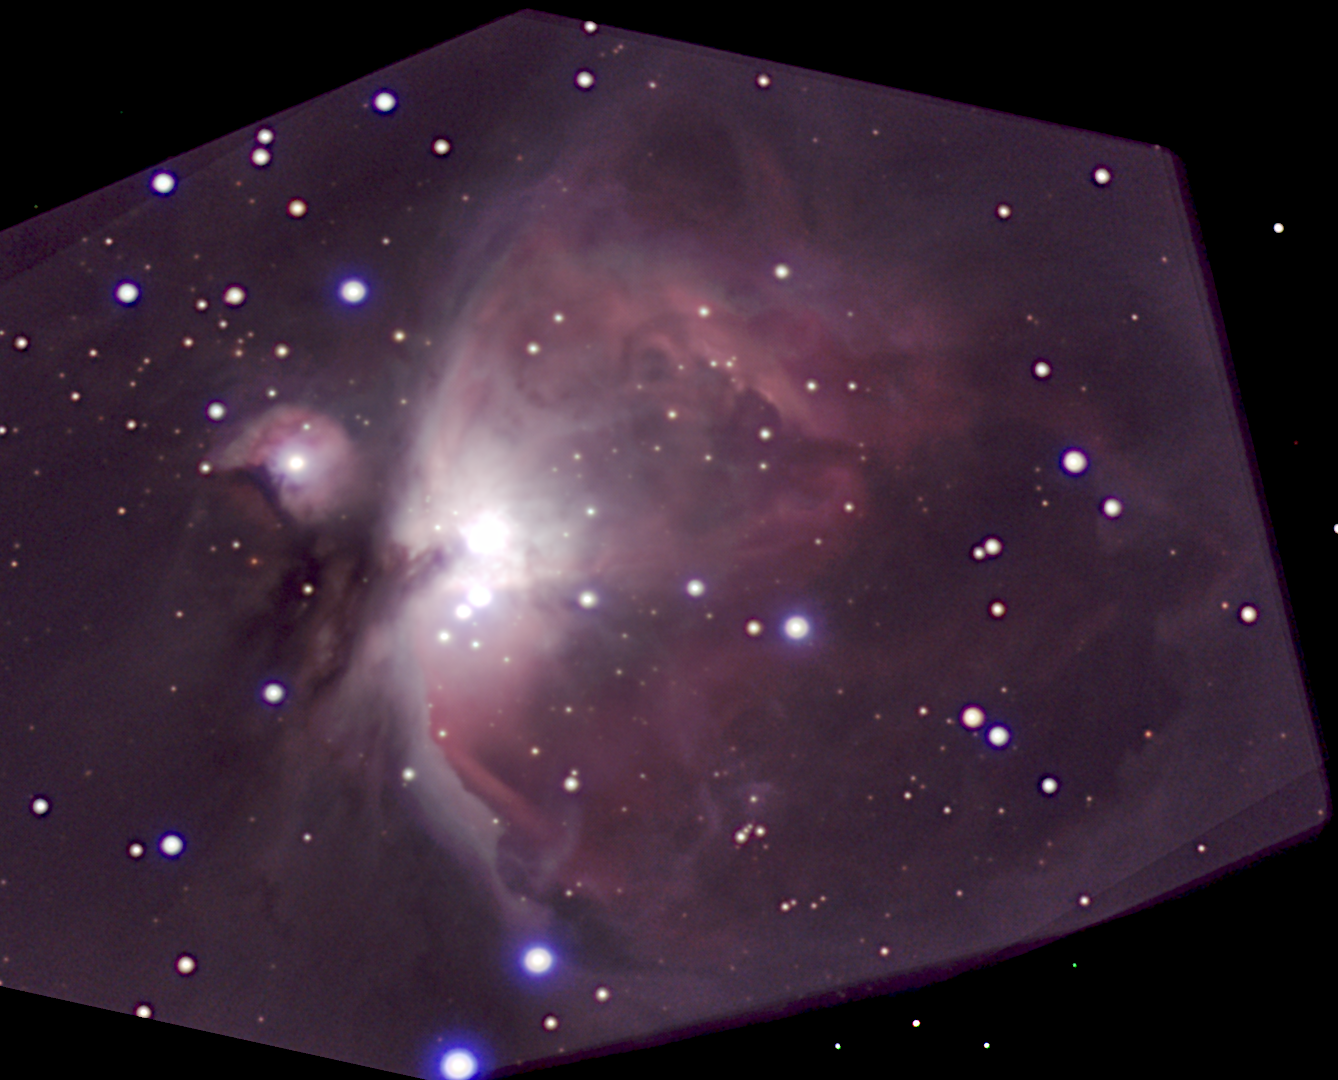
On November 21th there was some nice sky, and I could take my first picture ever of a Deep Space object. I had some problems, because the finder is a bit heavy and the position of the finder, attached to the Maksutov telescope, is not optimum for stability, and there was some motion, so stars look a bit distorted. Next time I will remove the Maksutov and use the telescope mount directly to hold the finder. But to do that we need a dovetail plate wider than the stock one. It is only 8 euro and it will take a time to arrive. Also, Orion was not so high from the horizon... Anyway, 5 seconds exposure per image (with some gain applied) and then stacking with Deep Space Stacker (DSS) and processing with Registax and GIMP, we can get images like the following ones. They come from the same set of 363 images, just the processing is different. Left click on the images, go to "view images" to get full resolution images.
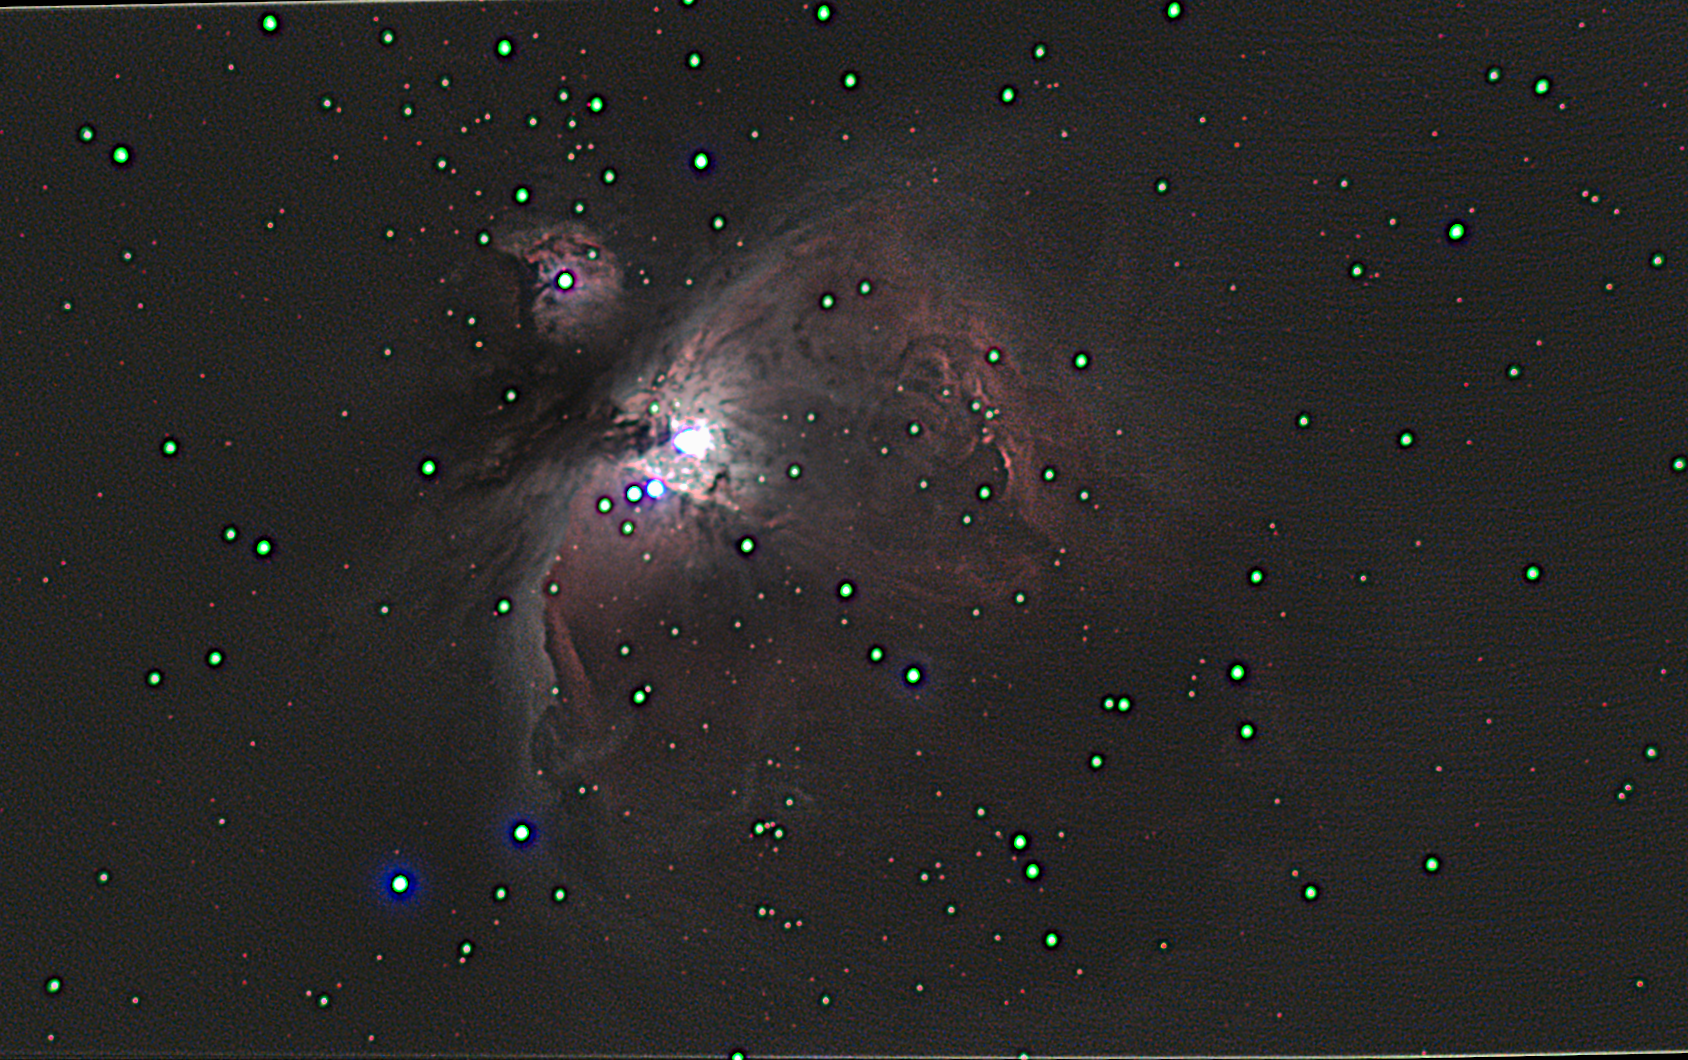
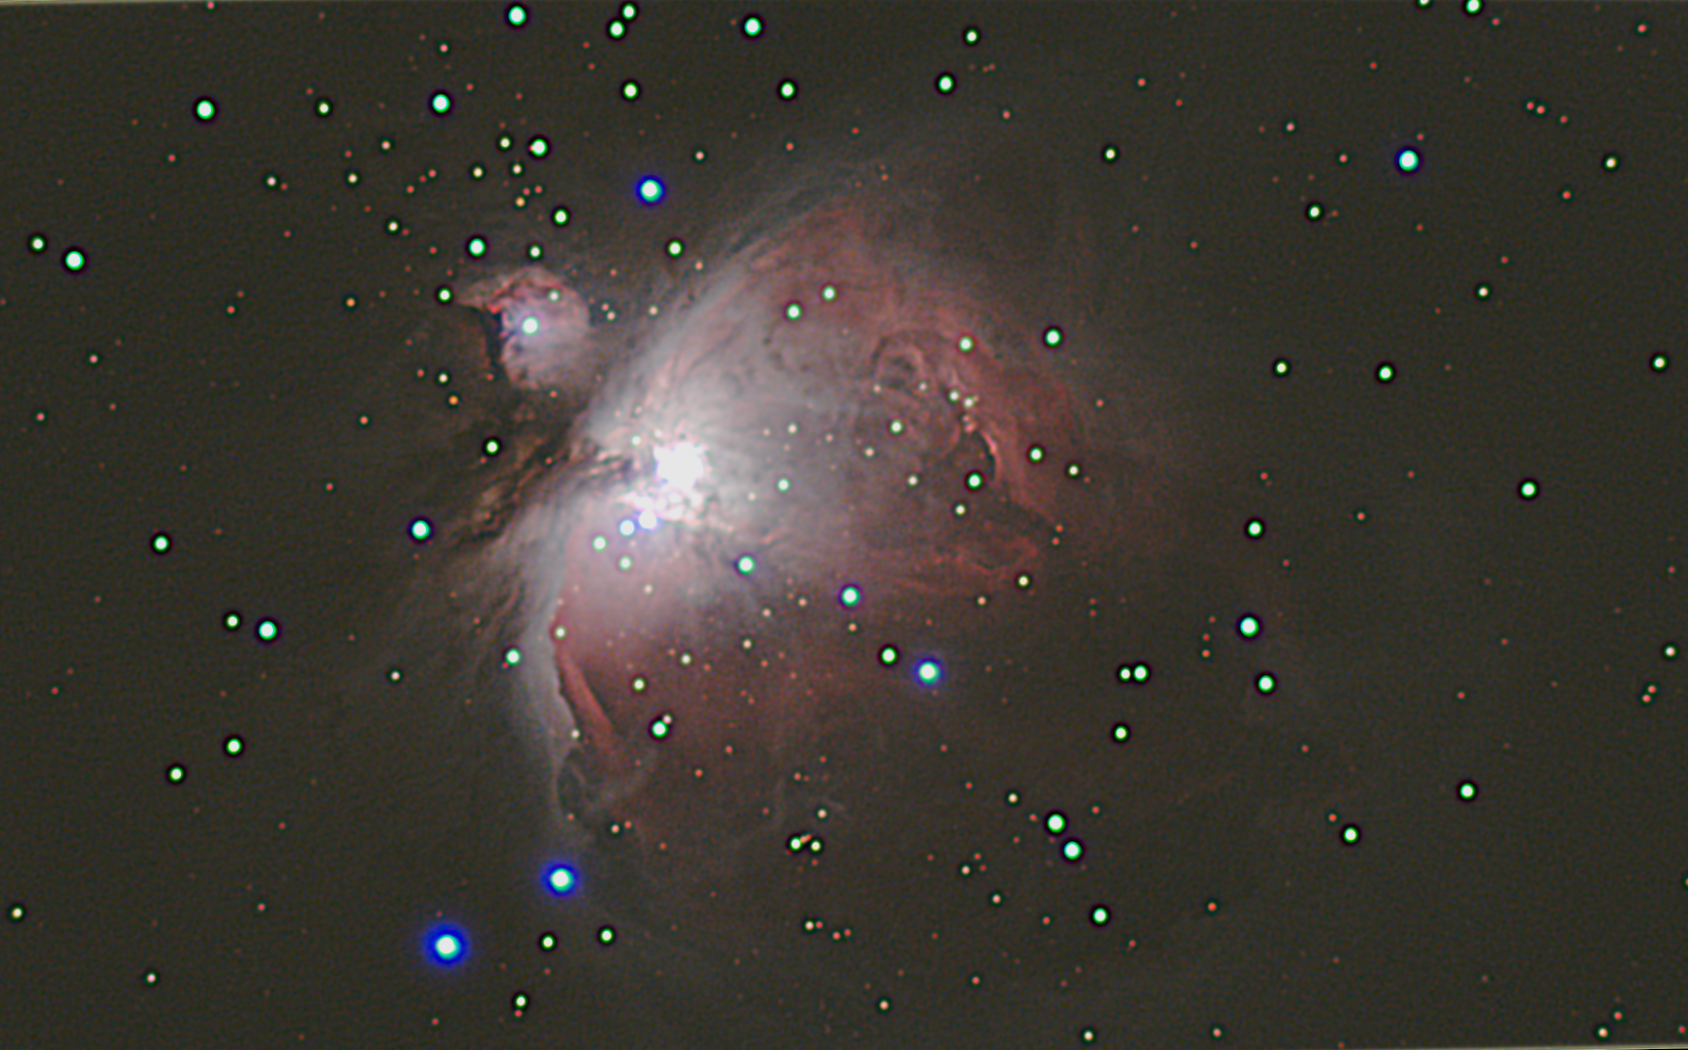
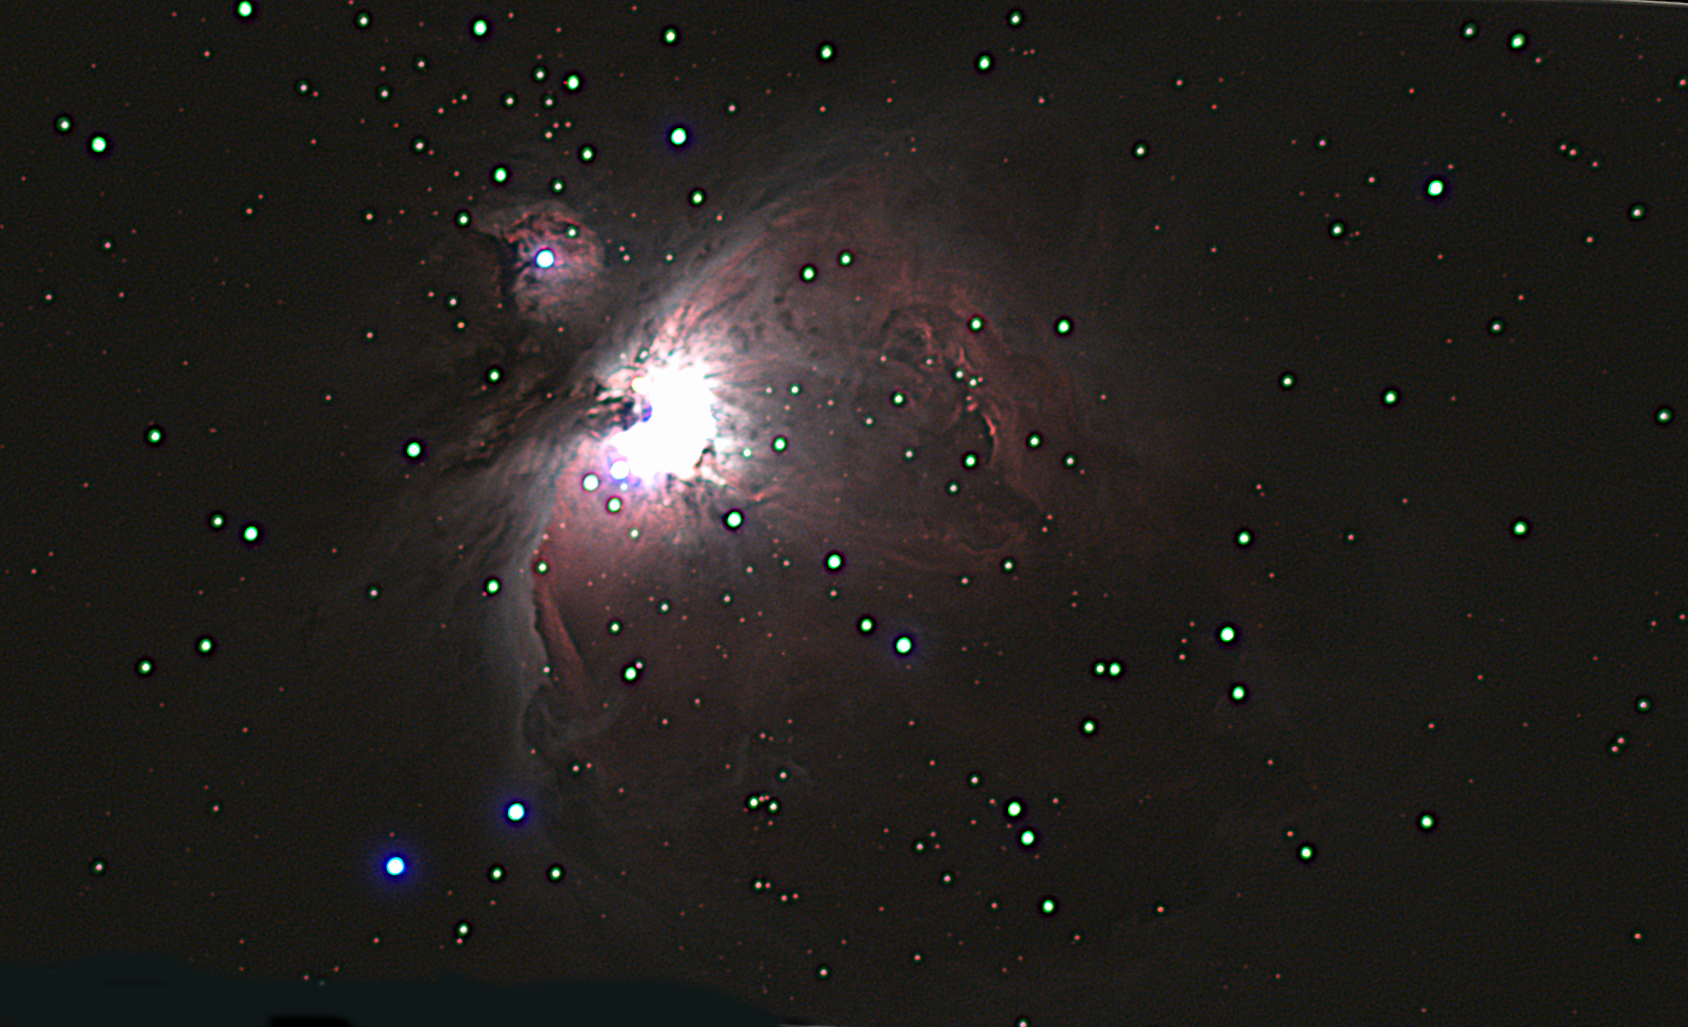
The first one offers a first overview of Orion Nebula. Processing was mainly made playing with luminance curve in DSS and a little enhancement with GIMP:
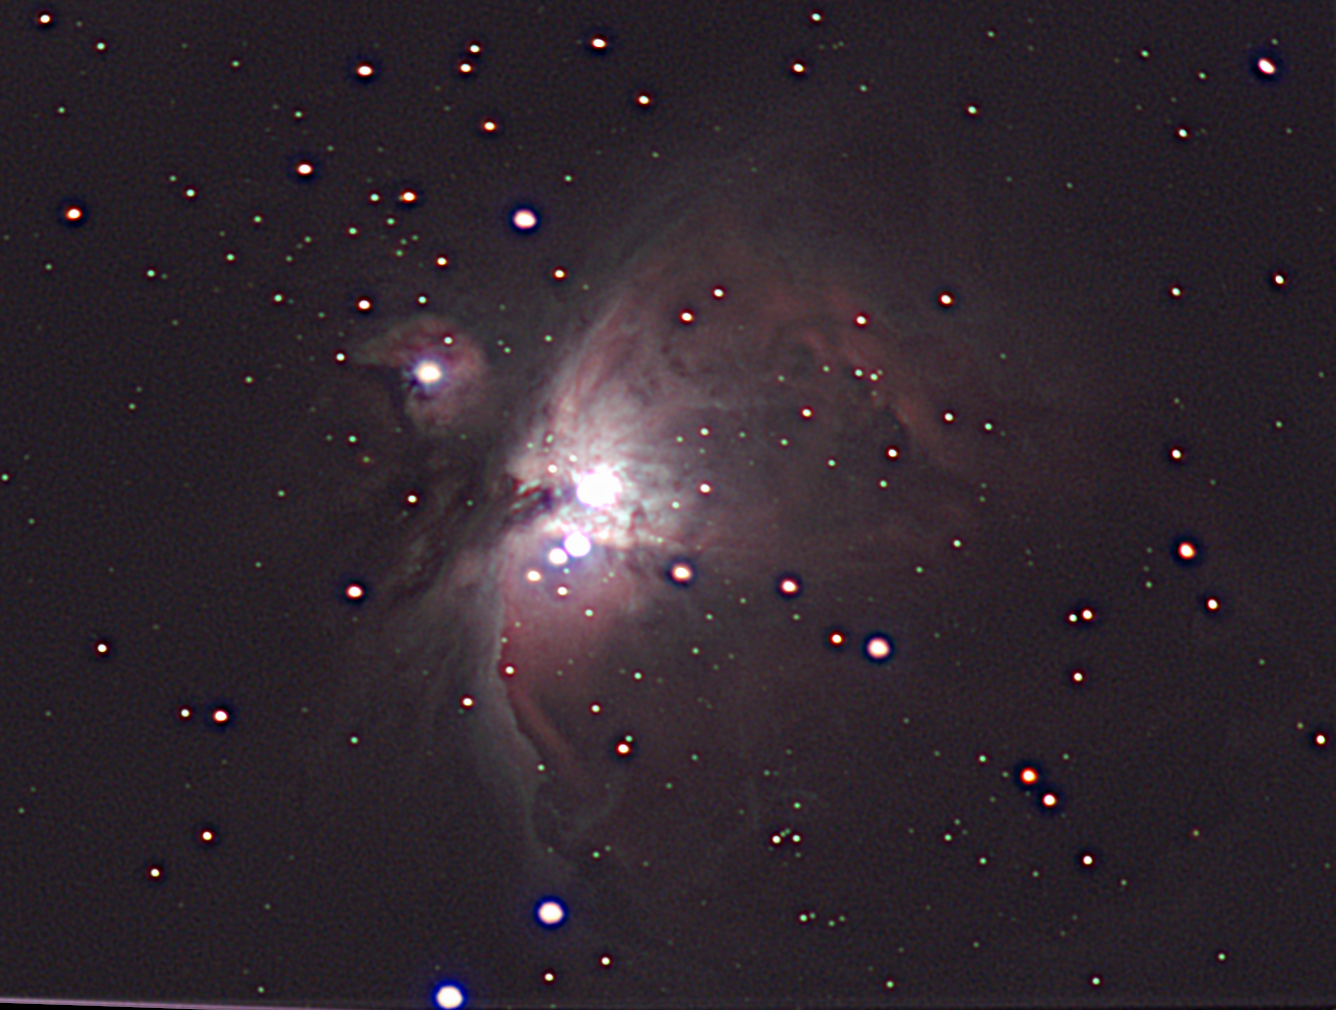
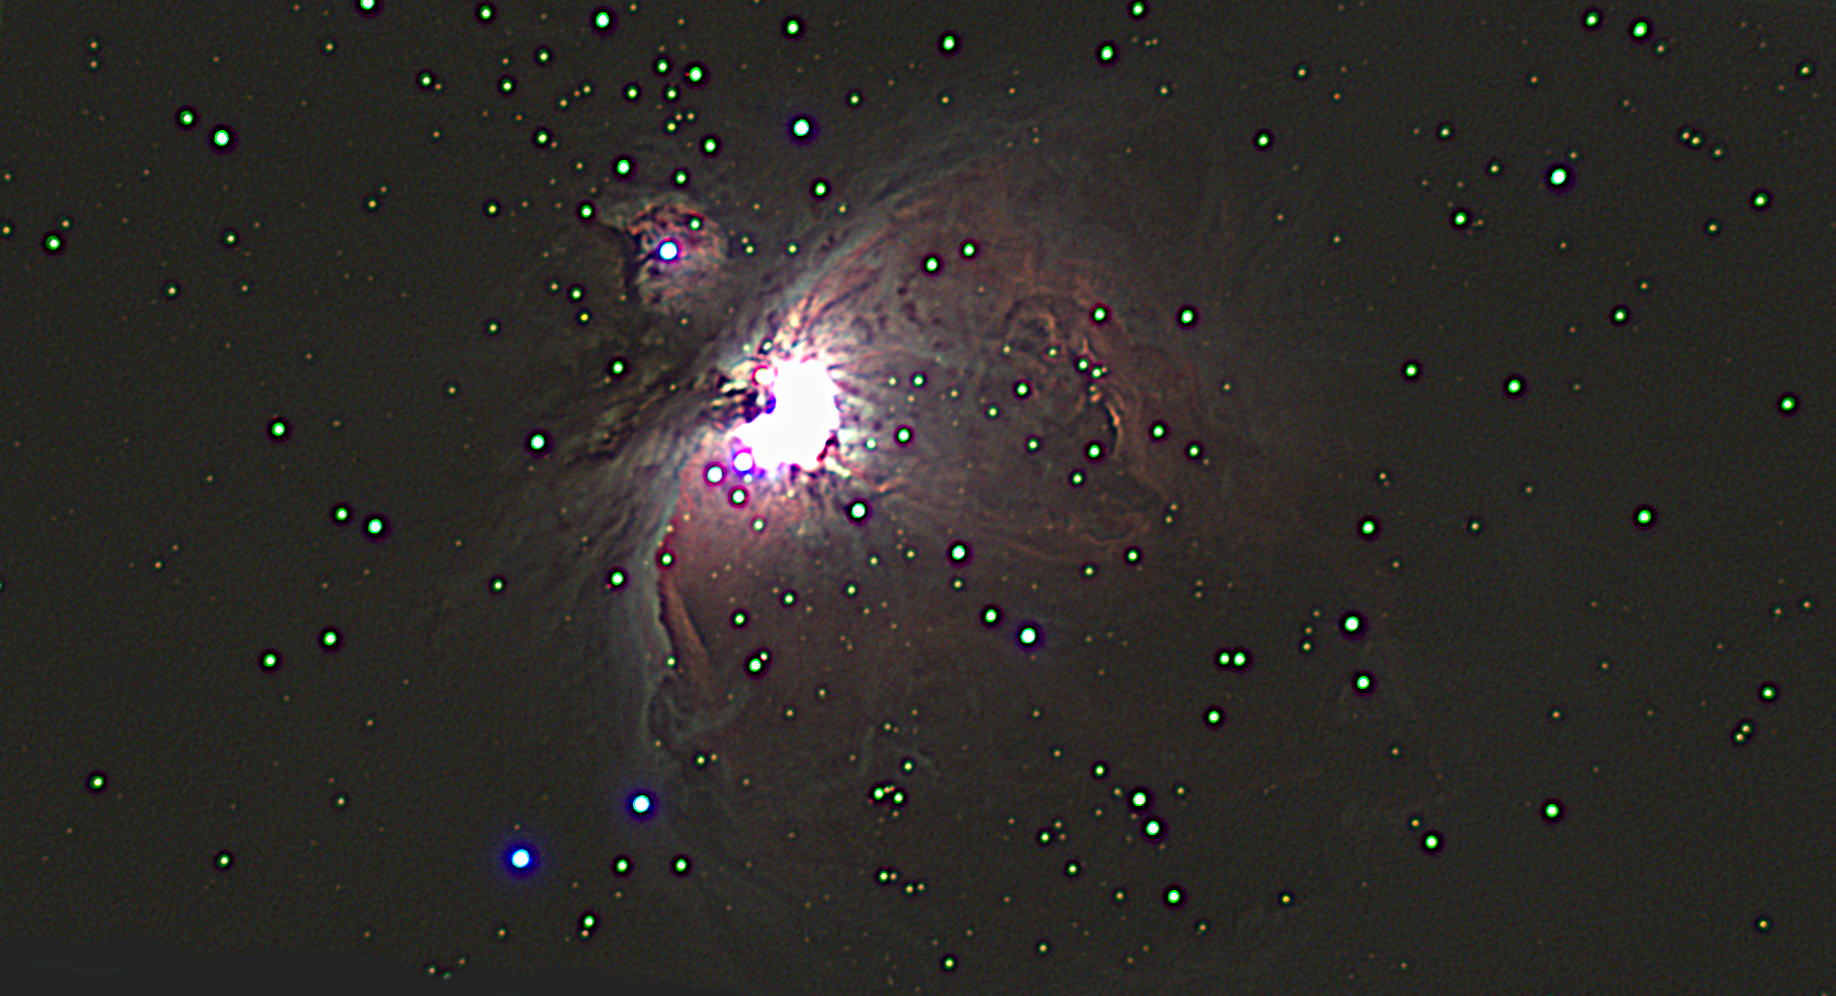
The next one offers a level of detail far better that I could dream with an achromat, 6 cm aperture telescope:
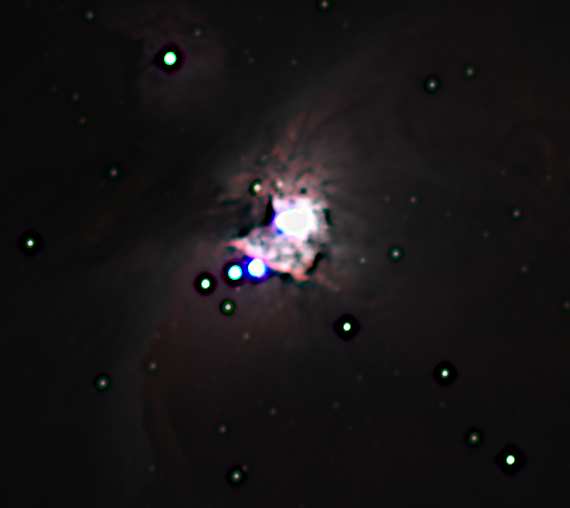
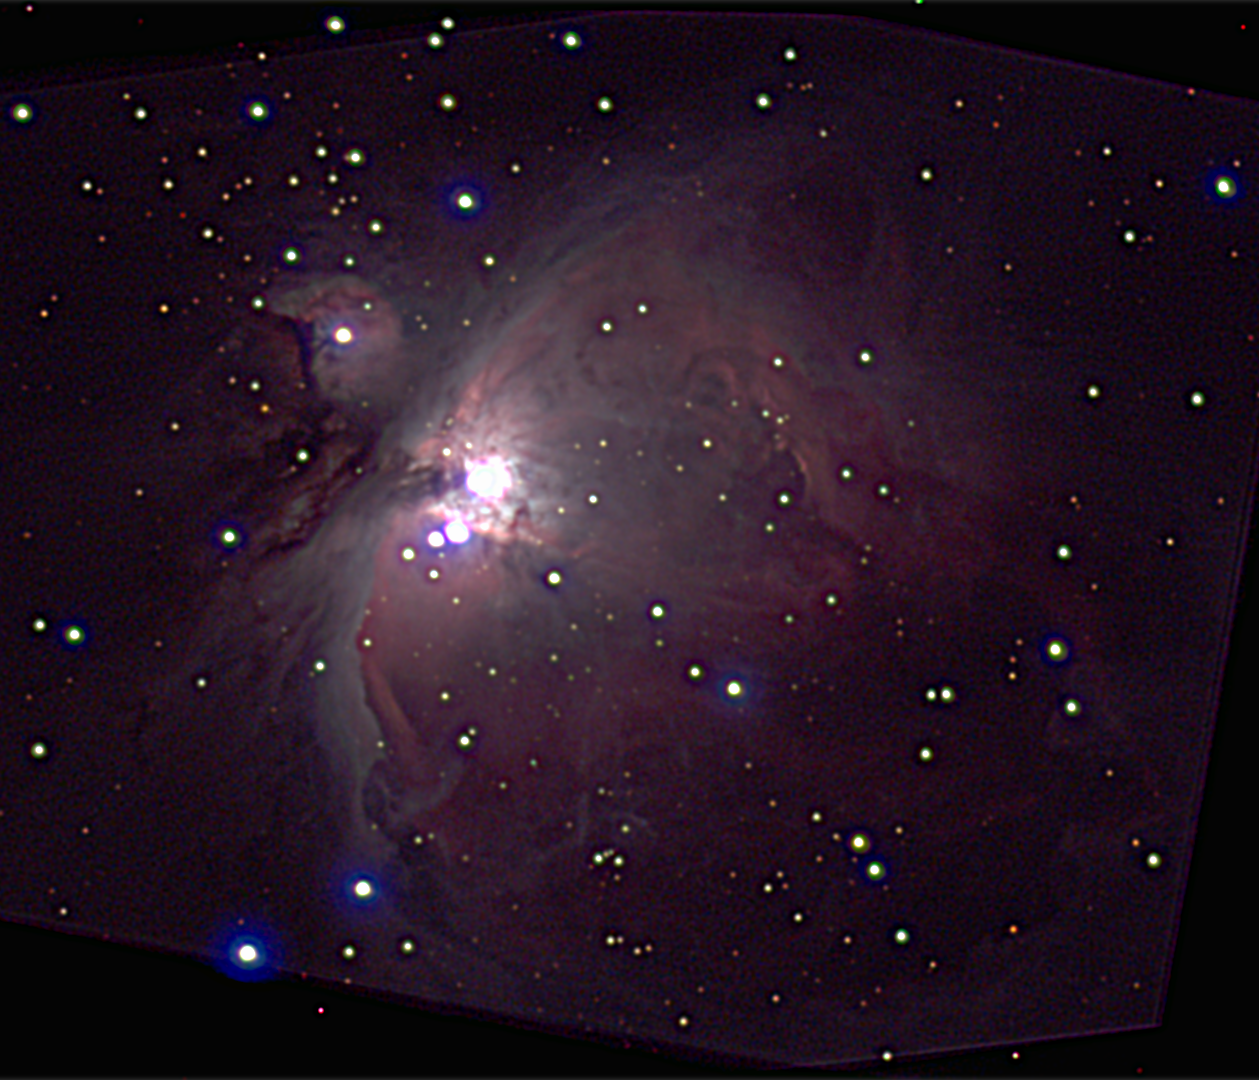
Finally, we want to see the Nebula's core:
If we analyze the RGB components of each image, we realize that the Green component is well focused, but the Red and Blue are not. This is because the residual chromatic aberration still present in any achromatic doublet. In some other images, the opposite will happen, we shall have the red and blue better focused than the green. This is a limiting factor we shall try to overcome a bit later on.
Taking into account that it was the first time, I feel fully satisfied.
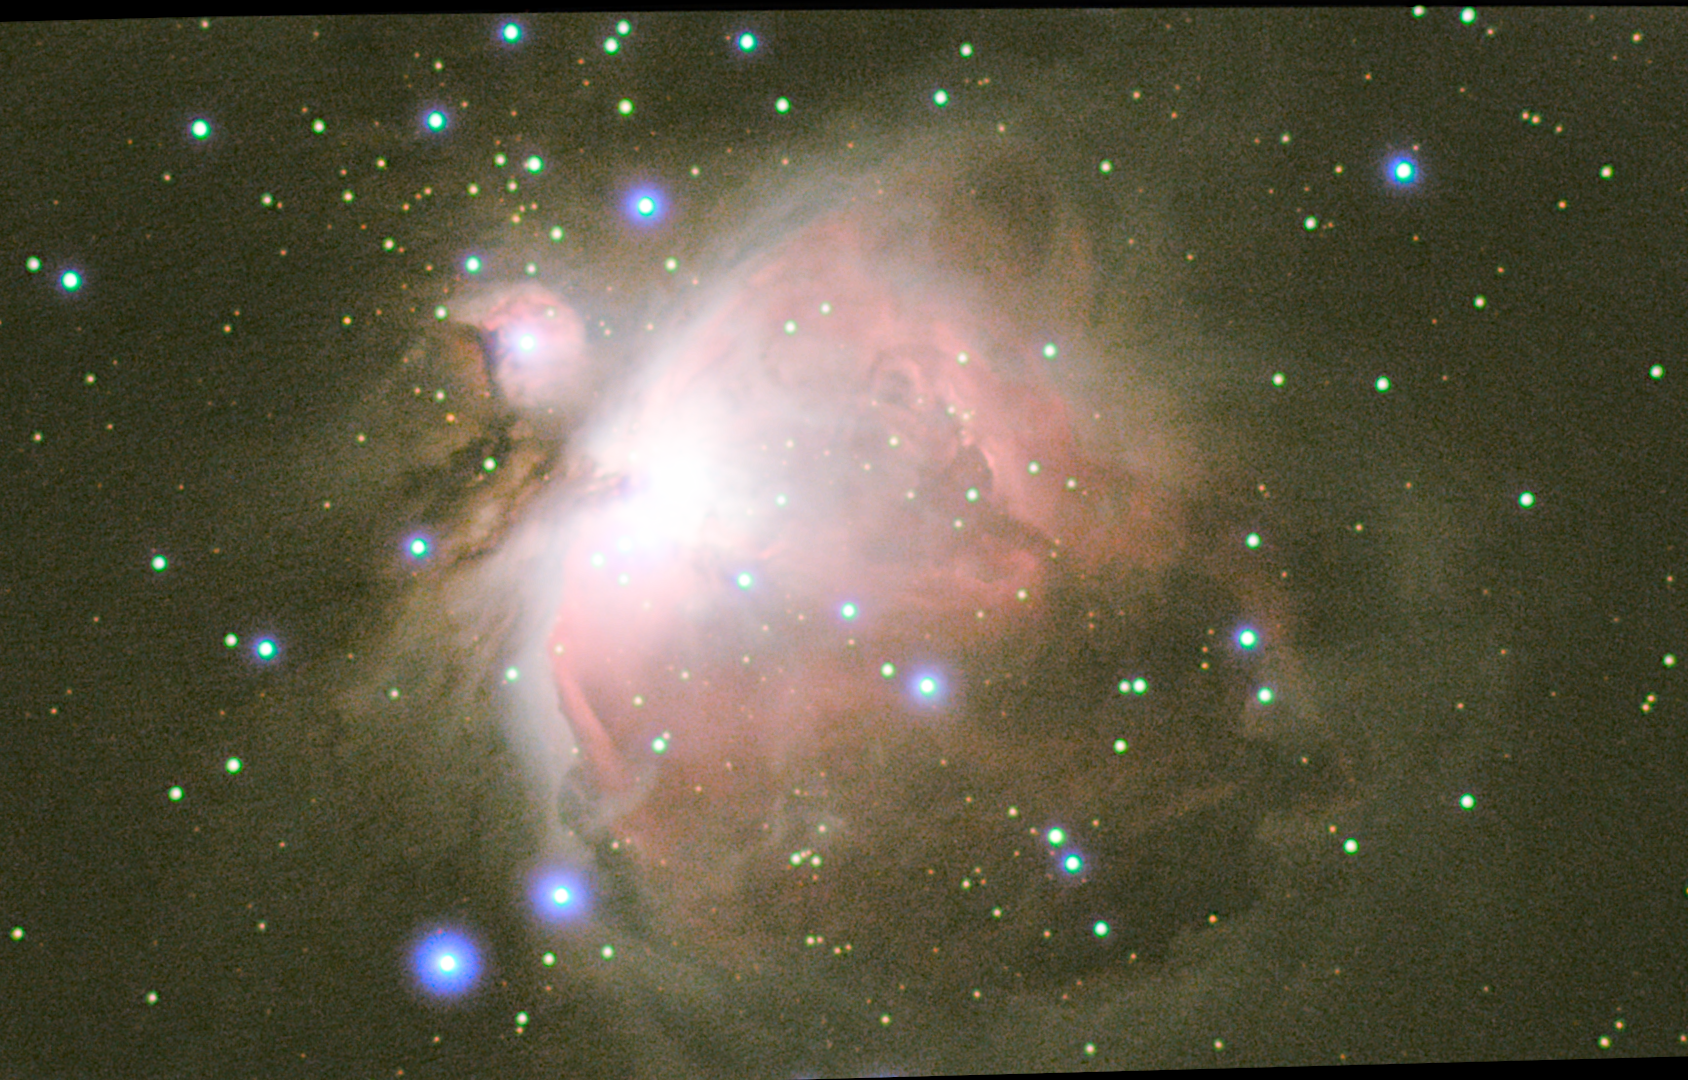
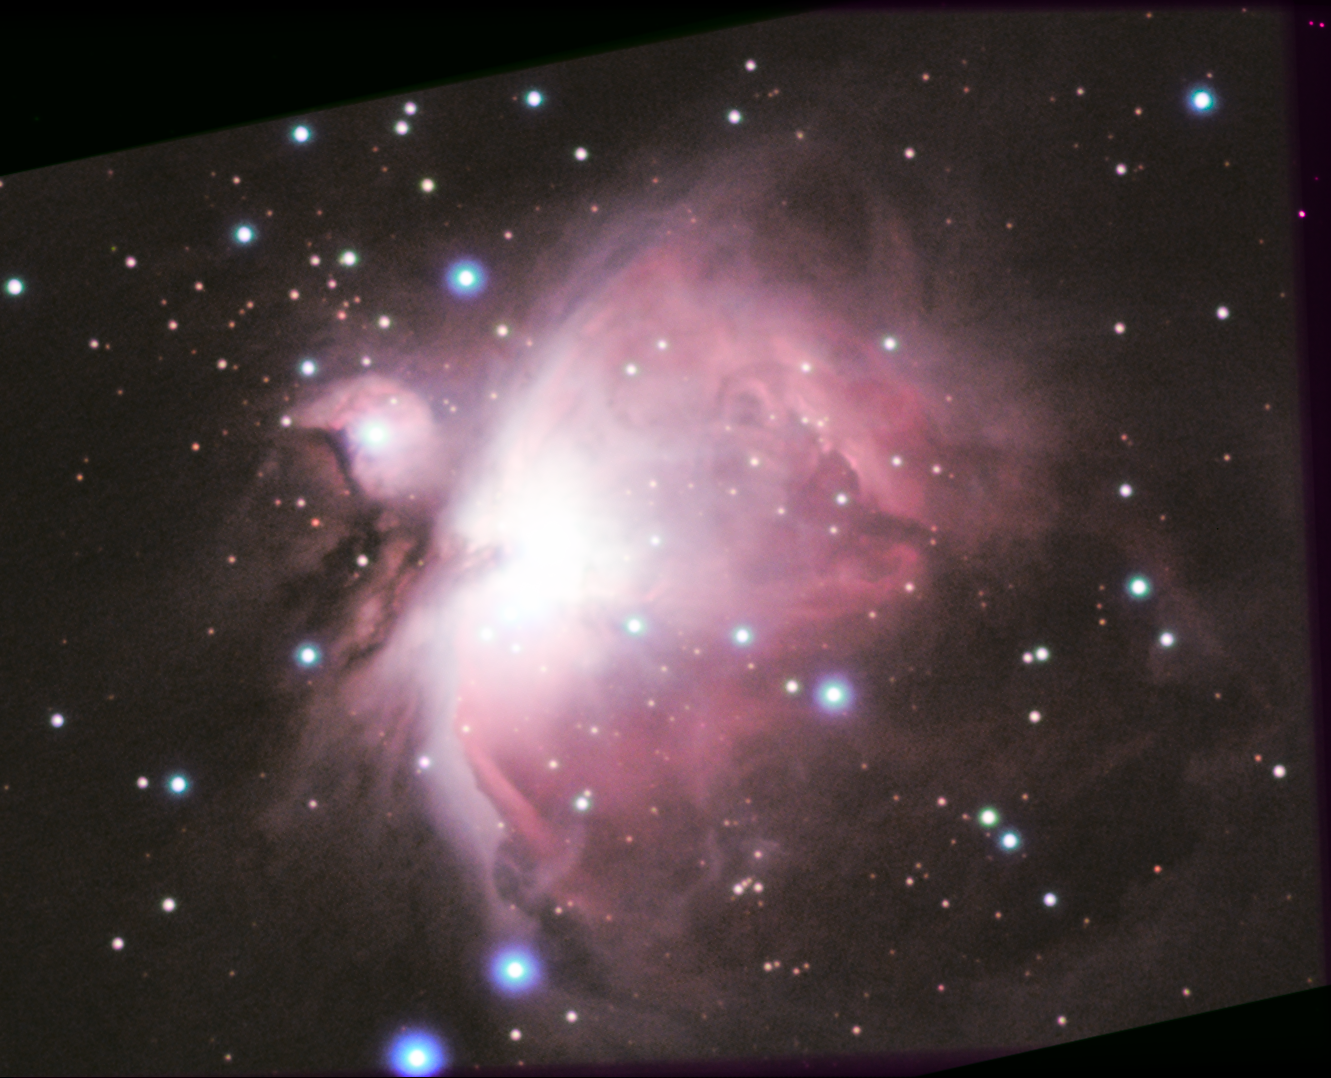
Well, weather in Autumn it's not so good, but finally there was a happy, very cold and very humit night and I took my best pictures of Orion Nebula. I got a bigger dovetail plate so I attached the SV106 directly to the telescope mount and the results are quite better. Also, Orion got higher in the sky now, so results are very much improved. I got a cold taking the following pictures... I took series of 100 images in different settings.
First we try to get images showing the maximum extension of Orion Nebula. This is a challenge because low values are usually noisy, and they become ugly when trying to enhance the image. Anyway, please enjoy three different images.
The first image from video, 5 seconds exposure, with quite a lot of gain, trying to show brightest and darker regions at the same time.
The second image from a series of images, 12 seconds exposure, gain at level 12. Nebula's core becomes overexposed, but it is the price to pay to get better images of the darkest parts of the Nebula.
Stacking 5 seconds frames with 12 seconds frames we get this overall wonderful image clearly showing filaments of gas far from the core.
Let's pay attention now to Nebula's core. A video with 5 seconds exposure and low gain was taken to that purpose. We show two images.
The first image comes from video, 5 seconds exposure per frame, with low gain. Only small changes in gamma so we can see only the core with detail.
The second image comes from the first one, after extensive processing and enhancement. The noise distribution is beautiful. I do not know why it become like that. It seems there was some sand over the image and some one dragged a comb.
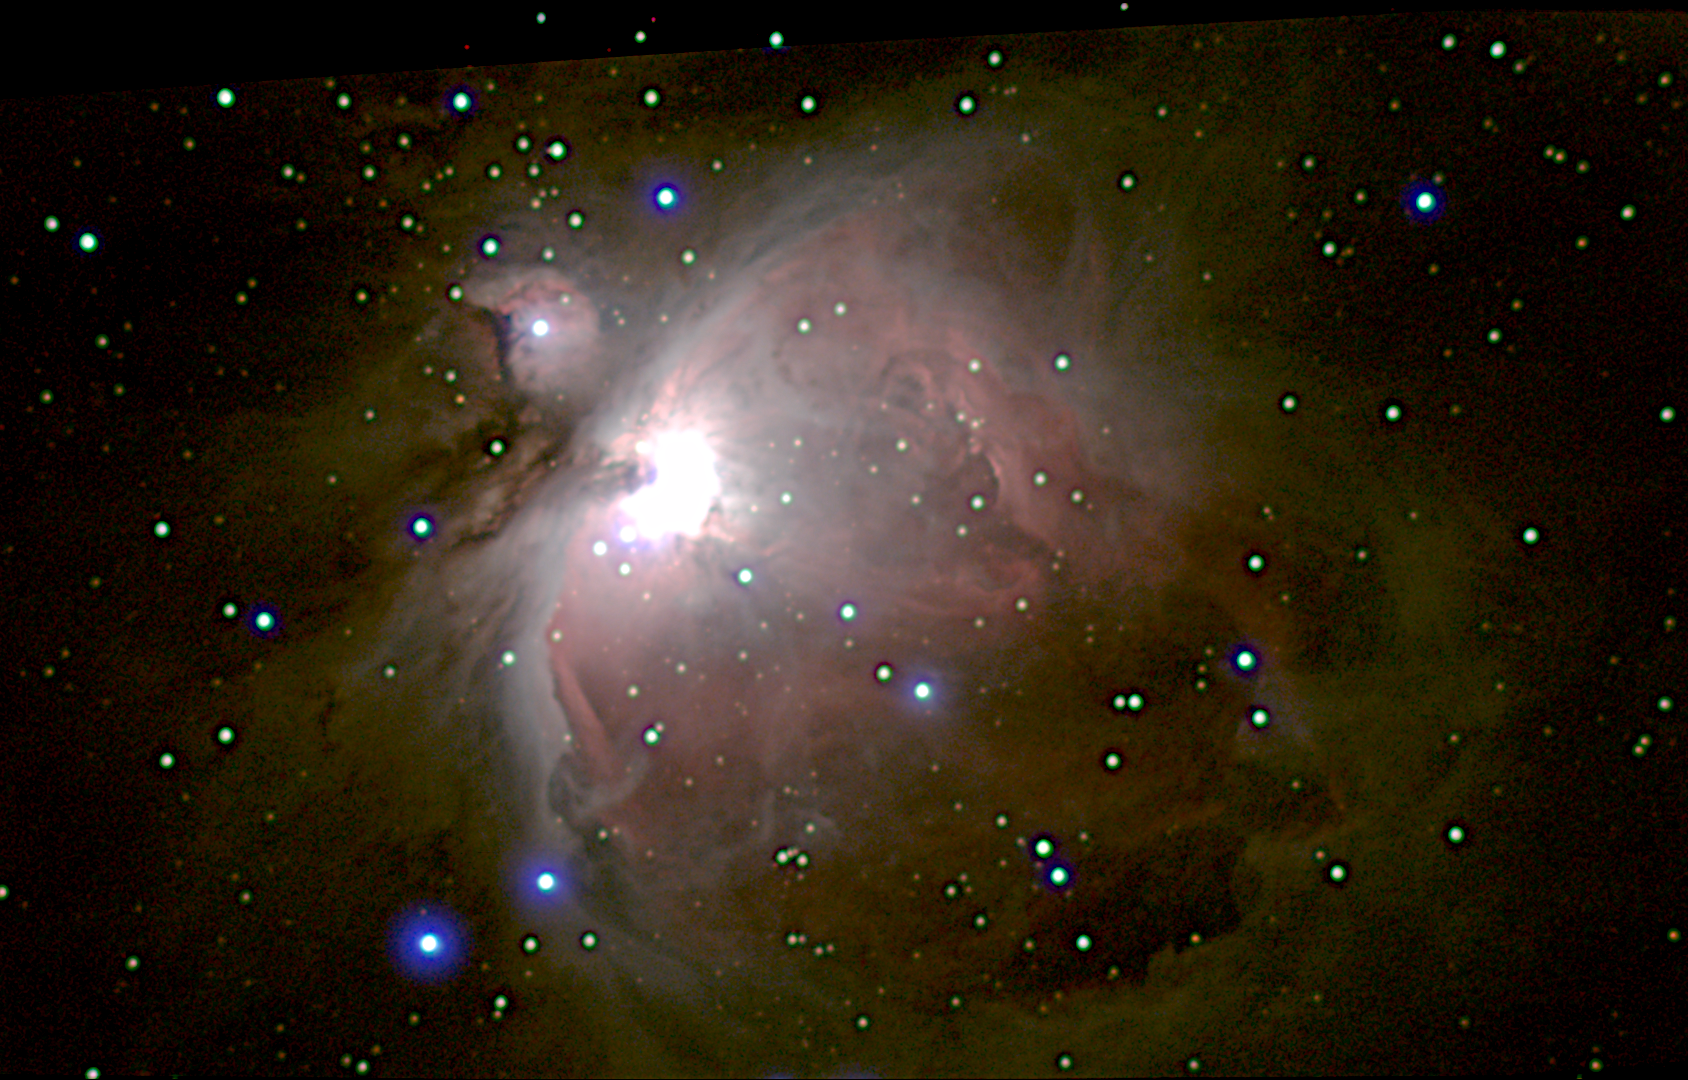
Two images with high level of detail follow. From this point of view, those two images are probably the best I was able to get.
The first image from movie, with higher gain, after deep processing. Level of detail is so incredible.
The second image from 12 seconds exposure per frame, with gain at 12, with the core overexposed. This image show the best details, tiny filaments of gas are visible. Unbelievable.
Watching the stars in the image, you can see its spectral content, thanks to chromatic aberration. Taking into account that we are working with RGB images, it can be a good idea to decompose the images and analyze them. Before doing that, let's check which is the spectral content of each component. Please check the following graphic:
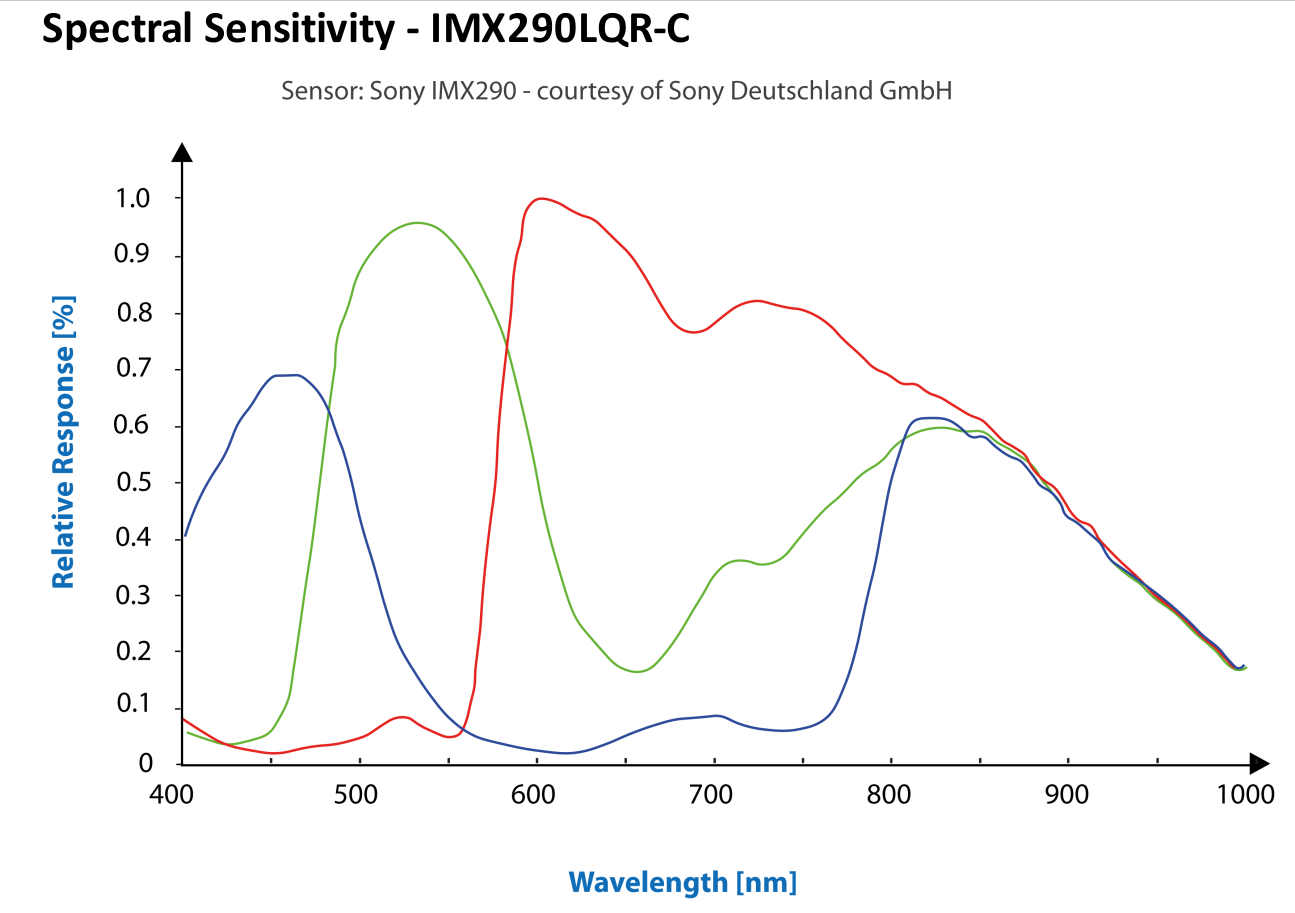
My camera has an IR-Cut filter with a window of 405-690nm. Each RGB component comes from a wide spectral window affected by the IR-Cut filter.
If we analyze each RGB component separately, we realize we have astonishing details in the RED image, the green one is quite out of focus (check the green ring of some stars), and the blue one is well focused. This problem is caused by chromatic aberration in combination with a short focal length. Focus of red and blue seems the same but then the green is out of focus. The opposite happened in the first session. To get an even better resulting image, it can be a good idea to decompose RGB components from the beginning, then compose again after processing. The idea is to get the maximum amount of detail from each component, then each component needs a different degree of enhancement. Green channel needs further processing because it is a bit out of focus. Blue channel need a bit more work than the red one. Composing the images again the result is absolutly spectacular:
You can see so many filaments of gas. Those images are far, very far beyond my expectations.
A final idea came to my mind to fight chromatic aberration, and it works pretty well. In the first two sessions I got red and blue better focused than green. In the last session I got green better focused than red and blue. What if I stack all those images together to get a single one? The result is an image quite more achromatic. Super!
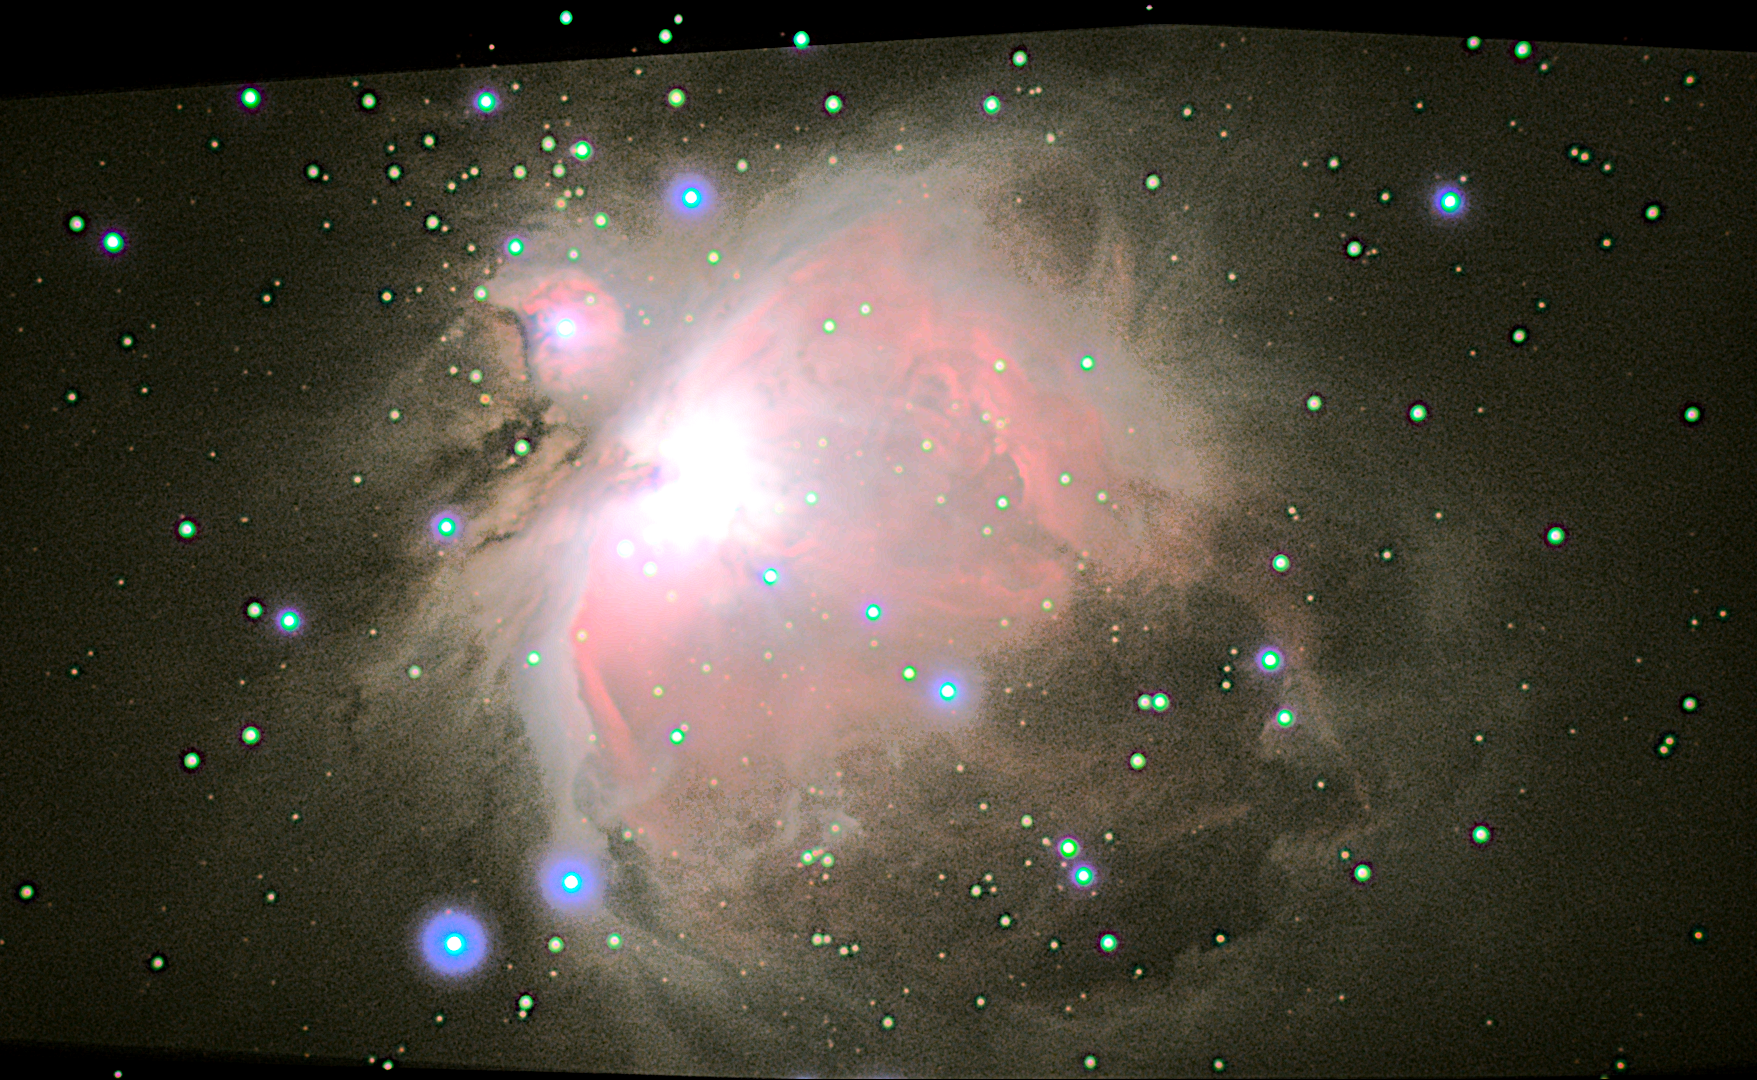
Stacking a total of 569 images:
Stacking a total of 598 images (one more series of images added with the core overexposed):
Stacking a total of 669 images (all available images stacked):
Differences between the images are small. If we check the RGB components, all three components look well focused now!. And images look more pleasant to the eye. This is a very promising way to fight the chromatic aberration of SV106.
With different processing, this "achromatic" picture showing the overall Nebula follows (obtained by stacking only two different sessions):
It could be possible to fight chromatic aberration by taking the green channel from a picture where the green is well focused, and then combining with red and blue channels from an image where both are well focused as well. Easy to say but not so easy to do unless capture was done in the same conditions, which is not in this case. Anyway, the result is interesting:
So much for Orion Nebula. I learned so much stuff by processing those images. With everything I have learned, it is time to go for a galaxy.