Amateur Astrophotography
Skywatcher Skymax Maksutov-Cassegrain f = 1500mm / D=127mm F12 SynScan AZ GOTO
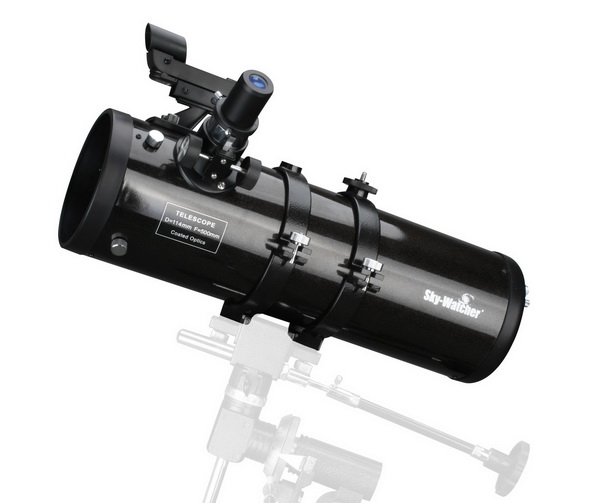
Skywatcher Skyhawk Newtonian f= 500mm (450mm) / D=114mm F4
Skywatcher Explorer 130PDS Newtonian, f=650mm / D=130mm F5 with Skywatcher Mount EQ5 Pro SynScan GoTo

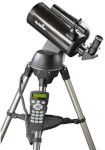
My main purpose is to observe and take some pictures of the moon and the planets (Mars, Jupiter and Saturn). My choice: Skywatcher Maksutov-Cassegrain D = 127mm / f = 1500mm SynScan AZ GOTO. It is my opinion that this is the simplest/cheapest telescope to accomplish my goals. See sections 3-6 to enjoy nice pictures of Mars, Jupiter, Saturn and the Moon.
For deep space I got a Skywatcher SkyHawk Newtonian. Aperture 114mm, focal length 500mm, F4.4 with a wonderful parabolic mirror. This telescope is very light and I used it so succesfully with the alt-az GOTO mount of the Maksutov (section 8).
After a couple of years I got a new, equatorial mount: Skywatcher EQ5 Pro SynScan GoTo. Later on I got a new Newtonian: the Skywatcher Explorer 130PDS, which is very convenient for astrophotography (section 9).
In section 7, I had fun using SVBony achromatic finder SV106, with 60mm aperture and 240mm focal length. Having a short focal length is helpful to get pictures of big objects with a planetary camera. Then I used this finder as a telescope to get images of the Orion Nebula.
Finally, I am writing all this to make a kind of diary to keep my ideas and progress in order and to not forget some stuff I learn. I will be happy if this web page is also helpful to someone else.
1. Skywatcher Maksutov telescope MC 127/1500 SkyMax BD AZ-S GoTo Review
You can find a nice, informative, honest review of the scope in here. Please read it carefully.
I will add now some more information from my own experience about the eyepieces. The scope is provided together with two Kellner eyepieces: 24mm and 10mm. They are cheap and light, but be careful, they provide a remarkable performance. You will read reviews about how bad they are to bias your experience and to push you to buy new ones. It is very easy to bias people's experience and opinions. Psicologists are always so surprised about how easily human beings get biased by other's and how they report biased opinions even when trying to be completly honest. Enology is one of their favorite examples. If you are familiar with the high level of stupidity and absolute ignorance in the HiFi world you know now what I mean. My opinion follows and it quite agrees with some people.
About the 24 mm eyepiece
Magnification is about 62X. This eyepiece provides the maximum field of view this telescope may provide, which is about one degree. Buying a 32mm or 40mm eyepiece to get more field of view will be a complete waste of money.
Resolution near the optical axis (central zone, let's say about 70% of the field) is excellent. Near the edges, oh yeah what a surprise! you can find some aberrations. My eyes usually work looking ahead, so I am lucky. If you watch the moon and you have it more or less centered you will enjoy your life. With planets this is quite a low magnification, but with careful observation you can see Jupiter's red spot, shadows from satellites on Jupiter's surface, and of course the Galilean satellites.
If you replace it with another wide field eyepiece, white balance will be better, you will get a little bit more light, and aberrations near the edge will be less (how much less depending on budget). Resolution near the optical axis will be the same. In my case it was impossible to tell from a good Plossl that the resolution was any different.
In my opinion, in an initial phase of observation, it will be a waste of money to replace it. Later on, after hours of absolutely enjoyable observation, if you get so picky, try to replace it. Buying in places like Amazon allows you to easily bring it back if you are not satisfied.
About the 10 mm eyepiece
Magnification here is 150X, not a small one. Some details on planets become visible and the view is enjoyable. In a good night with a nice seeing, you can see Cassini's division on Saturn rings. In Jupiter, you can see cloud belts and of course the red spot. In a bad night, and there are plenty of them in here, you will see Jupiter and the satellites dancing in the dark. When you see them moving like that you will not be able to see details, not even with a better telescope. Air motion, winds on upper atmosphere, turbulences, are always problem number one when trying to make good observations.
Again, I tried to replace this wonder with a Baader 10mm orthoscopic eyepiece. Wow! White balance got better, a bit more light, resolution near the edges was better, but guess what, resolution in the central zone was a bit inferior. Cassini's division was clearer with my cheap and light 10mm Kellner eyepiece! Why? May be the Baader orthoscopic is a too much compromise of perfection in all the field of view, very nice when watching the moon, no doubt. My cheap Kellner eyepiece is only designed to be fully perfect around the optical axis, very nice when interested in seeing something in particular with more detail. Surprised? Please try and be honest to yourself!
Shorter eyepieces?
This telescope is able to provide a maximum theoretical magnification of 250X. WOW... You need a 6mm eyepiece for such an achievement. To enjoy such magnification, you need a perfect night with an absolute clean air with no air motion. I have never been so lucky yet. If you are located in a high mountain (or have access to it) and you enjoy perfect skies, then you go for a 6mm. In my case, I went to an 8mm (187X). My experience: in general images get bigger, darker, softer, and because of air turbulences the image moves a lot. In lucky nights you see some moon details bigger and clearer. In my case I will never go for a 6 mm.
The human eye likes having plenty of light and plenty of contrast. The eyes work better with a smaller image if it has more light and more contrast. The human eye loves edges, it is a magnificent edge detector by design. The fovea, the region of the eye where we get the maximum resolution, is a very small area. If the planet fills that area, you get an enjoyable experience. If you spend some time looking at the planet, the eyes get able to get more and more detail until a certain limit, depending on air conditions. Believe it or not, in general, your eyes will get more detail from a 10mm eyepiece than a 6mm eyepiece. In my case, I have been able to enjoy more detail with an 8mm eyepiece only in some happy nights.
Take your time and your observation abilities will increase little by little, in the same way a musician develops a better sense of hearing, or a cooker a better sense of taste and smell. Eyes can be trained, same as any other sensorial organs. They get more details by practice. So take your time and enjoy.
Conclusion
Keep in mind the following: this is an F12 scope. Light arrives at the eyepieces with a very small angle. This means it is easy for any eyepiece to perform well. Any eyepiece designed to be perfect on the optical axis will perform very well (the Kellner stock ones). To get better eyepieces than the stock ones, with better resolution near the edges and keeping or improving the resolution near the optical axes you will need to spend a good fraction of the telescope price. In my opinion not worth it!
You want better images with the maximum amount of detail? You want to see Mars, Jupiter and Saturn far better? In the 21st century the best investment to get better images it is not about buying eyepieces, it is about buying a camera (150 - 250 euro depending on the sensor, brand, store and frames per second). Processing the images on the videos provided by the cameras it is possible to overcome a great deal of the loss of quality due to air turbulence. This is something you can not do with eyepieces. Far more information is provided in the next sections.
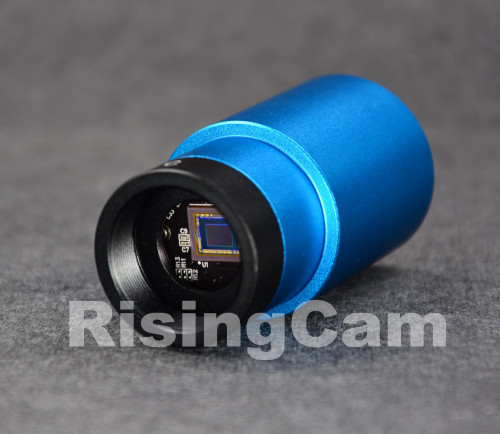
The idea is to replace the eyepiece by a sensor. This means that the image that we get at the focus of the scope will get projected directly on a sensor. Of course to see the image you need a computer and a USB cable usually provided together with the camera. This sounds simple and easy to do, just replace the eyepiece with the gadget you can see in the left image. And the results will be outstanding.
If you are able to get a cheap HD webcam, get rid of the optics, and attach it to the diagonal prism of the telescope, for instance with rubber bands, you will have something to start playing with. You can take the first impressive pictures of small regions of the moon that way.
When getting rid of the optics you will realize that right behind the optics, close to the sensor, there is a glass. That glass is a near infrared filter. All sensors are very sensitive to near infrared, but the optics is not designed for infrared so the glass absorbs it to avoid images becoming blurry. This means that whatever camera you use you are going to need an infrared filter. There are exceptions. People working in deep space photography, however, may love the near infrared into the sensor, because hot hydrogen emits a lot of it, and this makes it possible to take pictures of some nebulae and other objects otherwise invisible.
There are many cameras in the market. Some are cheap and not so reliable, others are expensive but overpriced. And there many sensors... Choosing the right camera is something that has to be done taking into account the characteristics of the telescope. And also we must take into account the characteristics of the available sensors. Based on those both factors we will choose the right sensor. Then we choose among the cameras having the right sensor. This took me some time, because there is more than once possible choice.
The first thing I decided is to buy a camera with a SONY sensor. Reliability, high quality, small pixels and highest sensitivity are the main reasons for such choice. Then, what pixel size do we need?
Looking at the characteristics of the telescope, the maker says that the maximum angular resolution of the telescope is 0.91". This means that two stars can be separated if they have such minimum angular distance. In a way this defines the maximum size a pixel could have. Taking into account a focal length of 1500mm, using simple trigonometry we get a pixel size of 6.6 microns. Using this pixel size two stars separated by 0.91" seconds of arc will project their light in two consecutive pixels. That's a very close and very critical separation, difficult to work with, since the image from every star is a diffraction pattern made of rings.
Perhaps easier to see the separation if we get a pixel size about half that number, or even smaller. With 3.3 microns the two stars are now separated by one pixel. This is still quite critical but better. Clearly, we want a sensor with a pixel size of 3.3 microns or even better smaller. There is another way to make things less critical. If use a Barlow lens, with a 2X, separation of the objects become double. Then, using a pixel size of about 3.3 microns or smaller, together with a Barlow lens, we can get an optimum system.
Using technical words, the image will be oversampled, but this will be a good way to make sure we are able to see by eye, watching at the image, every possible detail. We must take into account that we will have so many different sources of "noise" that will add unwanted information to the image. Electronic noise from the camera itself, atmosphere turbulances, no perfect focusing, etc. Redundance originated from oversampling is also a way to make sure we will be able to eliminate to a good extent the noise (by averaging surrounding pixels for instance) and will make it possible to recover the original image by a complicated process of image processing. There is simple enough free software that carry out the complicated processing in quite a straightforward way, so we do not have to worry about that now.
If we check Sony sensors with a pixel size of about 3 microns, and take into account camera prices containing them, I finally got two choices:
IMX290 2.9 x 2.9 microns 1945×1097 2.13M 5.64mm x 3.18mm;
final image of 1920x1080 at a maximum speed 126FPS
IMX224 3.75 x 3.75 microns 1305x977 1.27M 4.89mm x 3.66mm;
final image of 1280x960 at 150FPS (1x1) or 640x480: 240FPS (2x2)
The sensor Sony IMX290 is used in the cameras Svbony SV305 and SV305 pro. The SV305 is quite inexpensive but not implemented at full speed for the full resolution but I did consider it seriously. It has full Linux support. I was about to buy it since I am a Linux supporter. If I had to buy a camera for a young relative the Svbony305 would be my choice. You can get it easily in Amazon or Aliexpress.
There is a quite unknown but good maker of cameras called Risingtech. They have the Sony IMX290 in the G3M290 model implemented at full speed. The sensor IMX224 is used in the RisingTech camera G3M224C. My final decision, based on many factors, was the RisingTech camera model G3M290. They advertise Linux support but it's not so good. In windows support is excellent but I hate using Windows. Anyway, it is a good camera and I am enjoying it very much.
Taking into account that everything is made in China, you may get better prices in Aliexpress. But you may have to take into account taxes when crossing your country's border.
Let us review the final decision (G3M290 or Svbony 305, same sensor). Pixels of 2.9 x 2.9 microns and a telescope with a maximum resolution of 6.6 microns on the focal plane. This means little more than one pixel of separation between two stars separated by an angular distance of 0.91". Using a 2X Barlow lens, the separation becomes 6.6 x 2 = 13.2 microns. This means a separation of little more than 3 pixels between the stars. Not much but enough. The problem of going further with a 3X Barlow lens is that the image gets darker (same light energy spread in a bigger area), and that's really bad for the kind of processing we are interested in. We want to be able to record many frames per secons, as much as possible. So there is a trade off between camera speed (better if smaller image) and resolution (better if bigger image). The 2X Barlow is a good compromise.
Let's check which field can we cover with the sensor. Sensor size is 5.64mm x 3.18mm, which means a field of about 12.9' X 7.2' without Barlow. If we use a 2X Barlow lens, the field will be half: 6.5' X 3.6'. As you can see we are talking about small fields, but planets are very small.
To start working, it is a good decision to use the stock Barlow lens, 2X, provided by Skywatcher. Again, even being light and cheap and simple performs amazingly well. Later on, after some experience and observing the images, we may decide, or not, to replace it with an expensive (about 100 euro) 3 lens Barlow (again, my personal opinion, waste of money!).
How big are the planets going to look like with a 2X Barlow (which diameter in pixels)? Using some simple trigonometry:
Mars has a size of 25" -----> 125 pixels
Jupiter has a size of 45" -----> 225 pixels
Saturn has a size of 21" -----> 105 pixels
How accurate are those numbers? I tried two different 2X Barlows. The stock one, provided an image of Jupiter with a diameter of 205 pixels. With a branded Barlow (Celestron), heavier (3 lenses) and more expensive (did not provide far more resolution) Jupiter had a size of 233 pixels. Small variations from different eyepieces or Barlows from different brands are normal. The average of 205 and 233 is about 220, so this probably means the calculations, so far, are accurate.
Before next section it could be good for you to check or carefully read the following link https://www.astropix.com/html/i_astrop/Planetary_Imaging.html.
2020
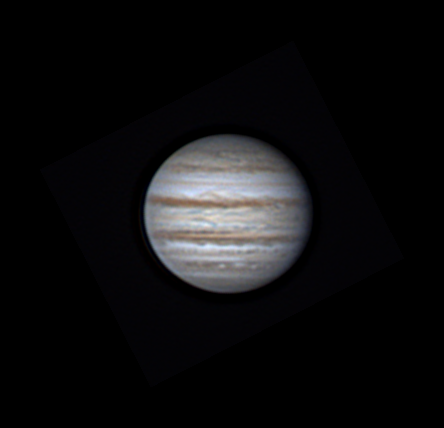
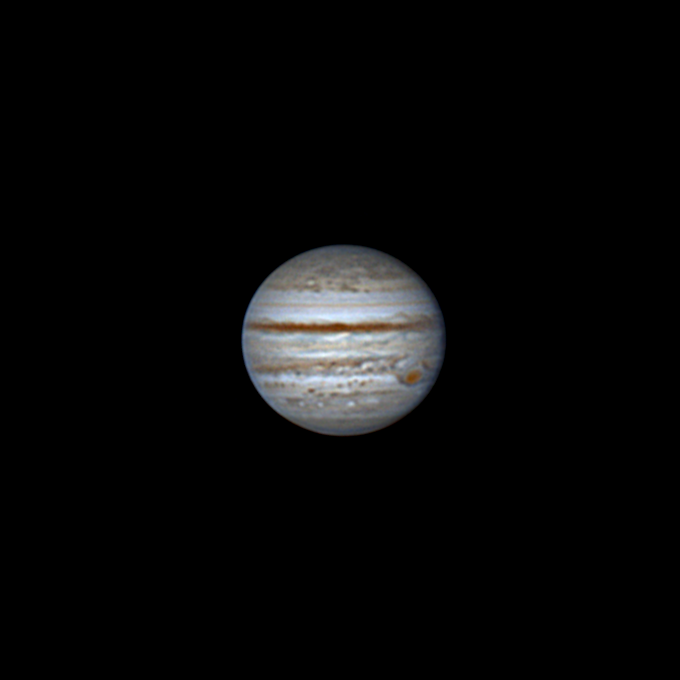
Using the Skywatcher Mak 127/1500, the stock 2X Barlow and the camera RisingTech G3M290 it is possible to get unbelievable pictures of the planets. The pictures are obtained by processing avi videos. The free software used for processing: Autostakkert 3 (to get stacked image), Registax 6 (wavelets), and GIMP (final processing). The images are a bit on the over-processed side, but I did care a bit more about trying to get as much detail as possible rather than absolutely beautiful. Anyway, to me, taking into account the size of the telescope, the images that follow are incredible. You will see images quite close to the resolution limit of the telescope. Taking into account my short experience (1 month) using the equipment, and the fact that Jupiter and Saturn were getting lower, I feel very proud. Because of that so you will see them getting worser. Sorry! Anyway, they are still informative about the planets.
It is possible to get better images when the planets are a bit higher from the horizon, using a devices like the "Barlow ZWO ADC Atmospheric Dispersion Corrector" and processing stacked images by means of Fitswork (deconvolution) and WINJUPOS (derotation). So many things to learn!
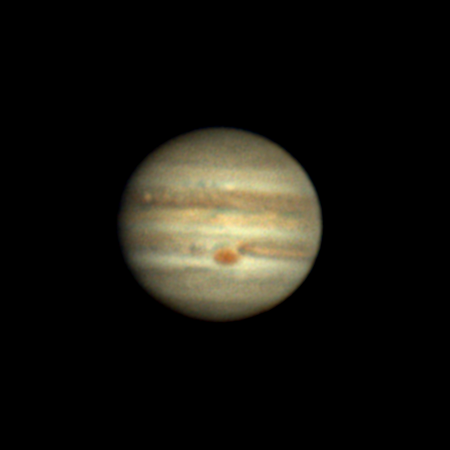
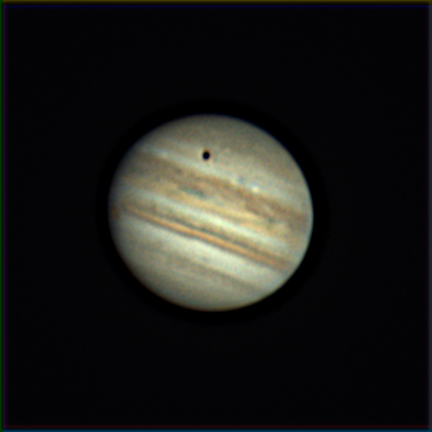
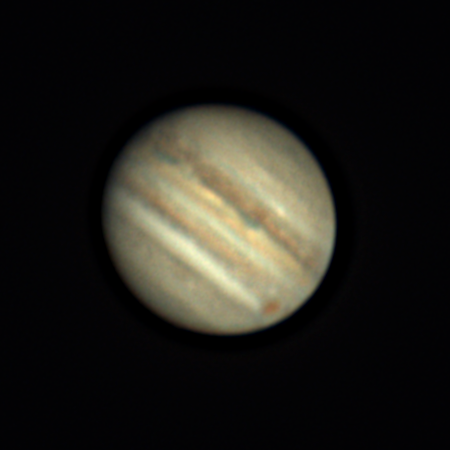
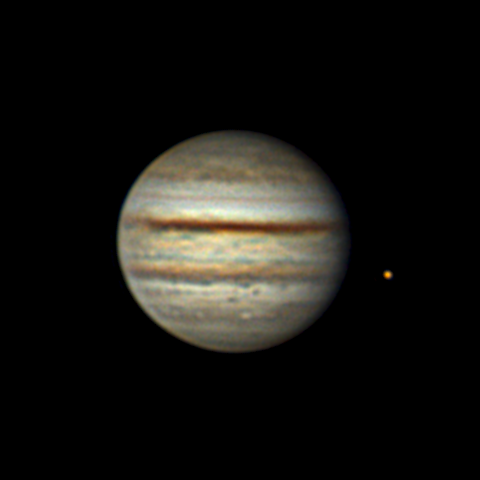
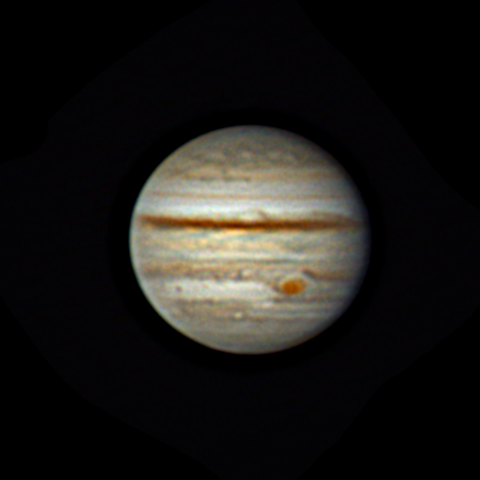
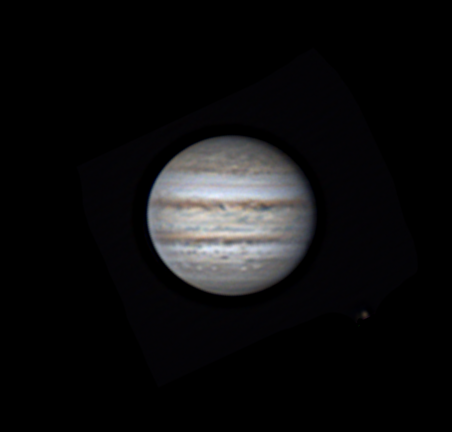
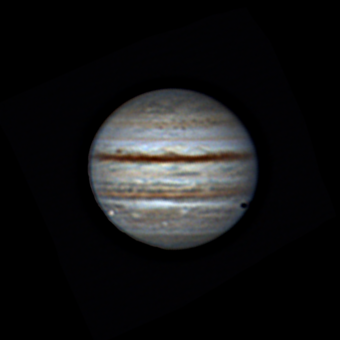
September 11th at 21h 32min UTC. We can see a wonderful image of Jupiter with its red spot right in the middle. On the upper left side we can see the satellite Europa beginning its transit.
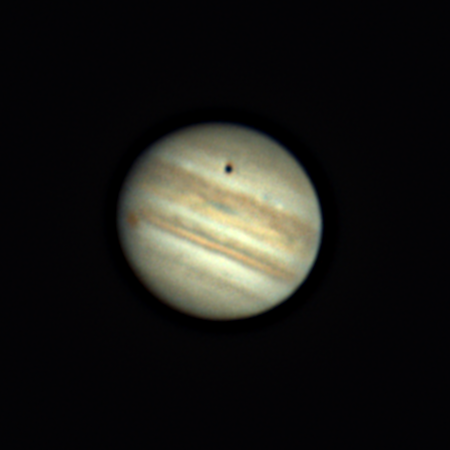
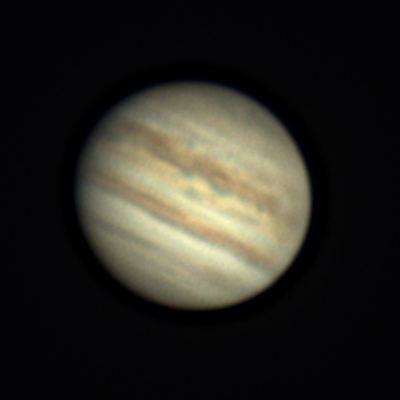
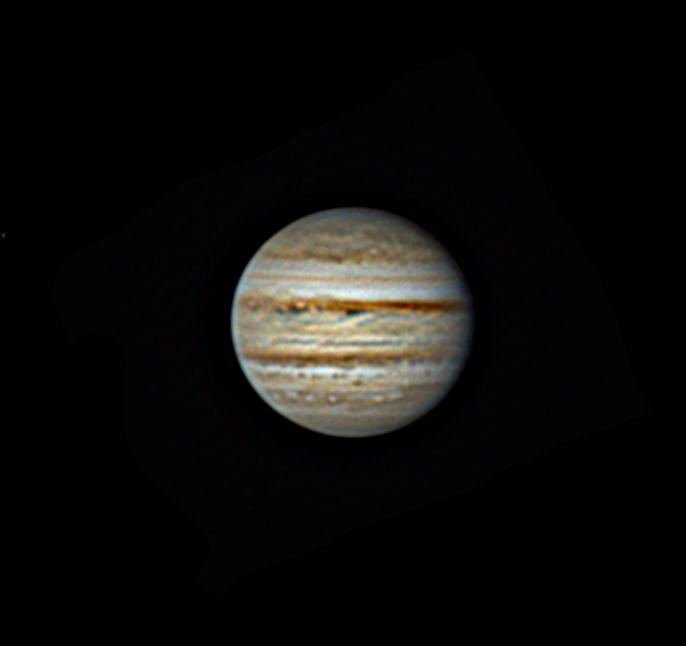
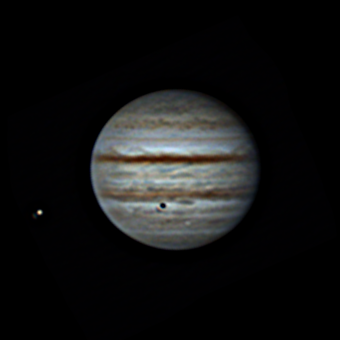
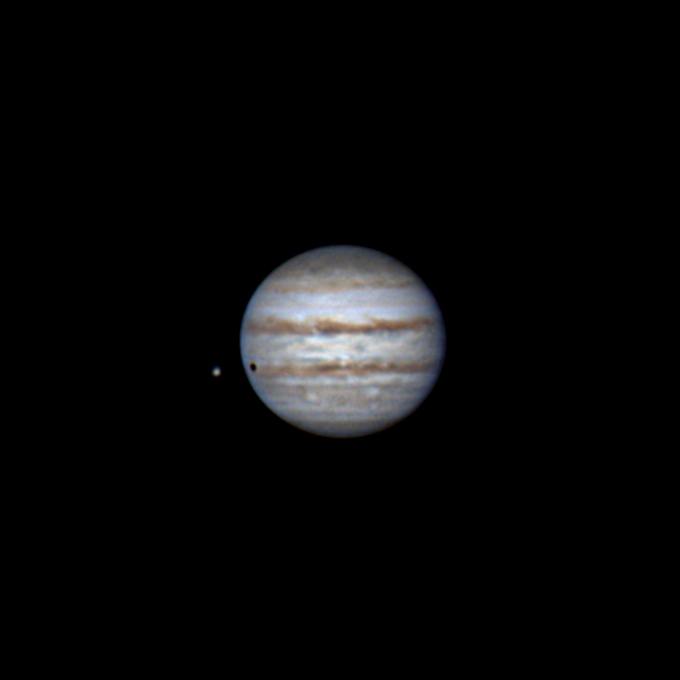
September 13th at 21h 14min UTC. We can see another wonderful image of Jupiter with its red spot appearing from the left side. We can see the sharp shadow of Callisto over Jupiter
In this animated gif we can see the evolution of 50 minuts of Callisto's shadow over Jupiter and the red spot from the left side.
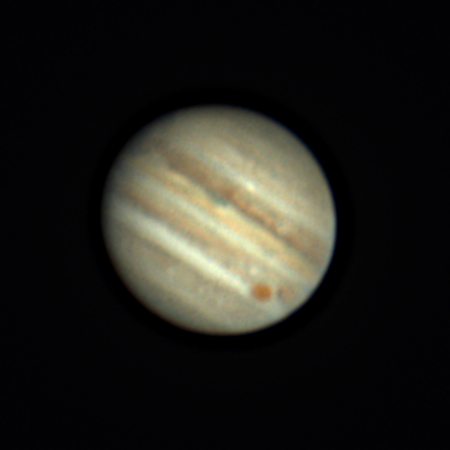
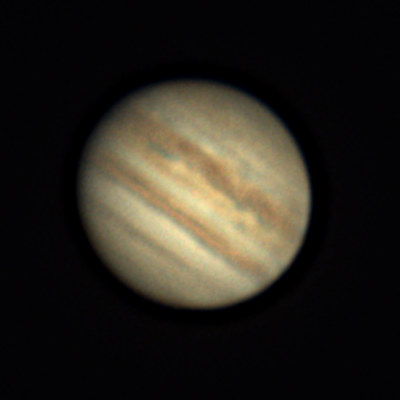
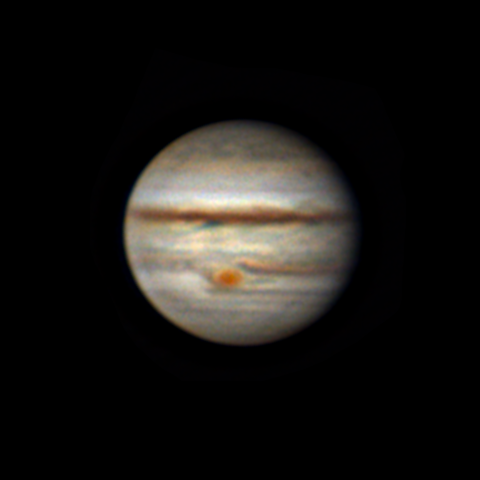
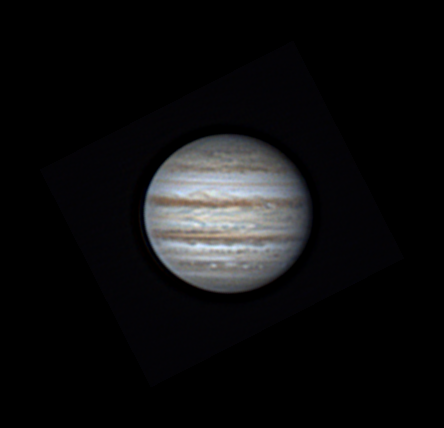
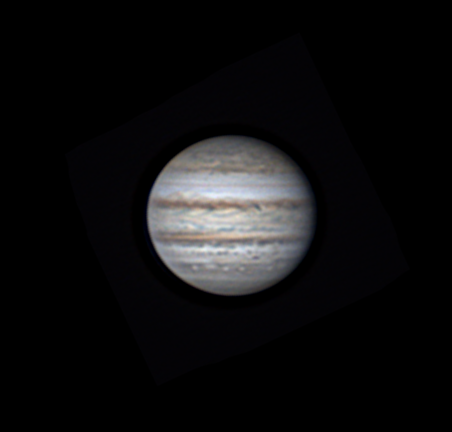
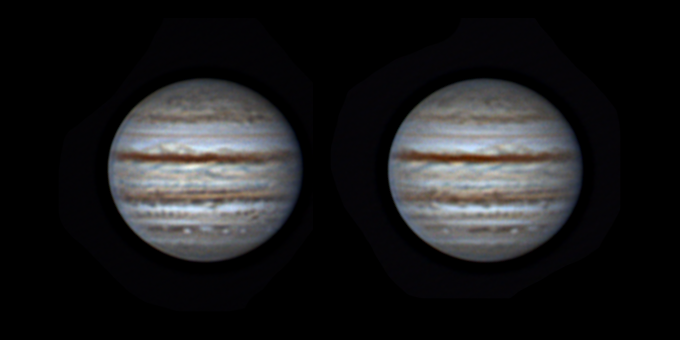
September 21 at 20h 52min. I used here a 2X Celestron X-Cel Barlow. No better results but the comparison is not at all fair because Jupiter is lower. Anyway, this is a wonderful image. Please notice the small size of the white spots in the south region of the planet.
Some half an hour later the planet was looking like this:
To finish the show, an animated gif follows:
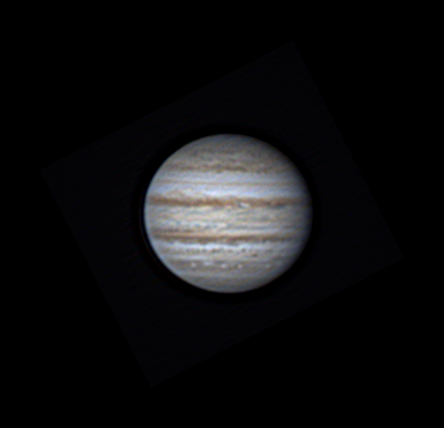
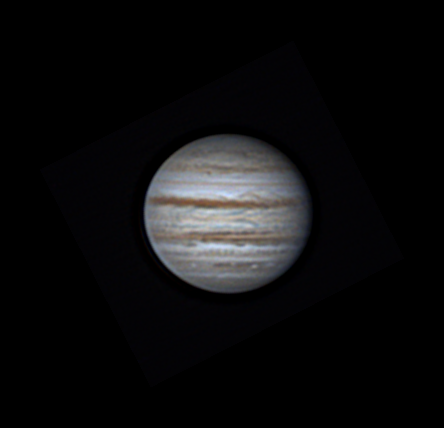
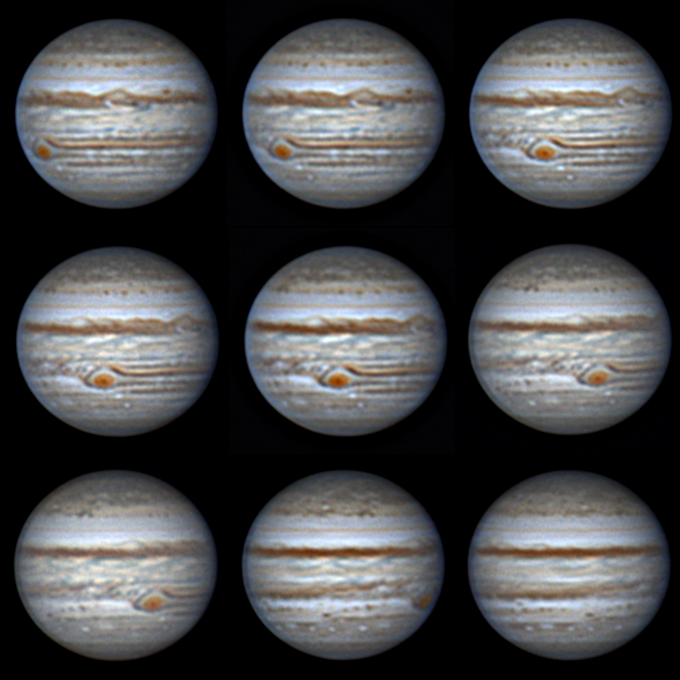
September 22 at 20h 52min. Taking the red spot as reference, we are clearly watching the other side of the planet. If you check the differences on the white band of clouds on the left and right side of the red spot (September 11), you may realize that those differences meet about the middle of this picture. Yes! The red spot is right behind us!
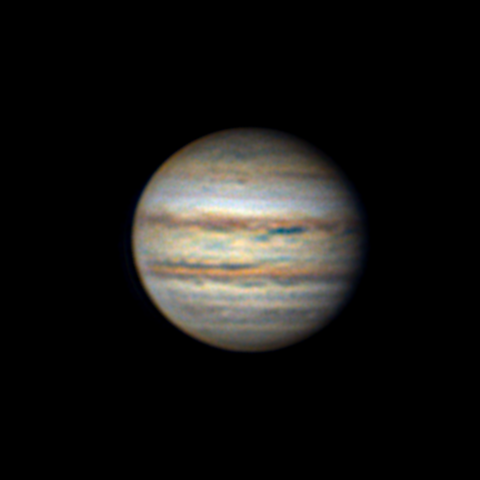
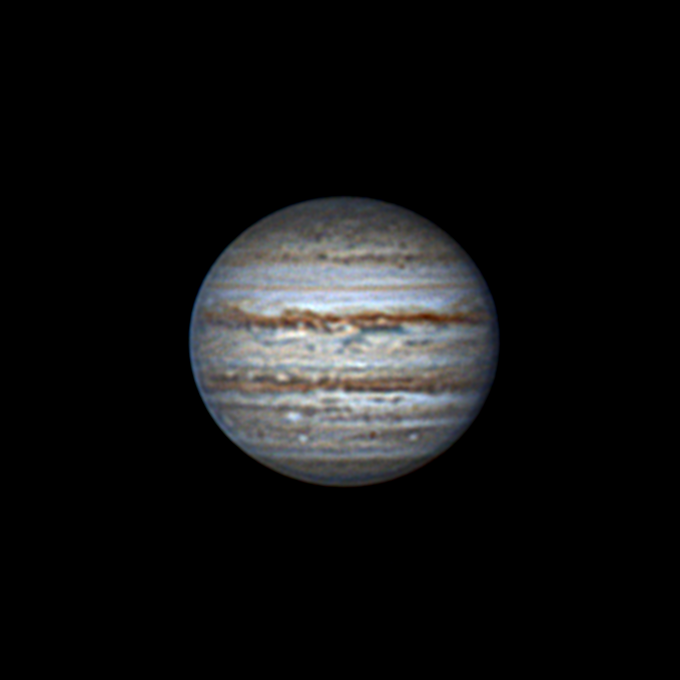
45 minutes later we get this wonderful image. In this picture we can see better the structures in the brown belt of clouds on the upper side of the planet. Beautiful!:
You can see now the evolution of 48 minuts of Jupiter in an animated gif:

Notice that we have pictures showing the red spot in the midle of the planet, in the left most and right most region of the planet, and also in the opposite side. This means that we have information about 360º of Jupiter's atmosphere. Eureka! We got Jupiter!
One important lesson here. Even if the seeing is not so good, do not refrain yourself from taking images! The satisfaction of finding things out about the planet, all by yourself, may be as enjoyable as getting beautiful pictures.
2022
July 10th. We won't have Jupiter at opposition until September 26th. But right now it is already beginning to have a considerable size. In addition, at 5-6 in the morning it is quite high on the horizon, at about 45º, which makes it easy to obtain good quality images. On September 26 the Earth-Jupiter distance will be the shortest in 70 years and won't be this close again for another 20 years, so I decided it was a good time to start warming up engines.
This season I will be using the Skywatcher Maksutov 127/1500 F12 telescope, my new Skywatcher Eq5 pro synscan goto mount, and the RisingTech G3M385 planetary camera, with Sony IMX385 sensor, UV/IR filter and Celestron 2X X-Cel LX Barlow.
The software used to process the images: Autostakkert, Fitswork, Registax, GIMP and FFmpeg.
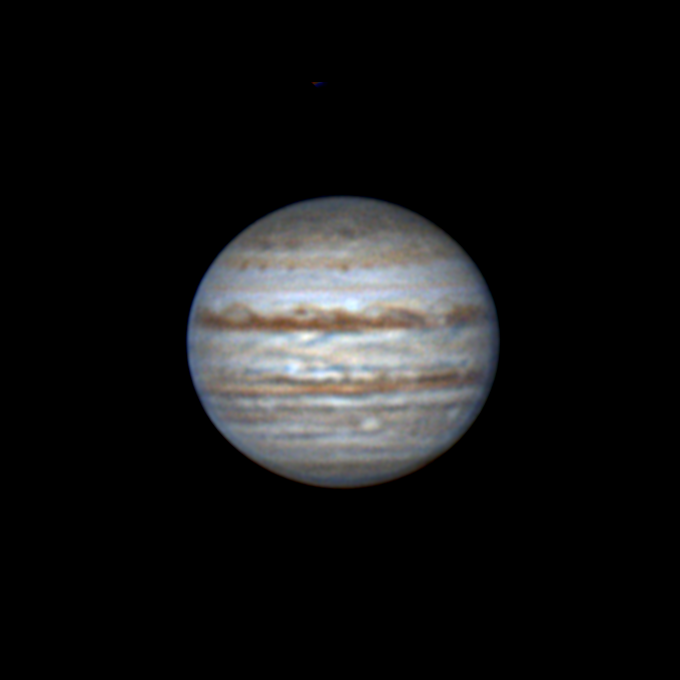
This is the best picture from July 10th, Jupiter and Io:
Observation took place from 4:24 am to 5:33 am. This video contains every picture:
This is the best picture from July 13th
This is the best picture from July 14th. We can see the Red Spot, so beautiful!
Observation took place from 4:46am to 5:46 am. This video contains every picture:
This is the best picture from July 16th. We can see the Red Spot on the left side.
Observation took place from 4:22am to 5:44 am. This video contains every picture:
This is the best picture from July 19th. We can see the Red Spot again, but with better resolution. Jupiter is getting high and day after day the quality of the images improve.
Observation took place from 3:48am to 5:52 am. This video contains every picture:
This is the best picture from July 22th. Incredible resolution.
Observation took place from 3:54am to 5:46am. This video contains every picture:
Those are the best pictures from August 1st.
Two hours and 40 minutes of Jupiter. This video contains every picture:
Those are the best pictures from August 3rd.
Two hours and 40 minutes of Jupiter. This video contains every picture:
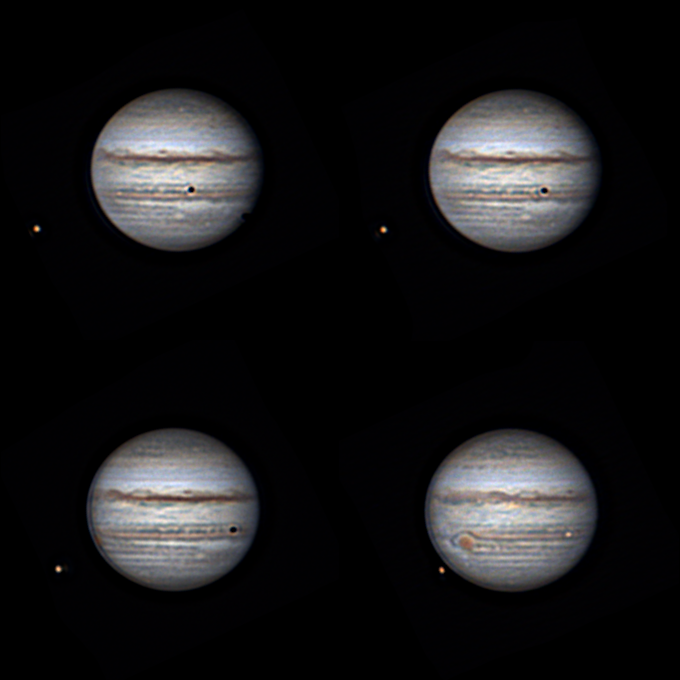
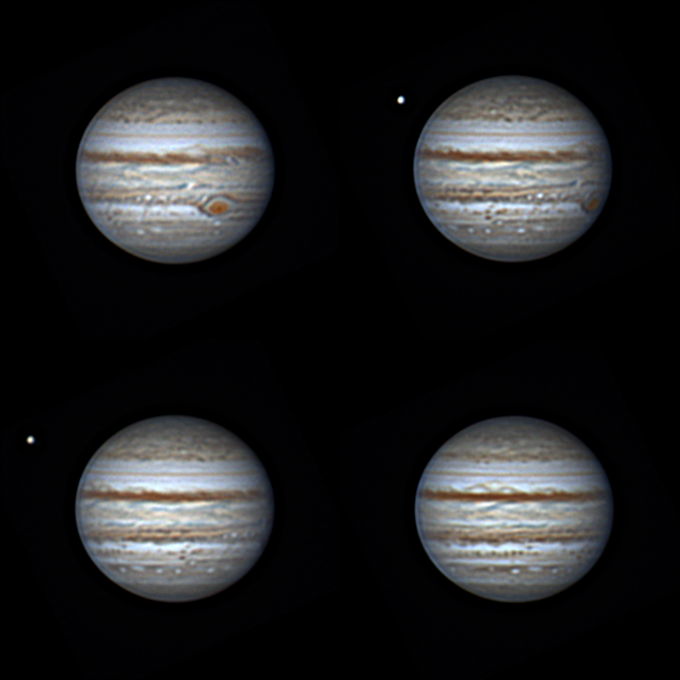
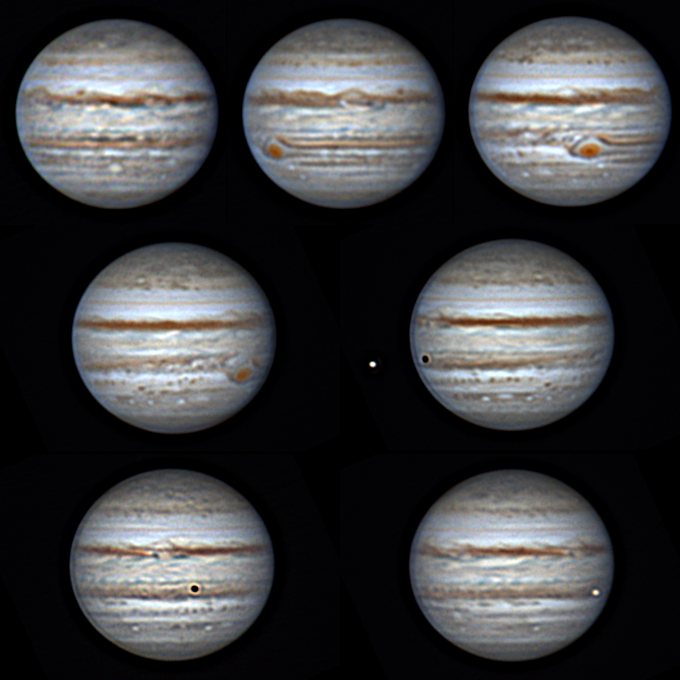
Jupiter is emotion, change and evolution. Jupiter's clouds change their shape and form structures of different colors that evolve over time. It is a spectacle of planetary dimensions. And let's not say when its satellites also do their thing and walk in front of the giant as if nothing had happened. Don't miss out, the best is yet to come. There is less than a month and a half left before it goes into opposition, so we will still see it bigger and brighter. Here are four photos of the transit of Europa's shadow over Jupiter. Quadruple ration so as not to stay hungry. Bon Appetite! From day 6/08/2022.

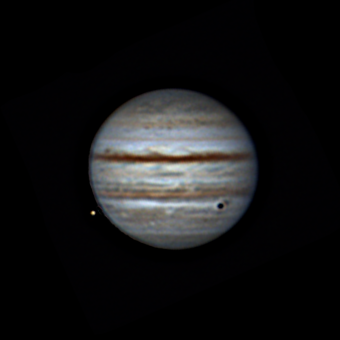
August 6. Europa, the smallest of the Galilean satellites, covered with frozen water and slightly smaller than our Moon, dared to cast its shadow for almost three hours on the surface of the great Jupiter. And he knew how to do it well, because the shadow crossed a white band of clouds, so that everyone could see it well. See this video resulting from the observation of 2 hours and 44 minutes. Observe how Europa's shadow evolves on Jupiter and how Europa appears after a while on the right side. It is interesting to imagine where the Sun was in relation to Jupiter and its satellite. The last images are slightly distorted due to a small problem with the camera control program. Pity.
Two hours and 44 minutes of Jupiter. This video contains every picture:
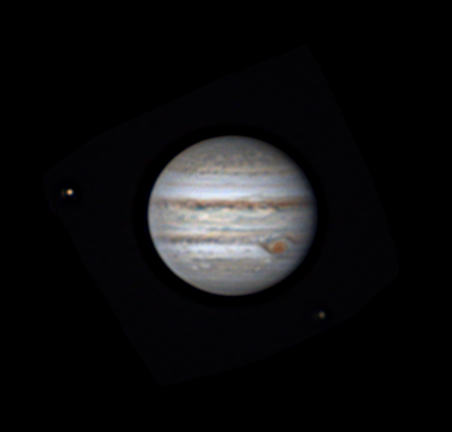
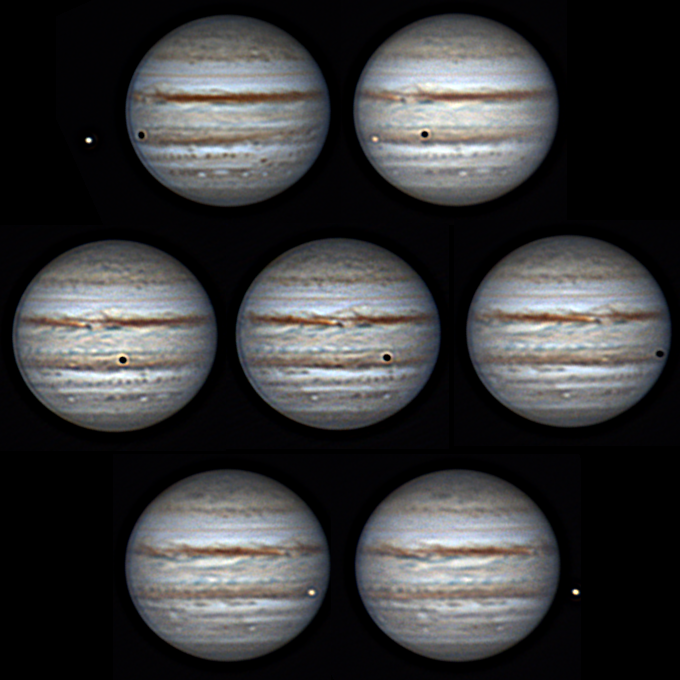
August 9. After having seen the transit of Europe, it was now time to see the immense Ganymede do its job. It is the largest natural satellite in the solar system, and its huge shadow over Jupiter leaves no room for doubt. But this time he was not alone; Io, the closest satellite to Jupiter, happily accompanied him creating a great event: a double transit over the gas giant. I had to fight intensely against groups of clouds that wanted to enjoy the spectacle in the front line, but such is life. They undoubtedly affected the quality of the images obtained. Four and a half hours of observation and 250GB of processed data to obtain the following set of pictures and a modest video. Enjoy it!

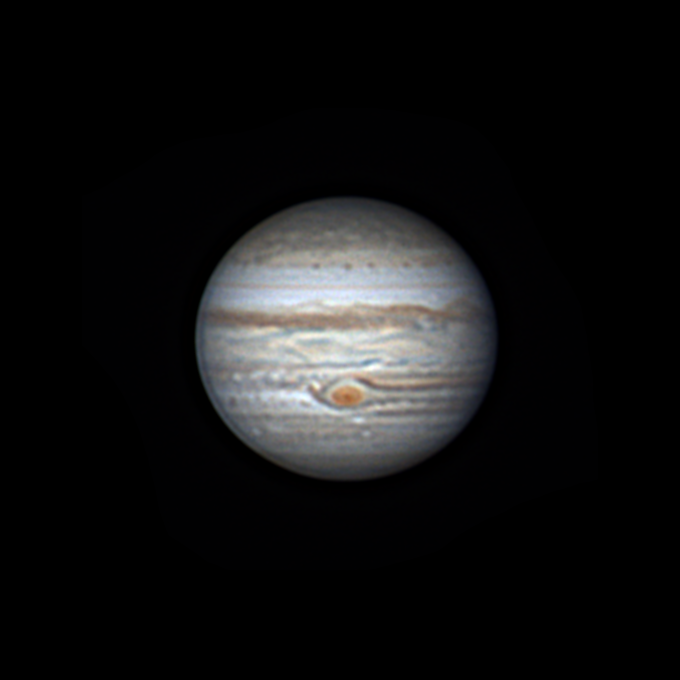
August 12. Bad seeing night. Only one picture look sort of nice. Jupiter with the Great Red Spot.
Session on August 13. Cloudless sky and full moon, but with consistent mist. From Jupiter came between 20% - 40% less light. Still the visibility was quite good at times. I had just collimated my friend Mak (how stressful!), so I started to take a few photos to stay comfortable. The two best ones:.
The session in a movie:
Sometimes it happens. After three consecutive heat waves, a measly 15 millimeters of rain cleanses the air. And then the northwest wind (mistral), drags all traces of moisture to the sea. The result is a clear, clean and transparent sky. Not even the Moon manages to illuminate the sky. And when that happens, the images you get are the best by far.
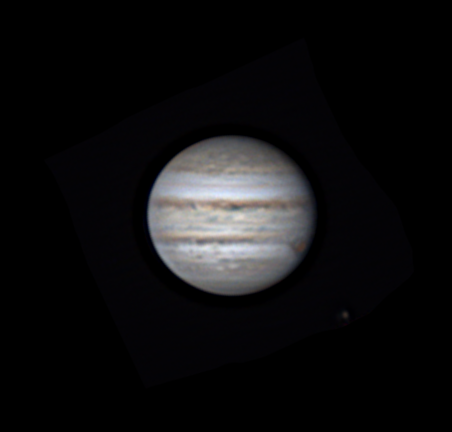
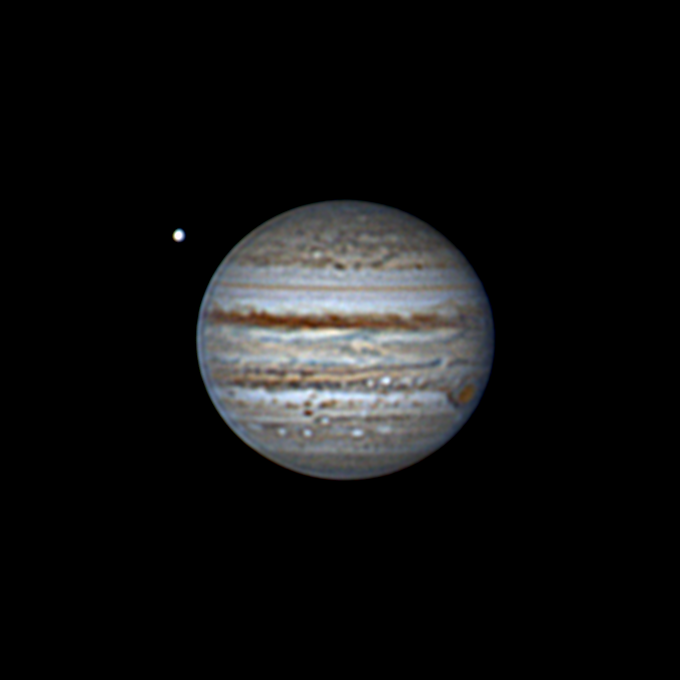
Early morning of August 20, "perfect" sky. Sequence of images taken at an interval of four hours. They are the best of the year and will probably be hard to beat. Note the dizzying speed of Jupiter's rotation and the level of detail in its atmosphere, and the appearance of Ganymede after hiding prior to the session.
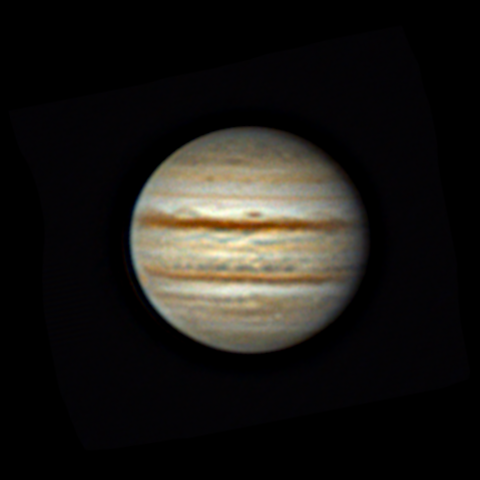
The best images of the session of August 20. The satellite that appears is the great Ganymede. My best photos of Jupiter this year without a doubt.
And before going to bed, a photo of Jupiter accompanied by the great Ganymede, taken during the early hours of August 20 Blessings and good night.
Early morning of August 24, 2022. There is humidity in the air and on the surface, but the visibility from 30-35º above the horizon is surprisingly good. The haze and all the dirt that had been present in the air for weeks seems to have finally disappeared. It's 4:40 and Jupiter is 50º high. On the computer screen I see details of the atmosphere that I normally only see after processing. I record several videos at about 180 images per second, with the gain at maximum and with an exposure time that exceeds 4ms. The result is the most detailed series of images I've ever gotten of Jupiter. These days everything seems to be going smoothly, and Jupiter still has a full month to go before it goes into opposition.
Jupiter cake. Gives for nine servings, although if you are generous and share they can be more. Made with a lot of love and a lot of dedication on the morning of August 24. I hope you enjoy it in good company and in good health.

Oh Jupiter! Why do you spin so fast? So I can see you all in one night? Bringing out the colors of Jupiter is fun and exciting: reds, oranges, browns, greens, blues, whites, greys... There is no greater spectacle on a planetary level. And besides, all those structures and bands of clouds are always changing, which ensures the pleasure of continuous discovery. The surroundings of the red spot and the cloud bands close to it are a good example. Or that prominent band of brown clouds located in the northern equatorial part, which is getting more and more jumbled every day and mixed with those strange blue-green structures, which seem to have been painted by a great artist. Jupiter is pure art, for there is no greater artist than Mother Nature. Enjoy the transit of the red spot of Jupiter. The quality of the images improves at the beginning and worsens at the end, that's life... The satellite that is observed is Europa, which shortly before had completed its transit over Jupiter.
Jupiter on the morning of August 29. 5 hours and a quarter of quiet observation. Very humid air with a certain amount of mist, but with visibility that was surprisingly good at times. See the planet turn around, which allows you to see it practically whole. Enjoy and be happy.
Jupiter cake! As always, nine portions made with a lot of love and dedication, selecting the best ingredients, this time at dawn on August 29.
The four best images of Jupiter obtained at dawn on August 29. Reprocessed with AS!3 with the "drizzle 1.5x" option.
Transit of Io over Jupiter. Do not miss it! Io, the closest of the Galilean family, passing in front of the giant as if nothing had happened, and projecting a shadow that looks more like a deep black hole. Unique show that occurred on the morning of September 1.
Jupiter cake to the transit of Io. This time only 7 servings. But as always, made with a lot of love and dedication, selecting the best ingredients obtained during the early hours of September 1. Enjoy it in good company and in good health.
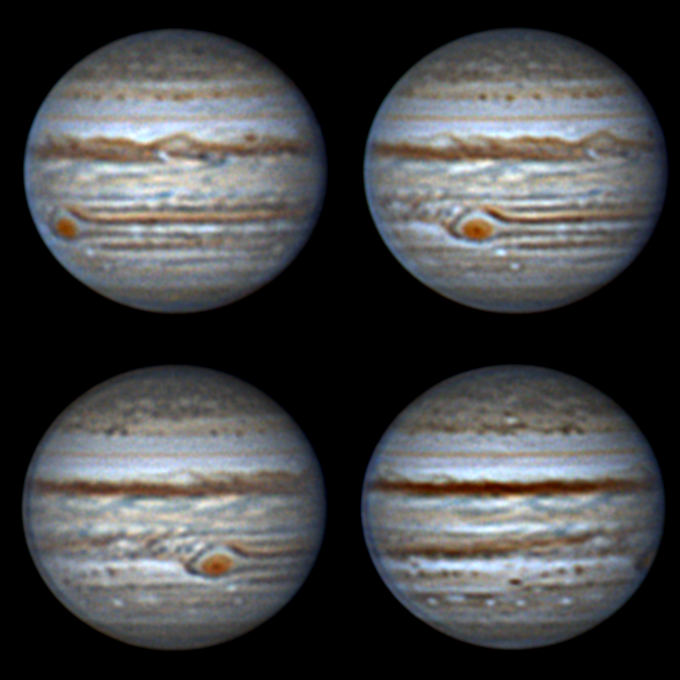
Jupiter shows his face, all faces. In a world first, I show you the full face of the gas giant. There is no corner that has not been exposed for you to enjoy in its entirety. The definitive jupiterine cake, in 7 delicious and exclusive portions. Images from two different sessions have been used (it could not be otherwise). They correspond to August 29 (the first three) and September 1 (the rest). In those of September 1, the transit of Io is observed. Between photo and photo there is an interval of about 45º (more or less). Between the last and the first there is an interval of approximately 90º. The inconsistencies between the photos are due to the differential rotation of the planet Jupiter. In an interval of 3 days differences are already noticeable.
Jupiter is emotion, change and evolution. See how after more than 30 days, the images of Jupiter that are so difficult to obtain expire without remedy due to the differential rotation of the planet and the interaction of the adjoining cloud bands, among many other reasons. In particular, it is interesting to look at the surroundings of the red spot and the adjoining cloud bands. Enjoy this 6-serving cake (every day there are fewer...) before it expires (in less than 30 days!).

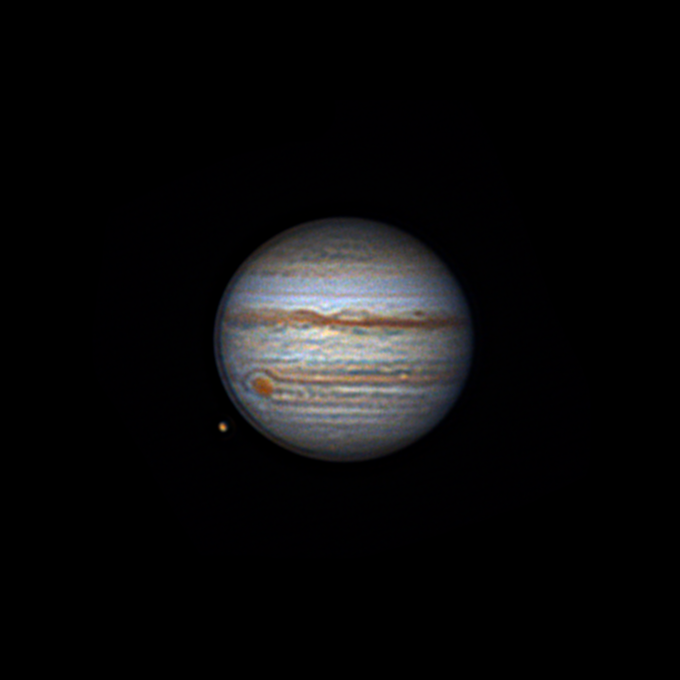
Image of the wonderful Jupiter, the largest planet in our Solar System, with its red spot and its bands of clouds in constant and incessant evolution. Obtained on the morning of September 1.
Early morning of September 7. It started well, but the turbulence in the upper layers of the atmosphere gained ground and after 3 in the morning the visibility was already very bad. Sometimes happens. There wasn't even a cloud. On the surface the air was almost static, which caused the humidity to be almost 100% (everything ended up wet!). But up there there was a lot of movement. So enjoy this modest video, a summary of two hours of observation that allows you to see a good number of details of the always beautiful and imposing Jupiter.
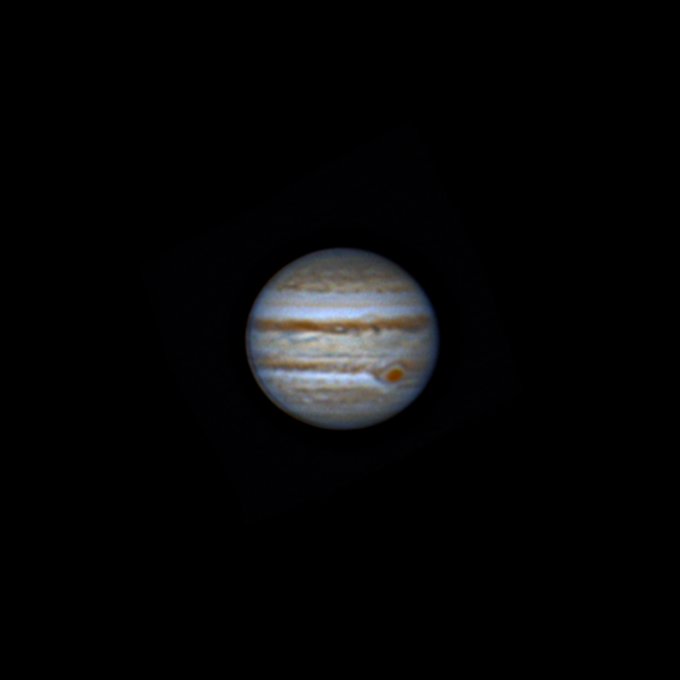
Clearly, Jupiter is entering opposition. The full face is already visible and the shading on the "right" side is minimal. It's not going to grow much bigger, but anyway, how huge it is! Now it is over 47.7" and will reach 48.77" on the 26th of this month. I show you the best image of this morning. But what complexity shows this planet!
"Testimonial" image of the transit of the small Io over the great Jupiter obtained in the early hours of today, September 10. There were many clouds and air currents in height that made the session impossible. Still, it's always impressive to see that round shadow piercing Jupiter's atmosphere.
Jupiter! From today's morning (09/15) only the first image (12:07) is saved. The next minute a high air current appeared that caused tremendous turbulence and there was nothing to do. From one moment to another. Incredible. And it's the second time... This is the end of summer here.
2020
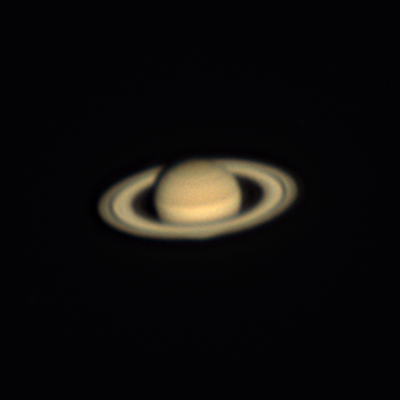
Saturn shows such beautiful, peaceful images. Please enjoy the best image I got so far on September 12, 20h 11 min UTC. The free software used for processing: Autostakkert 3 (to get stacked image), Registax 6 (wavelets), and GIMP (final processing). Stock 2X Skywatcher Barlow was used. Can you enjoy Cassini division? And the basic structure of Saturn's atmosphere?
2022
Saturn, what a feeling of tranquility and harmony conveys to me the image of this planet. We will have it in opposition on August 14, so there is only a month and a few days left. Saturn is lower on the horizon and dimmer than Jupiter, so it costs more to get good images.
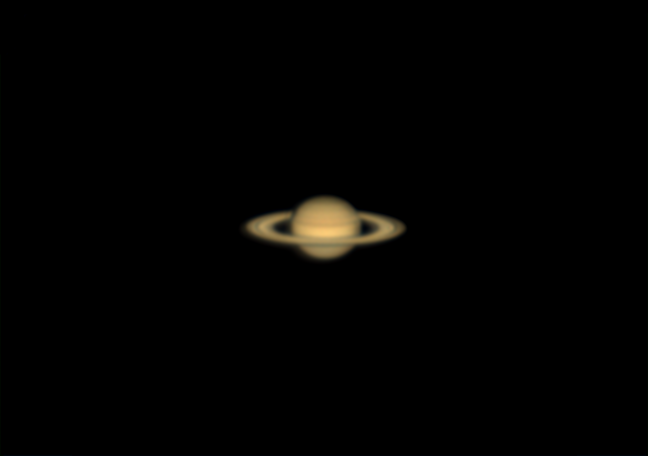
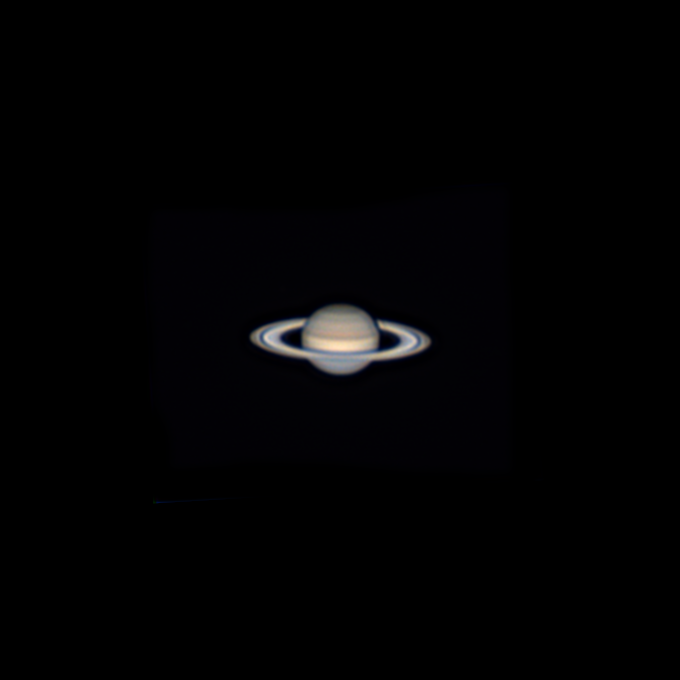
On July 10th I used the Skywatcher Maksutov 127/1500 F12 telescope, Skywatcher Eq5 pro SynScan goto mount and the Celestron RisingTech G3M385 planetary camera, with Sony IMX385 sensor, UV/IR filter and Barlow 2X X-Cel LX. The images were processed using Autostakkert, Fitswork and Registax and Gimp. The final result follows:
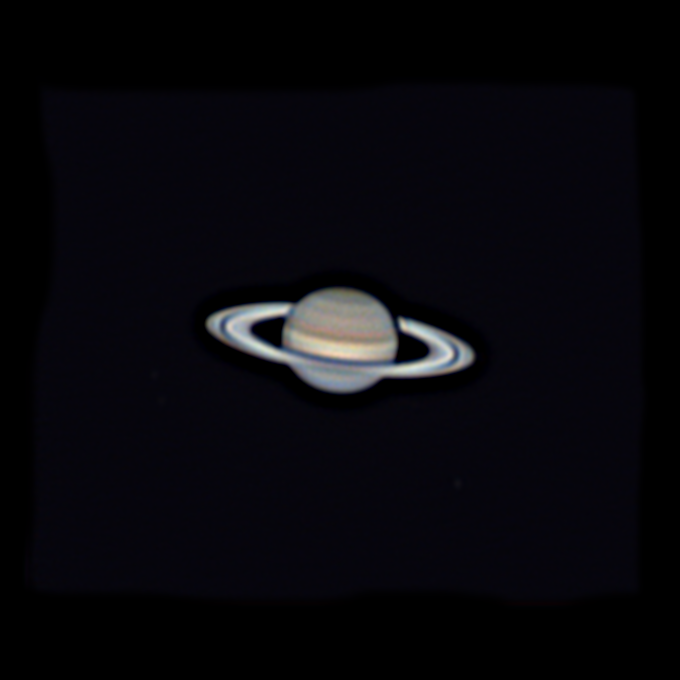
On 14th new images were obtained and this time the white balance was probably better, allowing to see differences in color in the bands of clouds.
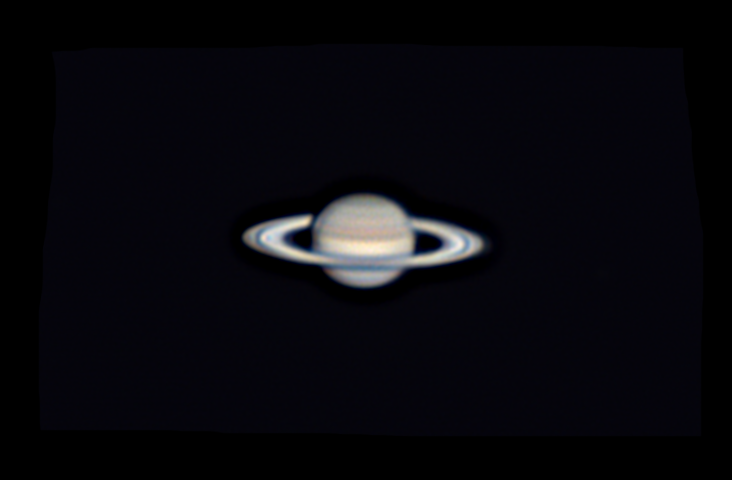
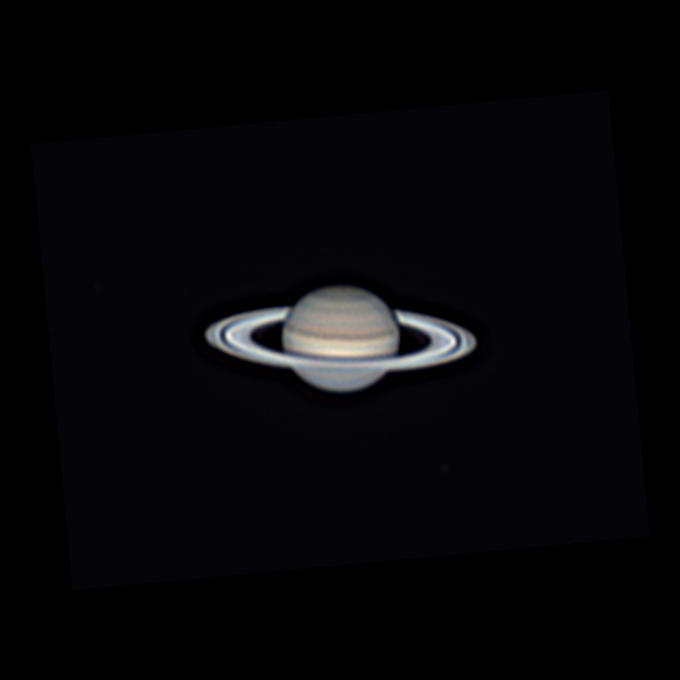
Quiet Saturn floating through space on the 6th of August 2022. Notice your rings with the Cassini and Encke divisions. Enjoy those bands of clouds of different colors. Saturn is barely more than 30 degrees above the horizon at the observing site, so this is what it is. We are already close to opposition, on the 14th. Do not forget to take a look at it, this planet is special, it has a touch of elegance and balance that distinguishes it from the others.
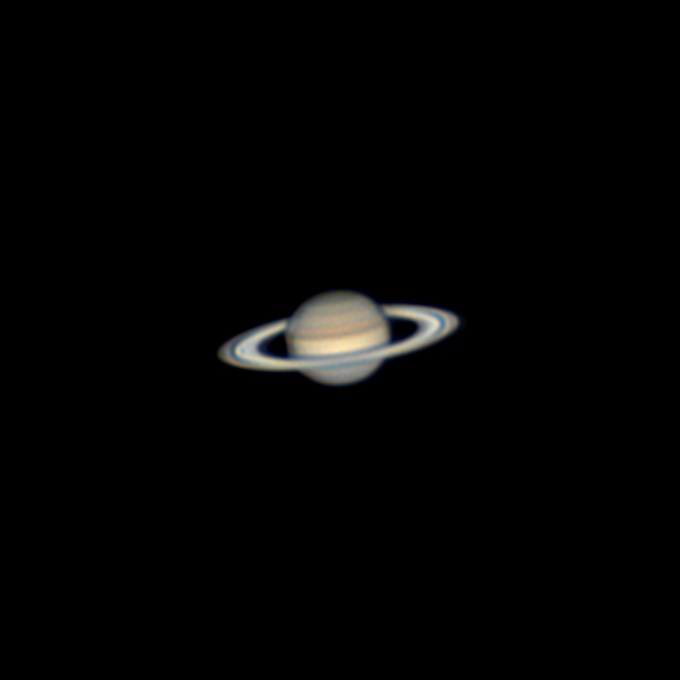
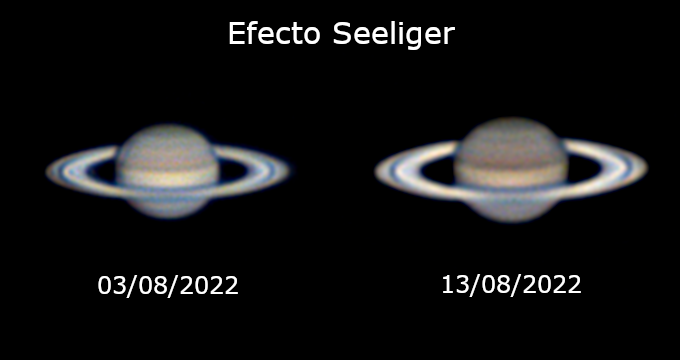
During the days around the time of opposition, Saturn's rings suddenly intensify their apparent brightness. German astronomer Hugo von Seeliger (1849-1924) first noted this change in 1887, concluding that the only plausible explanation was that Saturn's rings were made of tiny particles. Therefore, this effect bears his name. In the photographs, if we compare the brightness of the rings with the brightness of the planet, we see that the image of the 13th shows much brighter rings (the opposition occurred exactly the next day, August 14).
Saturn on August 20, quietly continues its path across the sky.
On August 24th it was located 1.327 million km away. Far from home. Its light took an hour and a quarter to arrive. And a tiny part of that light entered my Mak 127/1500 and was absorbed by an IMX385 sensor. And the miracle happened and a beautiful image appeared.
Saturn! Why do you always go so low on the horizon? Why don't you come up a little higher so we can get a better look at you? Do like Jupiter, 50º above the horizon. He sure knows! Maybe next year? We will see... Early morning of August 29.
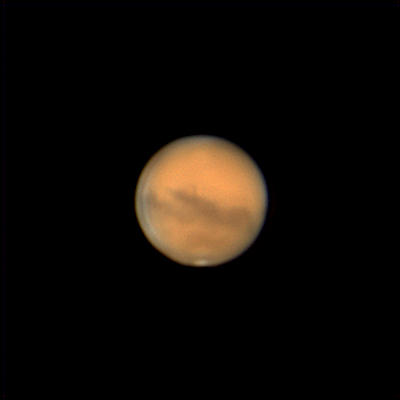
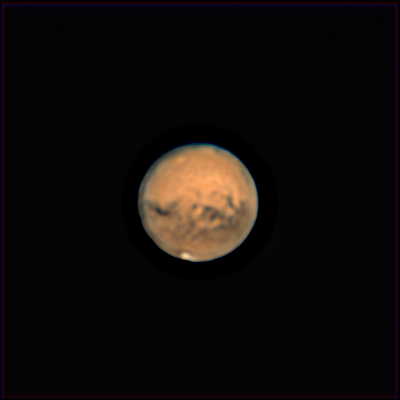
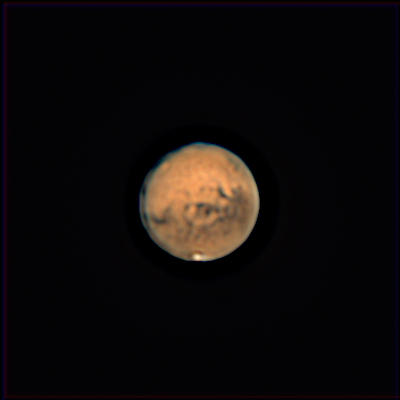
Mars, the red planet is very bright, which means easy to take higher quality videos with huge number of frames per second. And it is getting higher in sky! Opposition happens at October 13. Good! We are going to analyze the only thing visible, its albedo. Some regions of mars look darker and some look brighter. Planetary scientists say that albedo has little relation to topography. The bright areas are now known to be locations where fine dust covers the surface. The dark areas are places where the wind has swept clean of dust, leaving behind dark, rocky material.
September 22 20h 33min UTC. You can see a wonderful image showing Mars atmosphere (notice the difference between the left and right side of the planet). The Sun is illuminating the planet from the left side. Also notice the differences between the north and south hemispheres. Of course you can see the iced south pole. Wonderful!
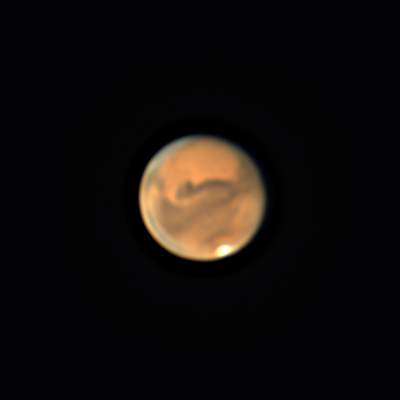
Please watch 23 minuts of evolution of Mars in the sky:
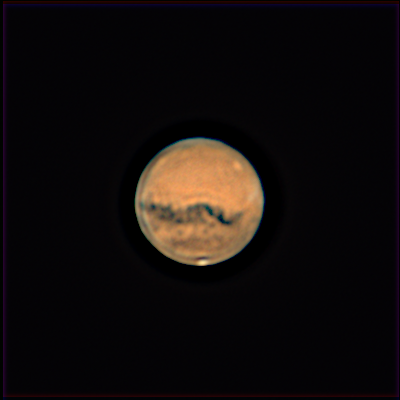
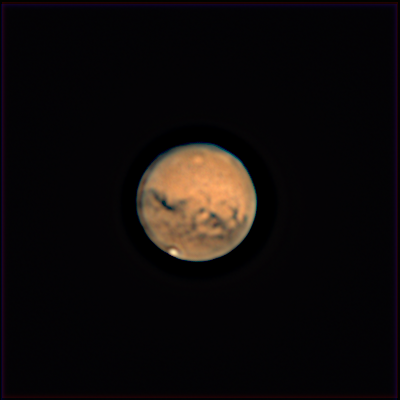
September 30, 22h 09min UTC. We capture this wonderful image of Mars, stacking with Autostakkert and processing it first with Fitswork and then with GIMP. Notice that this corresponds to the east side of the images taken on 21st September, so we are making a full map of Mars step by step:
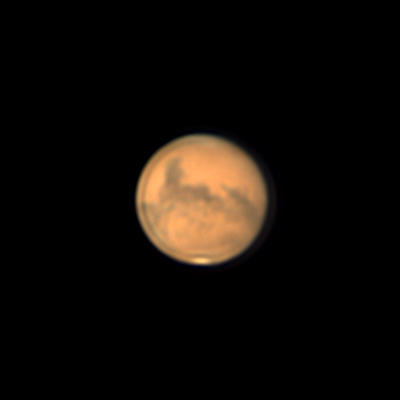
We also processed this image using Registax and GIMP:
We can see that fitswork allow to get detail obtaining a more natural image. However Registax wavelets seems to get a bit more detail at the cost of getting a very strong contrast. I still have to learn a lot about both, but little by little I like fitswork better.
It follows an animated gif showing the rotation of the planet. It corresponds to an interval of 52 minutes starting at 21:46 UTC.
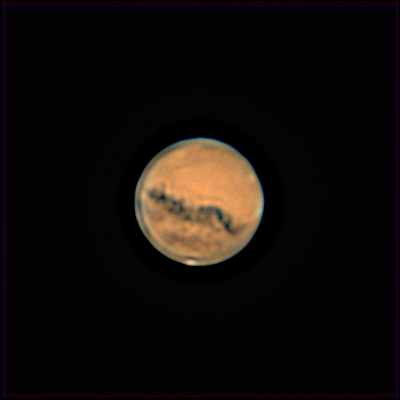
October 5, 22h 08min UTC. We obtain this image of Mars, stacking with Autostakkert and processing it first with Fitswork and then with GIMP. Notice that this corresponds to the east side of the images taken on September 30, so we continue our mapping of Mars:
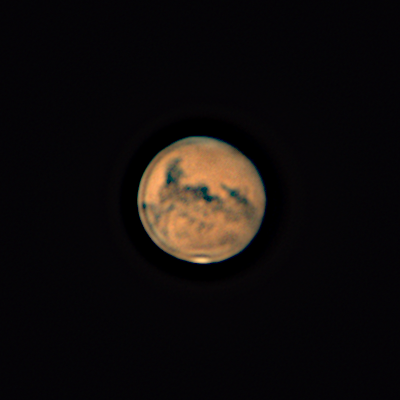
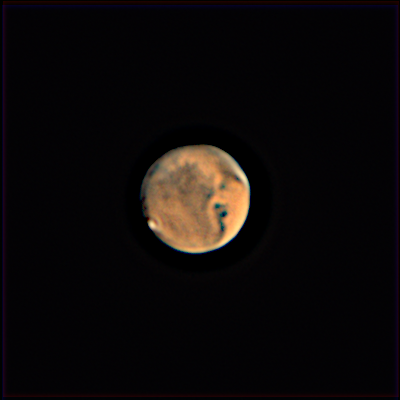
October 9, 21h 39min UTC. We obtain this image of Mars, processing only with GIMP. Notice that this corresponds to the east side of the images taken on October 5. We can see a light orange round region in the northern hemisphere, in the east side of the image. It is not clear whether this is a region in the surface or some kind of clouds. Given the color, it seems it belongs to the surface (may be related to Olympus Mons). On the west side, more or less at the same latitude, another spot is visible (probably Elysium mons). Near the equatorial region, also in the east side, we can see clearly a nearly white line of clouds.
We can see both spots clearly in the following image at 22h 33min UTC:
An animation follows, corresponding to a time span of 1 hour, from 21:32 UTC.
October 17. We continue to get new images of Mars. Look at the following one, taken at 21h 55min UTC
and this one taken at 22h 39min UTC
Clearly the west side of the planet corresponds to the east side of the images taken on October 9, so we are getting close to get a full map of Mars. We can see now "Olympus Mons" very clearly as a light orange region. It is interesting to notice that in the northern hemisphere, the images look "noisy". But looking at a series of images, we realize that the noise corresponds to real features of mars surface. Taking a look to the following animated gif, it becomes obvious. It starts at 21h 35min and it lasts one hour and 22 minutes:
October 18, 21h 49min UTC, I get this wonderful picture. Mare Acidalium is starting to show up in the east side:
October 29th, 23:47 UTC, another wonderful picture with plenty of detail. Notice in the west side some bluish regions corresponding to clouds. On the east side, some very faint red lines, starting near the south pole and going to the north, can be seen. Those are not artifacts, and they can be seen in different images rotating together with the planet. The northern darker region corresponds to Mare Acidalium. The southernmost feature from Mare Acidalium is called "Oxia Palus" (it seems a peninsula of Mare Acidalium), and looks bluish, may be because of the presence of clouds. Some other dark areas look cyan. All this stuff is easier to see from the images looking at them at 200% size.
Taking a look to the following animated gif, in the last images we can see those mysterious red lines rotating with the planet. It can only be seen in the last images because the seeing was quite good only by the end of the session, when mars was higher in the sky. It starts at 22h 11min and it lasts and finishes at 23h 54min minutes, so about one hour and 45 minuts:
The moon is one of the most rewarding targets in the sky. It offers plenty of light and a terrific amount of details. If you think the moon is boring because it is the closest object in the sky, and an already overstudied thing from many years ago, you are wrong. Discover the pleasure of rediscover! Watch it carefully and discover the moon all by yourself. You have a full world in your eyes.
Our telescope has a resolution 0f 0.91". Our camera has pixels of 2.9 x 2.9 microns at a focal distance of f=1500mm. The moon distance is about d = 384,400 Km. How big are the details that we can see? Let's do some very simple trigonometry. 0.91" correspond to 1.7 Km. Not bad!
How many Km in, lets say, 10 pixels? The answer is 7.43 km. With a 2X Barlow 10 pixels are 3.72 Km.
This is what we could get with a perfect seeing. Not bad! We can get ready to land on the moon! Field of view of the camera sensor is 12.9' X 7.2' without Barlow. That is an area of 1442 Km x 805 Km. With 2X Barlow we have an area of 727 Km X 403 Km.
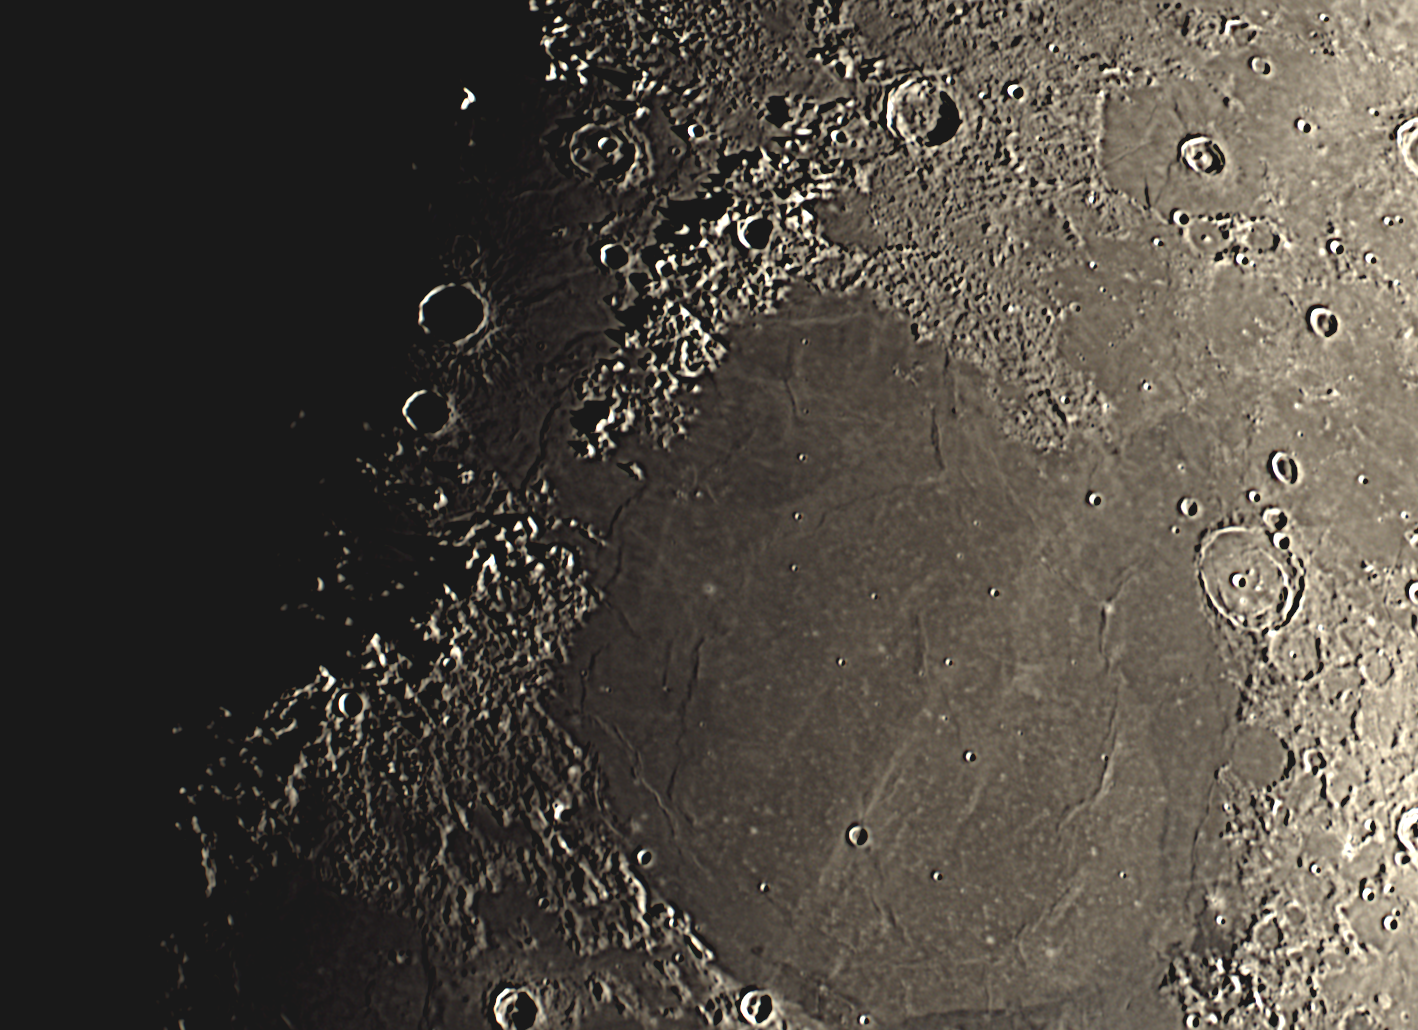
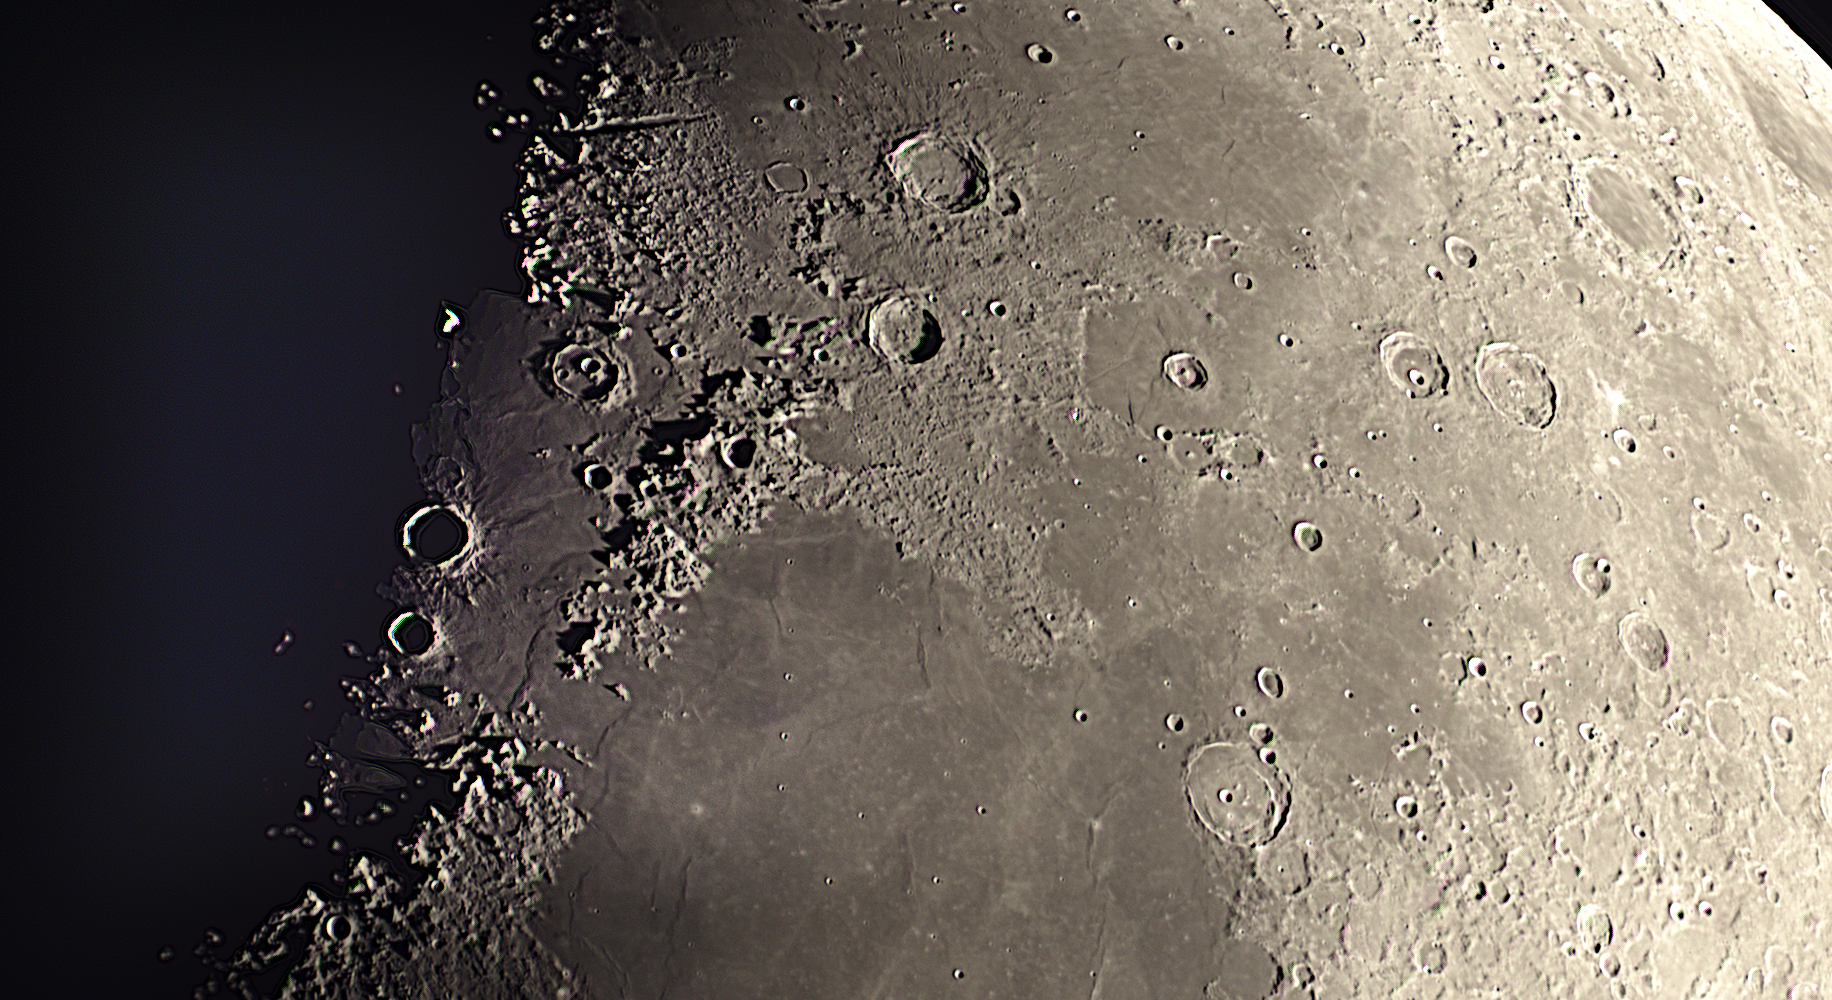
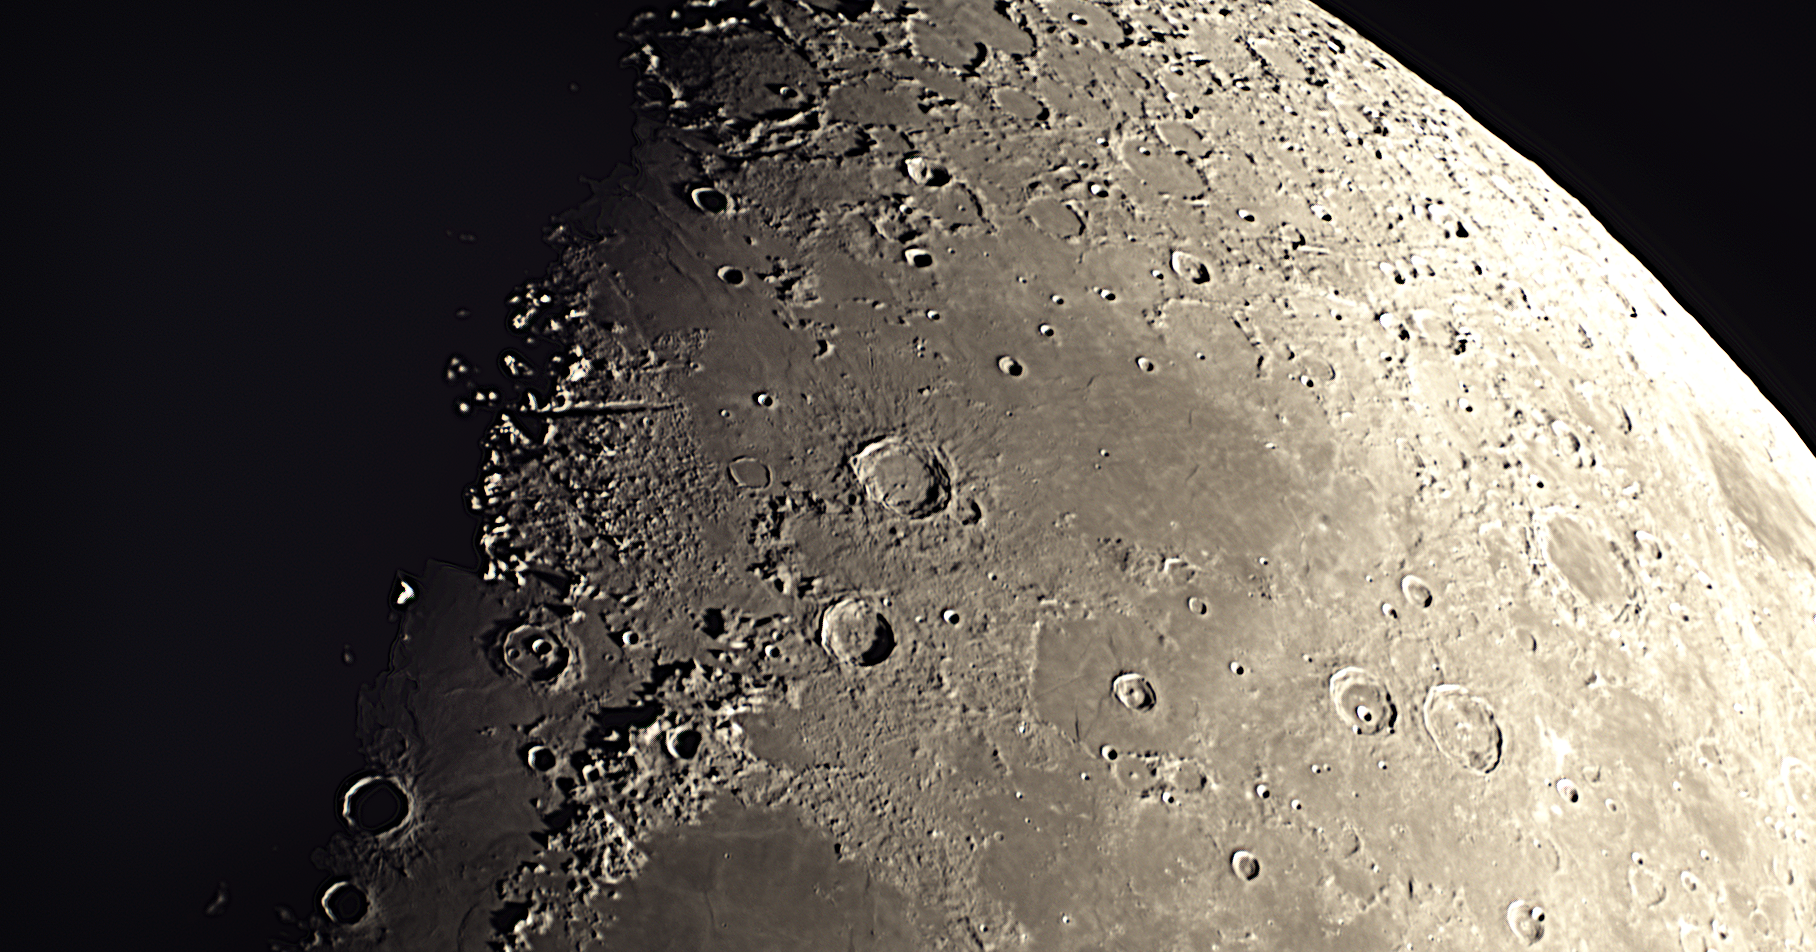
The following pictures were taken on 5 October with a 2X Barlow (not a good decision with quite a bad seeing). Processed with Autostakkert-Fitswork-GIMP. Final result is as usual, better than expected. To get HD image left click with mouse on "view image"
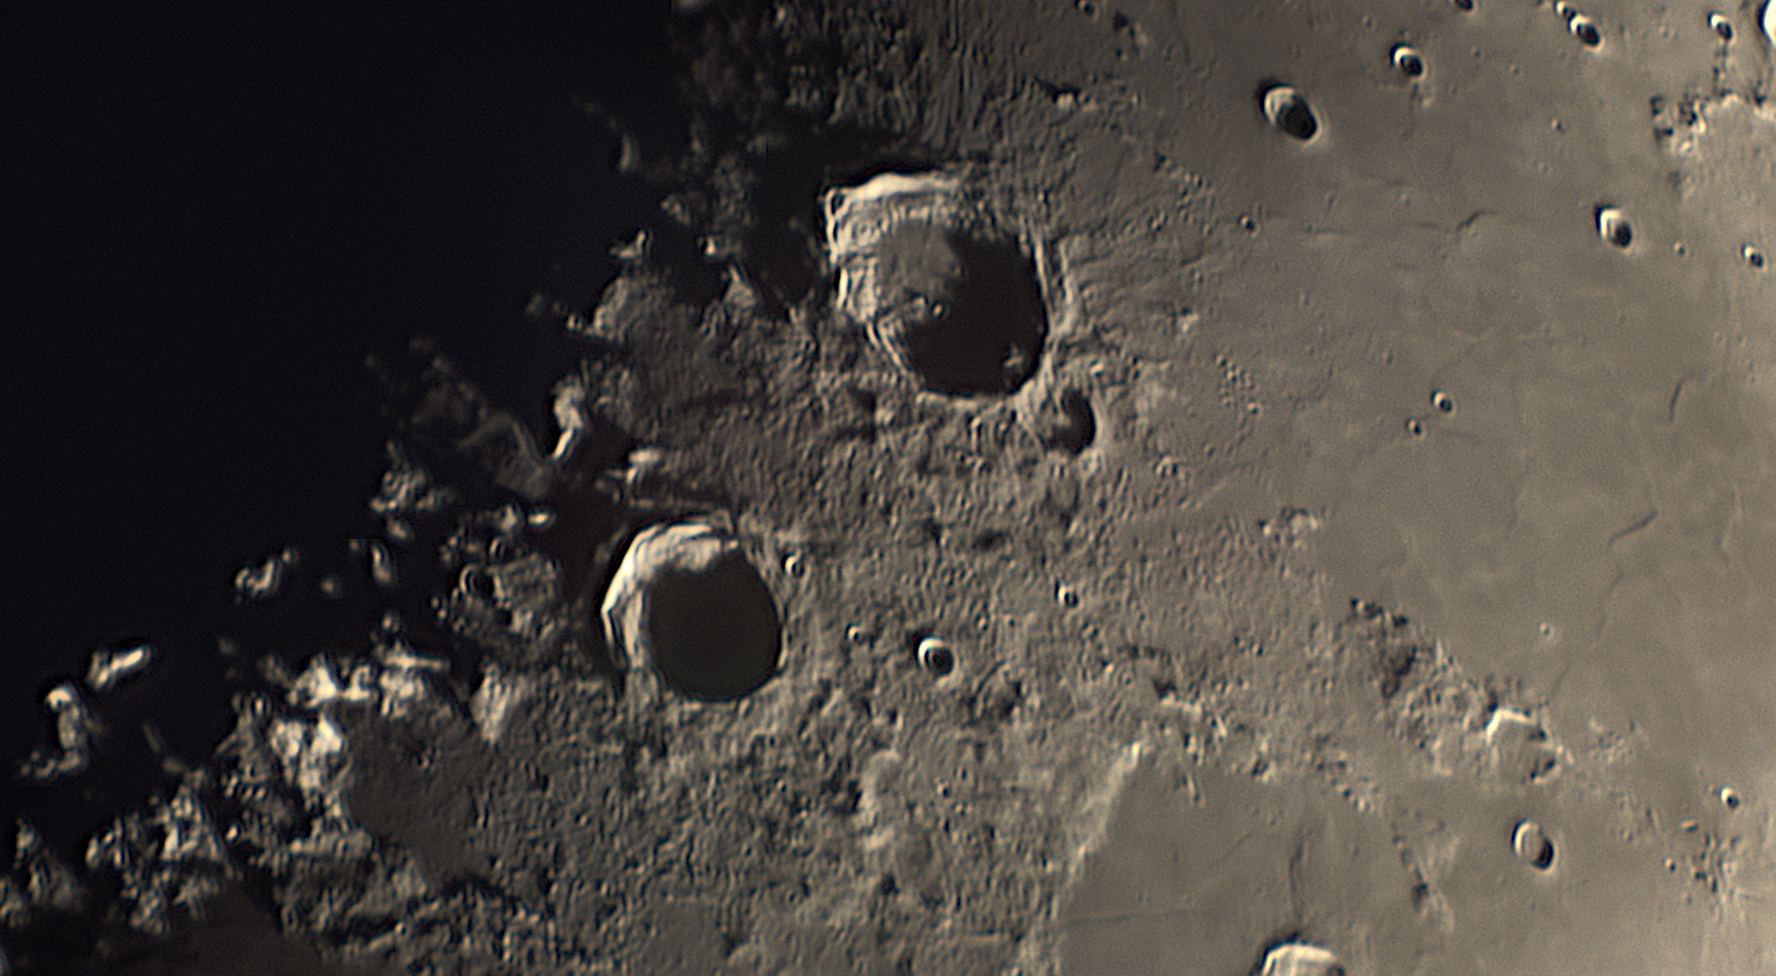
Tall Craters
Close inspection of this image reveals how tall and thin are the crater walls in the upper part. Some terraced structure is visible. From the outside the walls look very steep. This image shows fine 3D details of the craters, thanks to shadows. Notice that the upper inner side of the crater walls are highly reflecting, while the outer part is far darker. That difference is amazing. This is my first discovery! So enjoyable!

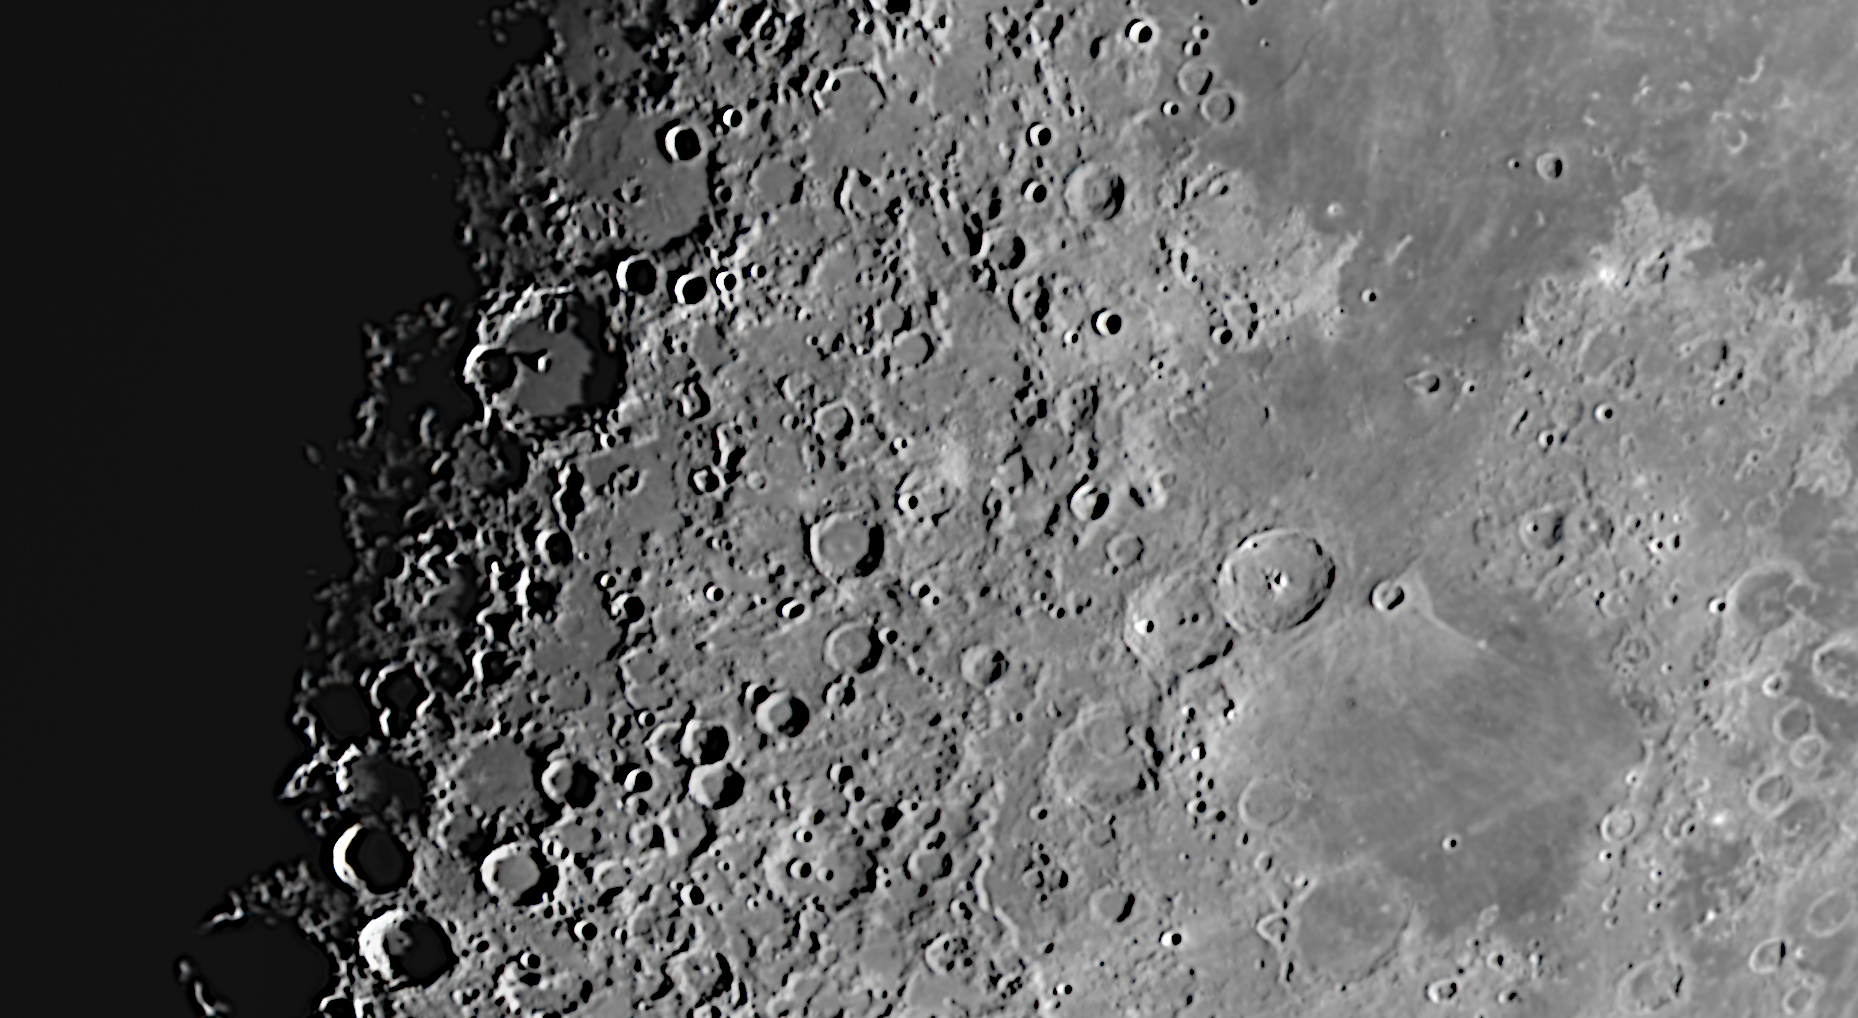
Mare Nectaris
Notice the craters on the left of the mare. Mountains in the central part of the craters have quite random shapes. Some are single mountains, some are a set of mountains. If you check the image in full resolution, you will notice so many small craters on the mare. The mare itself is far from being flat.

Funny central peak on crater
Please check the funny shadow of the biggest crater of the next image. Can we guess the shape of the central mountain? Incredible formation from an impact! We can see very well terraces on the walls of the craters. Notice the extremely long ridge that seems to originate on the west side of the crater.

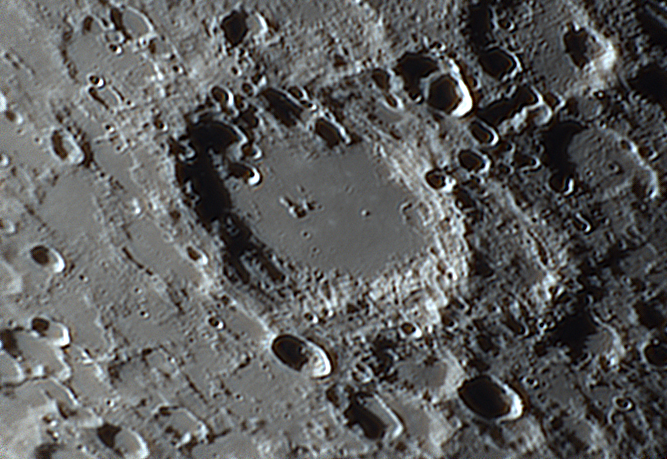
Craters on crater
It is not uncommon on the moon to find craters inside craters. A quite interesting example can be found in the following image. Even In the inner walls of the biggest crater of the image, impacts are clearly visible. Notice many craters lack central peak.
Tycho Crater
Please compare the shadows of craters around the Tycho crater. It seems Tycho crater is big but the walls are not very tall. Actually they look quite affected by other impacts on the west side.

The following pictures were taken on 21 and 22 November
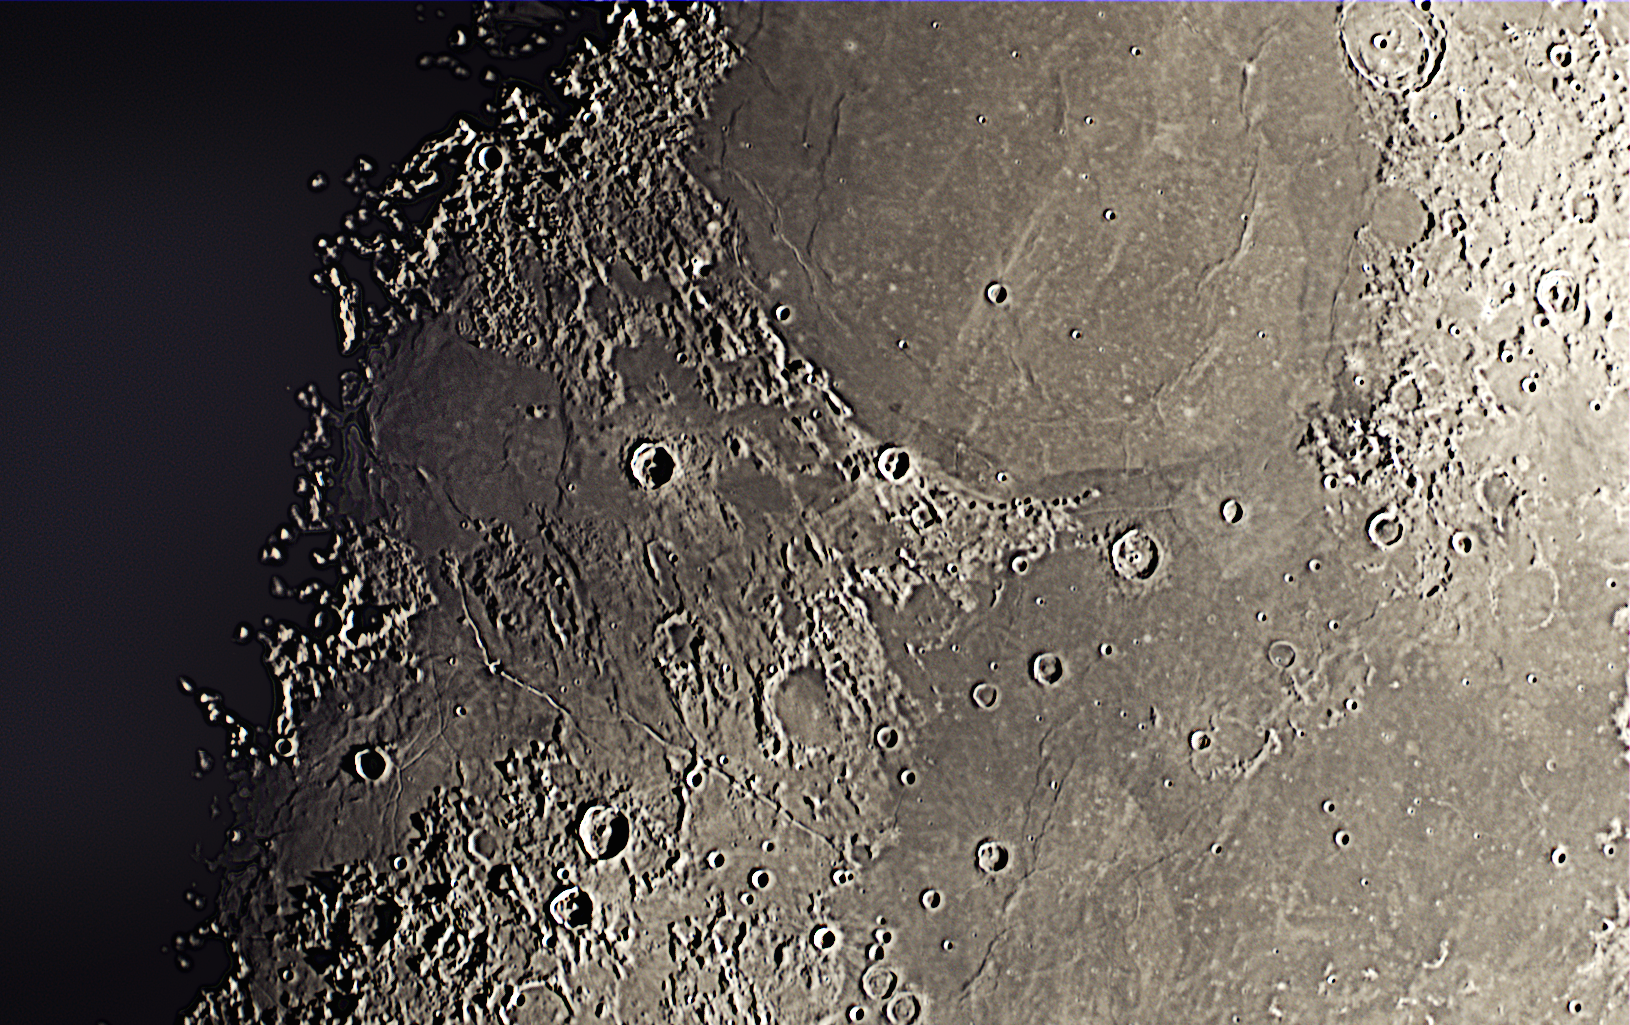
Mountains on the Moon
On the left side of Mare Serenitatis there are two ridges, on the north "Montes Caucasus", on the South "Montes Apenninus". Mountains look tall, narrow and very sharp. On Mare Serenitatis we can see six small craters in a row. There are so many grey spots, probably smaller craters.
Montes Apeninus, Rima Hyginus, Rima Ariadaeus
In the south of Montes Apeninus, we have Mare Vaporum, and things get very interesting. It looks like there has been some flow of a liquid, probably lava, from north to south.
Also, we can see "channels", actually called "Rilles". One of them has a tiny caldera, (of volcanic origin?) in the middle. It is called Rima Hyginus and branches to the northwest and to the east-southeast for a total length of 220 Km and a width of about 4Km, quite a valley!. Another huge rille is Rima Ariadaeus.
On the South of Montes Apeninus we have Sinus Medii, a small Mare. Its mountains on the north look so really steep and sharp. Some of them belog to craters. In the middle of Sinus Medii we have Crater Triesnecker, with a diameter of about 25Km. Its walls look so steep. And around it nothing is flat. We can see rilles and wrinkles...
Craters Teophilus, Cyrillus and Catharina
Catharina in the south is clearly the oldest, and Theophilus is the youngest. Cyrillus is next to Teophilus. The level of detail of this picture is really impressive. It looks like we are about to land in the area.
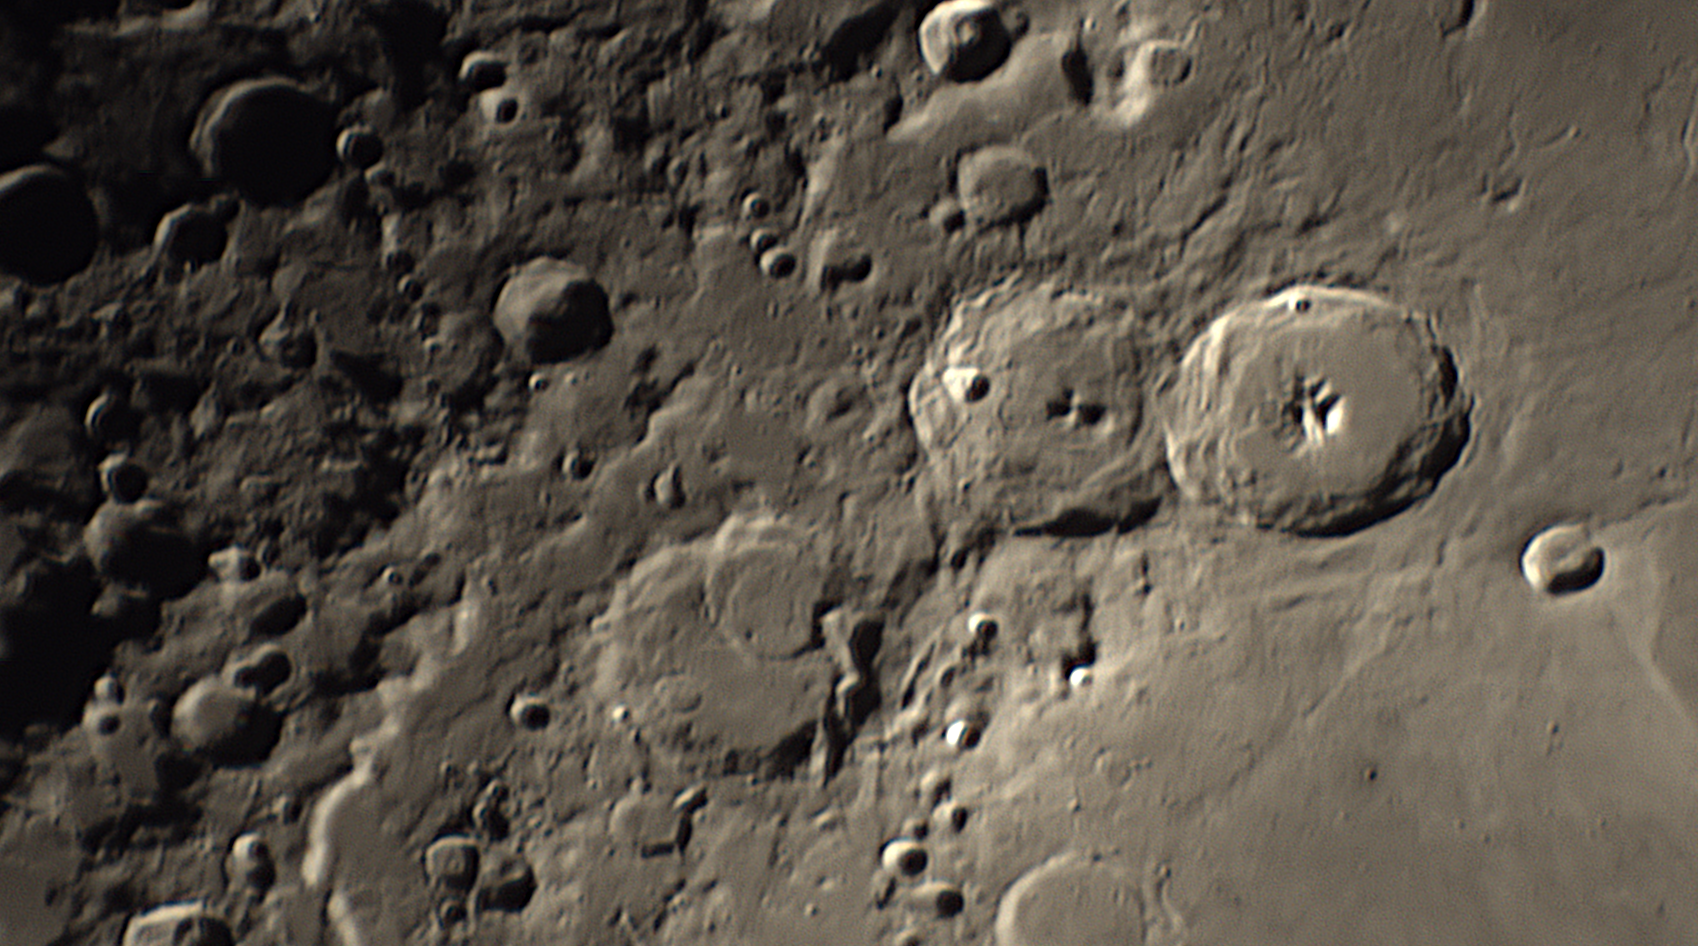
In the next picture we can see the location of the craters, between Sinus Asperitatis and Mare Nectaris
Montes Apeninus, Montes Caucasus, Montes Alpes, Vallis Alpes
From south to north: Montes Apeninus, Montes Caucasus and Montes Alpes. Bisecting Montes Alpes we can see a huge valley, called Vallis Alpes.
Another picture taken more in the north:
The biggest crater is called Aristoteles Crater and the one in its south is Eudoxus Crater. On the left of Eudoxus Crater, with two craters inside, is Cassini's Crater. Let's enjoy a closer look to Aristoteles Crater and Eudoxus crater:
2022
The Moon has colors.
The regions we call Mare are dark regions rich in iron oxide and titanium dioxide.If you look at the photo, Mare Serenitatis (top left) shows a dark reddish color, indicating the presence of iron oxide. Instead, Mare Tranquilitatis, just below Mare Serenitatis, is even darker and shows a bluish hue, indicating the presence not only of iron oxide, but also of titanium dioxide.
The photo was taken in the early hours of August 13, so the moon was very low and visibility was not very good (there was fog). I took the photo to try to see what can be obtained in those conditions and it didn't turn out too bad.

Lunar Landscapes: Mare Nubium
In the heart of Mare Nubium we find the Bullialdus Crater, in honor of Ismaël Bullialdus, a 17th-century French astronomer and mathematician. The crater is 61 km in diameter and 3.5 km deep. What an impact! Enjoy the detailed structure that the image offers. This crater is relatively isolated, which allows us to observe its structure very clearly. The interior walls are structured forming the typical terraces, ideal for sunbathing. The exterior part of the walls is in the shape of a ramp, and is dotted with a wide mantle of ejecta that has given rise to a radial pattern of crests and low valleys. In the central part there are several peaks that rise to more than a kilometer in height. Ideal for experienced climbers.
If you continue down the slope on the right hand side, near the edge of the image, you will come to "Straight Rupes", which appears as a prominent white line. In truth, it is a huge fault of 110 km in length and offers a drop that varies between 240-300 meters. Be careful, because the black line you will find before reaching "Rupes Straight" is a channel or fissure called "Rima Birt", and it is about 50km long and 1.5km wide. The depth is unknown to us, so be careful not to fall.

Lunar Landscapes: The Crater Copernicus
It is one of the main craters on the Moon. It receives its name in honor of the Polish astronomer Nicholas Copernicus. Located in the middle of Oceanus Procellarum, it is a relatively recent crater (less than a billion years old), so it has remained relatively intact since it was formed. Its diameter measures 93 km. The crater floor is at a depth of 3.8 km. The pointed mountains that rise from the center of the crater have a height of 800 meters.
To the north of Copernicus are the Montes Carpatus, which lie at the southern end of the Mare Imbrium. This mountain range has a length of about 360 km and an average width of 60 km, with several summits of 2,400 m in altitude. They constitute part of the old wall of the crater that originated the Mare Imbrium. West of Copernicus is a group of scattered lunar hills. In the northeast we see the Tycho crater and the "Mons Wolf" mountains, which constitute the southwestern end of the Montes Apenninus.

Lunar Landscapes: The Rainbow Bay (Sinus Iridum)
If you are thinking of going on vacation to the Moon, you will not find a better destination. Sinus Iridum, the Rainbow Bay, will surprise you with the beauty of its coastline and the imposing mountains that surround it. The calm waters of the bay belong to the Mare Imbrium.
The capes "Promontorium Heraclides", to the east, and "Promontorium Laplace" to the west, limit the bay with their imposing peaks, 1,700 and 2,500 meters high respectively. The Jura Mountains surround the bay, forming a 400 km long mountain range with peaks exceeding 6,000 meters in height, which guarantees that you can enjoy endless walks in the light of the Earth. And as if that were not enough, in the aforementioned mountain range, you will find the Bianchini crater, with 40 km in diameter and a depth of 3000 meters.Go ahead and remember to make your reservations well in advance.

How fun it is to get the colors out of the Moon to see the mineral content, especially iron (red) and titanium (blue). Of the three that I have shown today, the most spectacular image is that of Sinus Iridum. So I show it reprocessed to show the splendid color of the seas and mountains.

Lunar Craters: Longomontanus
Longomontanus is an ancient crater located far to the south, southwest of Tycho. It receives this name in honor of Christen Sørensen Longomontanus, a contemporary Danish astronomer of Keppler. Due to perspective, Longomontanus appears to be oval in shape. It has a diameter of 145 km and a depth of 4.5 km. The crater walls are heavily weathered and at the top are nearly level with the surrounding terrain. The north side is affected by multiple overlapping craters. To the east is a semicircular ridge that has the appearance of the rim of another, older crater. Inside the crater we find a group of short peaks quite displaced to the west.
The Moon: Harbinger Mountains. Sometimes I go for a walk with my little Maksutov to explore the lunar terminator, and I find surprises like this: a group of isolated mountains called "Harbinger Mountains", located on the western edge of the Mare Imbrium. It is immediately striking to see those long shadows and the curious distribution of the main mountains and those small peaks placed two by two. How nice it would be to be able to land there and be able to take a good walk. Image taken on September 7 with the Moon at about 20º above the horizon.

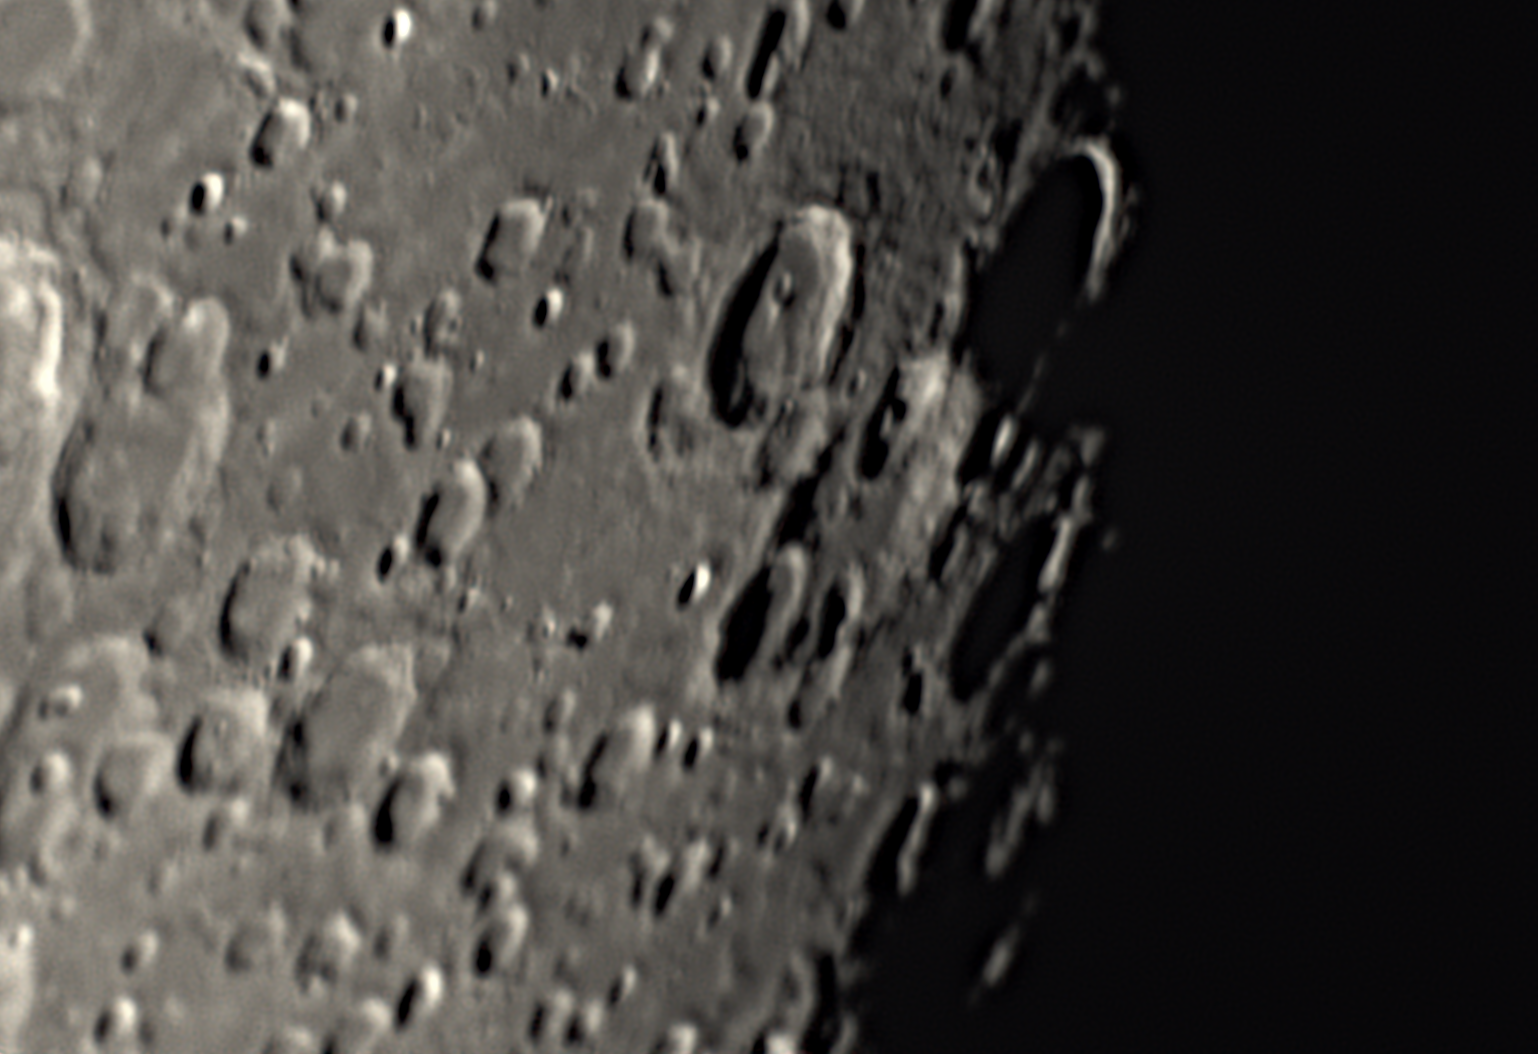
Lunar terminator: Gassendi crater. The Gassendi crater is located on the northern rim of the Mare Humorum. It measures about 110km in diameter. The crater wall varies in height from as little as 200 meters to a maximum of around 2.5 kilometers. In the central region several peaks are observed and the highest is approximately 1.2 km high. The crater was flooded with lava during the formation of the Mare Humorum, so the floor is covered with solidified lava. There are several mounds scattered throughout the interior, and in the southern part of the floor a concentric ridge with the outer edge is clearly visible. This ridge is not particularly high or steep, but there are some peaks that rise more than a kilometer above the deepest part of the ground. A very notable feature of the interior of Gassendi is the presence of numerous long and narrow depressions (rima) as channels. The main ones can be seen in the photo.

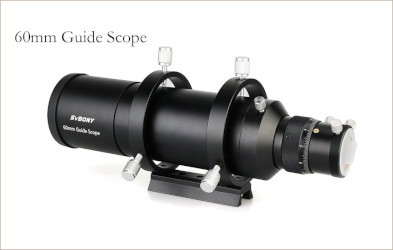
Am I crazy? No! I am not even the first one. If you own a planetary camera with a small sensor, you need a telescope with a small focal length to take pictures of big objects like galaxies and nebulae. A telescope finder is small telescope with a short focal length. Then, we can use it to take pictures of big objects, like Orion Nebula, for instance.
This means we need to buy a new finder, but do not worry, just 51 euro in Aliexpress (near to 90 euro in Amazon!). My choice: SVBony achromatic finder SV106, with 60mm aperture and 240mm focal length. It is impossible to get a higher price quality relationship with this instrument.
Let's see what limits we have with a such a small aperture and focal length. First thing we worry is about resolution. How good are the images in the focal plane?
Let's make some calculations. The diffraction pattern of a circular aperture of 60mm diameter at the focal plane, 240mm from the aperture, has a size of 1.22 x focal_length x Wavelength / Diameter. This is about 1.22 x 240mm X 550e-6 mm / 60mm = 2.7 um. That's a fantastic number! Separation of pixels in the camera is 2.9 um. Usually the REAL diffraction pattern will be bigger, at least two times bigger. But this just means we are going to get a perfect sampling of the image and we are going to take full advantage of the maximum resolution of the instrument. Just fine! Incredible!
Taking into account that the size of the sensor is 5.640mm x 3.181mm, the field of view is going to be: 1º 21' x 46'. Enough to take some really nice pictures of the Universe.
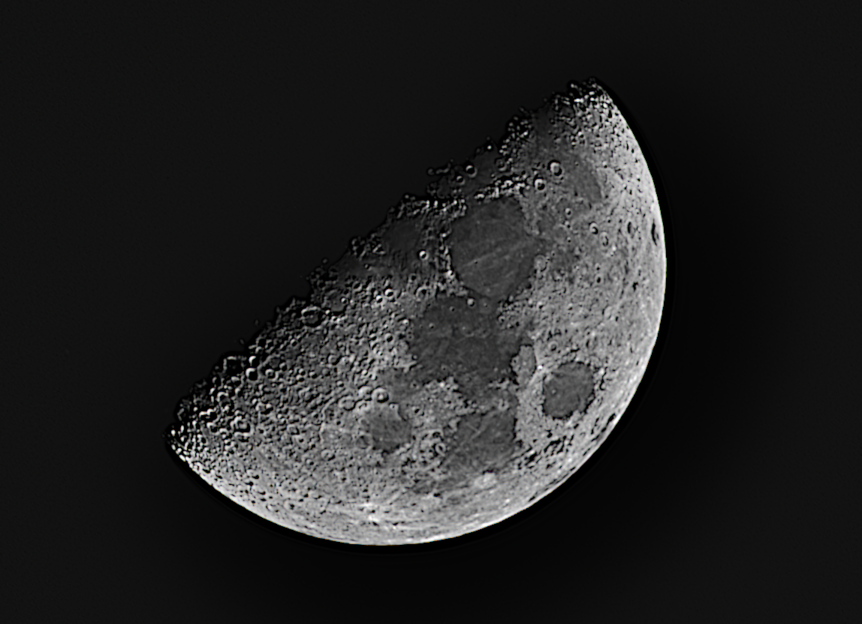
Let's get started with the following picture of the moon after processing with Autostakkert and GIMP, to show this is an instrument we can work with:
Some people, using cheap eyepieces complain about chromatic aberration (also people trying to sell more expensive stuff). But you must take into account that in this instrument, the ratio between the focal length and diameter is pretty big = 4. Usually we say this is and F4 instrument. Then, unless you are using very high quality eyepieces, you are going to enjoy a huge chromatic aberration generated mostly in the eyepieces.
The SV106 works with an achromatic doublet, and the focal length is quite short. This means that chromatic aberration will still be there, and it will be noticeable if we use our super planetary camera. Our camera has a very small detector, so we will see no coma, no field curvature. Some spherical aberration may affect us. That said, the resulting images will still be very enjoyable with plenty of detail. It is very fun to push an instrument like this to the limits and the get the very best of it. I can tell you something: please check the first pictures ever taken of Orion Nebula. With our little telescope we are going to get better results than most astronomers in the past.
There are much better finders, Sky-watcher offers apochromatic finders with 50mm aperture with a cost of 200 euros or more. It is my belief that at an amateur entry level we need no better than SVBony to start taking pictures of objects like galaxies and nebula. You should check the instruments used in the past to make important discoveries in Astronomy. So let's fully enjoy the SVBony 106 and let's get the best from it.
To stack deep space images with Autostakkert can be a problem because we take frames every several seconds, which means the objects move in the sky and rotate. For instance taking pictures of Orion Nebula every 12s... after 100 images Orion has rotated quite a lot, and Autostakkert does not include derotation.
There is a wonderful, simple and intuitive, and also free program called DeepSkyStaker, or DSS, that includes derotation by automatically determining the position of the stars. Then, analyzing a lot of images and selecting the better ones (75-50%), and finally stacking them, it is possible to get images with good SNR and impressive details. I am ready now to get the best possible images with my setup.
Orion Nebula
Orion Nebula is a nice target to start with. It is easy to locate and it's quite bright. Let's see some nice pictures.
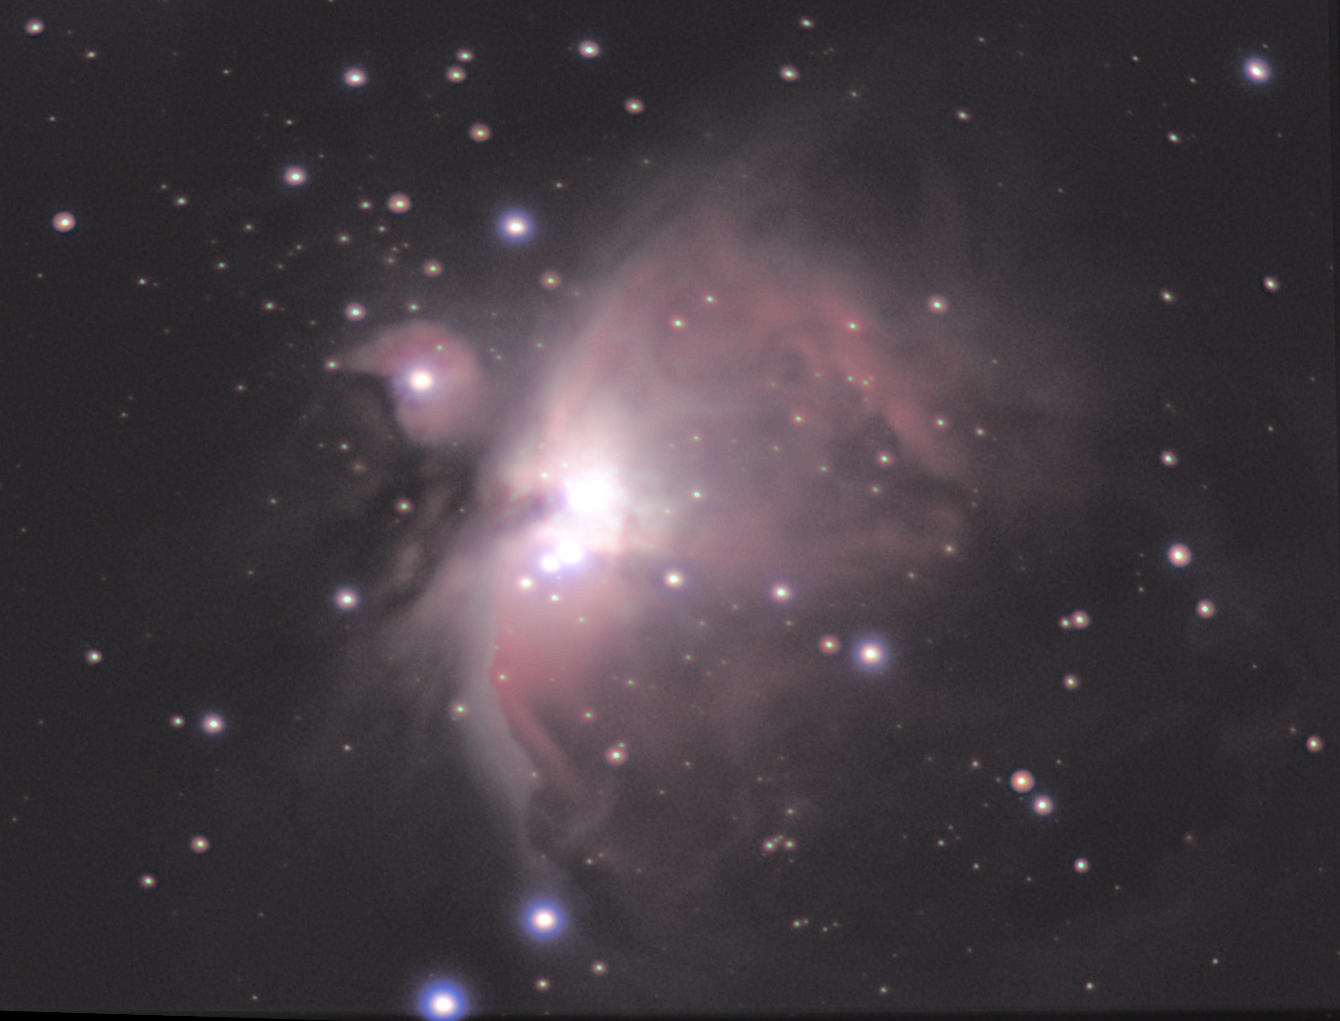
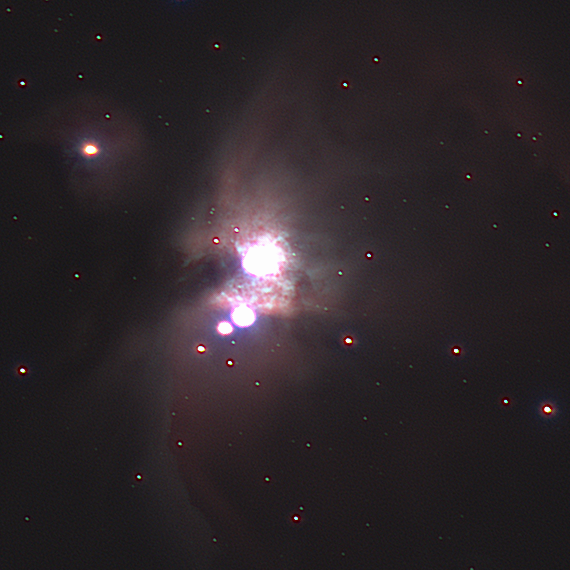
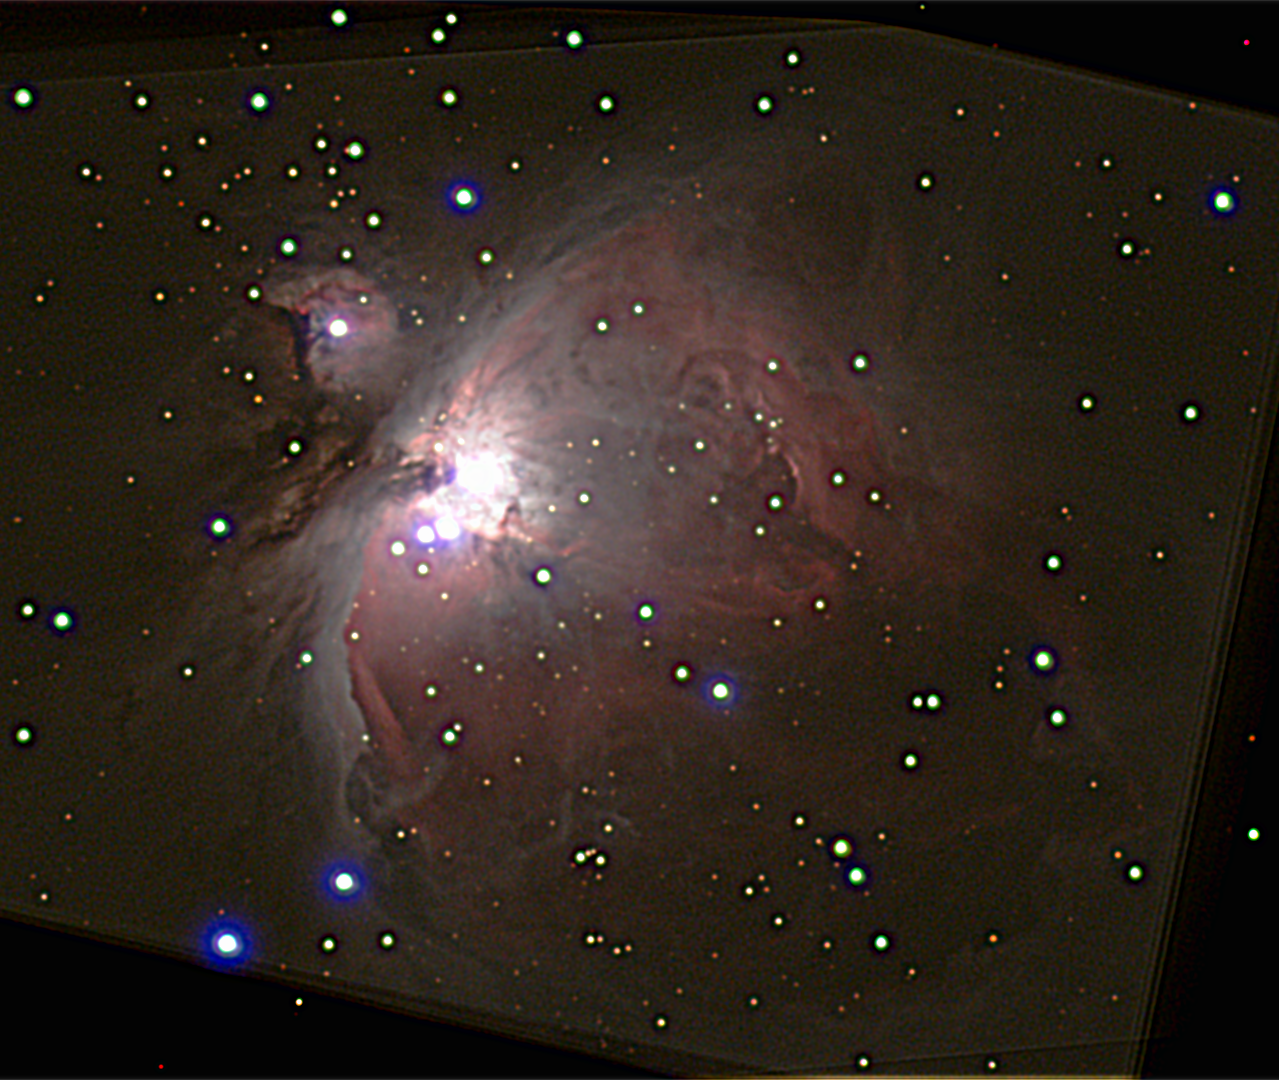
On November 21th there was some nice sky, and I could take my first picture ever of a Deep Space object. I had some problems, because the finder is a bit heavy and the position of the finder, attached to the Maksutov telescope, is not optimum for stability, and there was some motion, so stars look a bit distorted. Next time I will remove the Maksutov and use the telescope mount directly to hold the finder. But to do that we need a dovetail plate wider than the stock one. It is only 8 euro and it will take a time to arrive. Also, Orion was not so high from the horizon... Anyway, 5 seconds exposure per image (with some gain applied) and then stacking with Deep Space Stacker (DSS) and processing with Registax and GIMP, we can get images like the following ones. They come from the same set of 363 images, just the processing is different. Left click on the images, go to "view images" to get full resolution images.
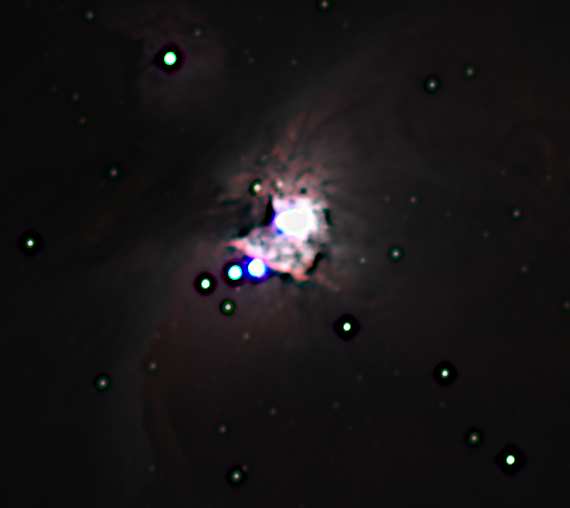
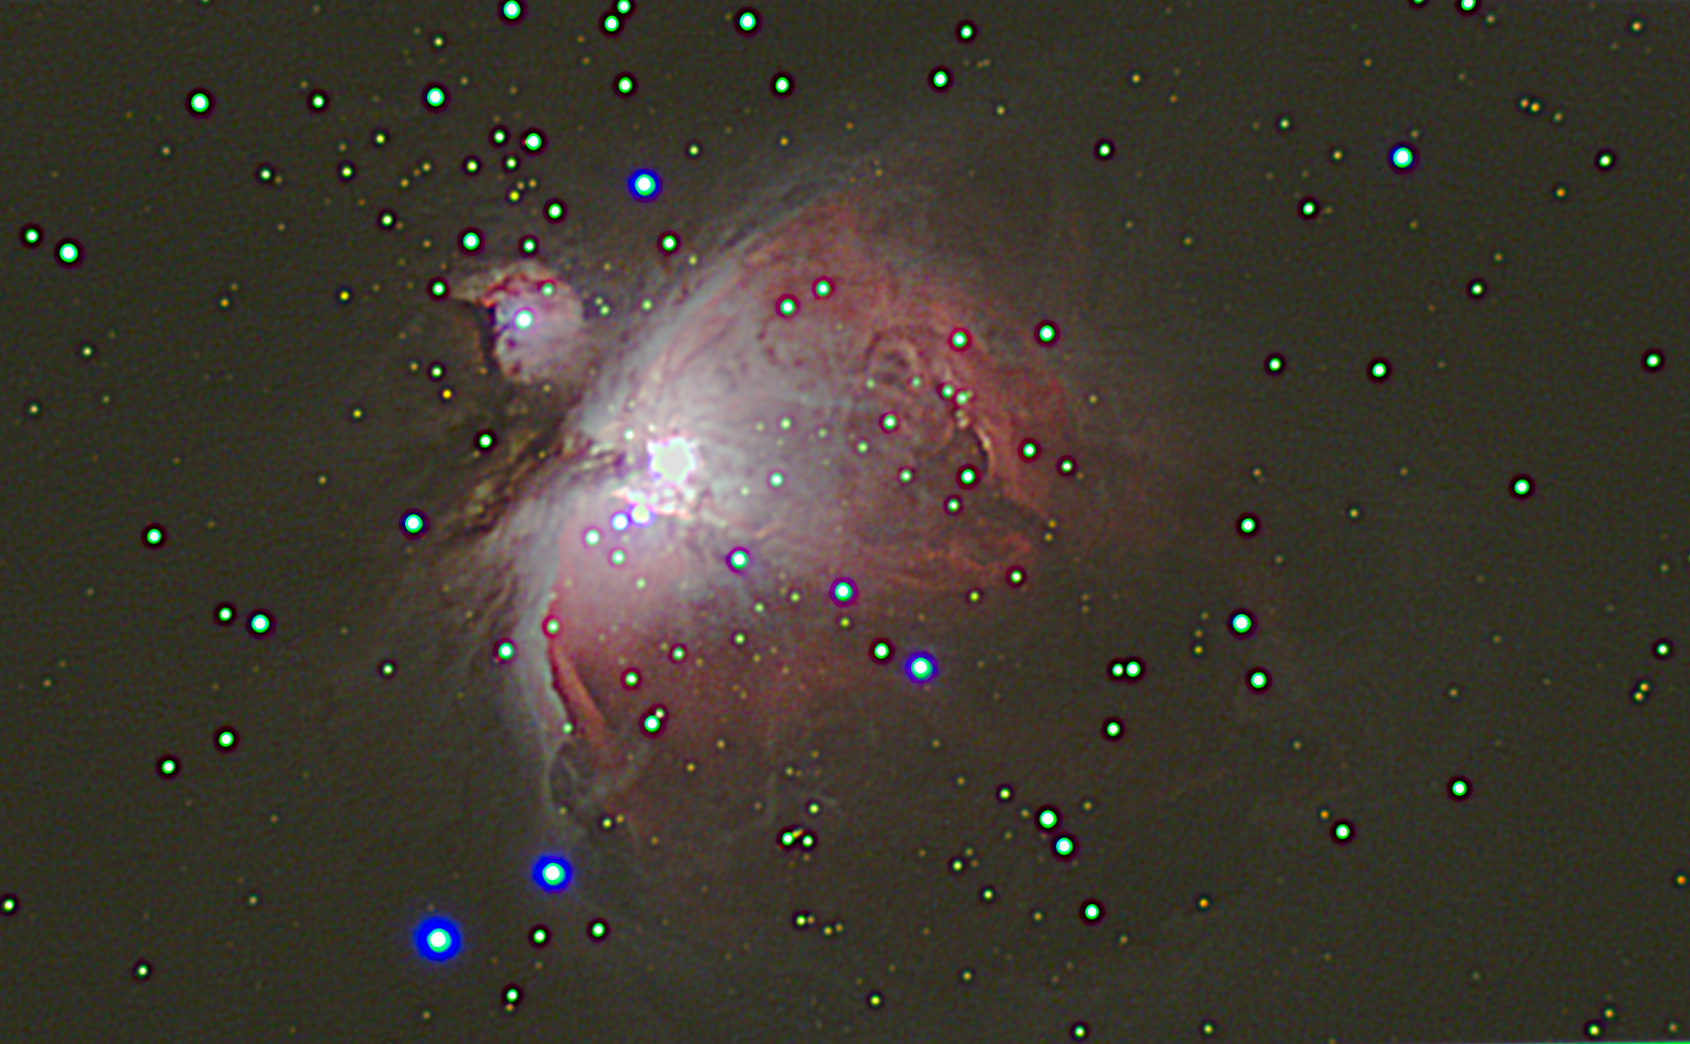
The first one offers a first overview of Orion Nebula. Processing was mainly made playing with luminance curve in DSS and a little enhancement with GIMP:
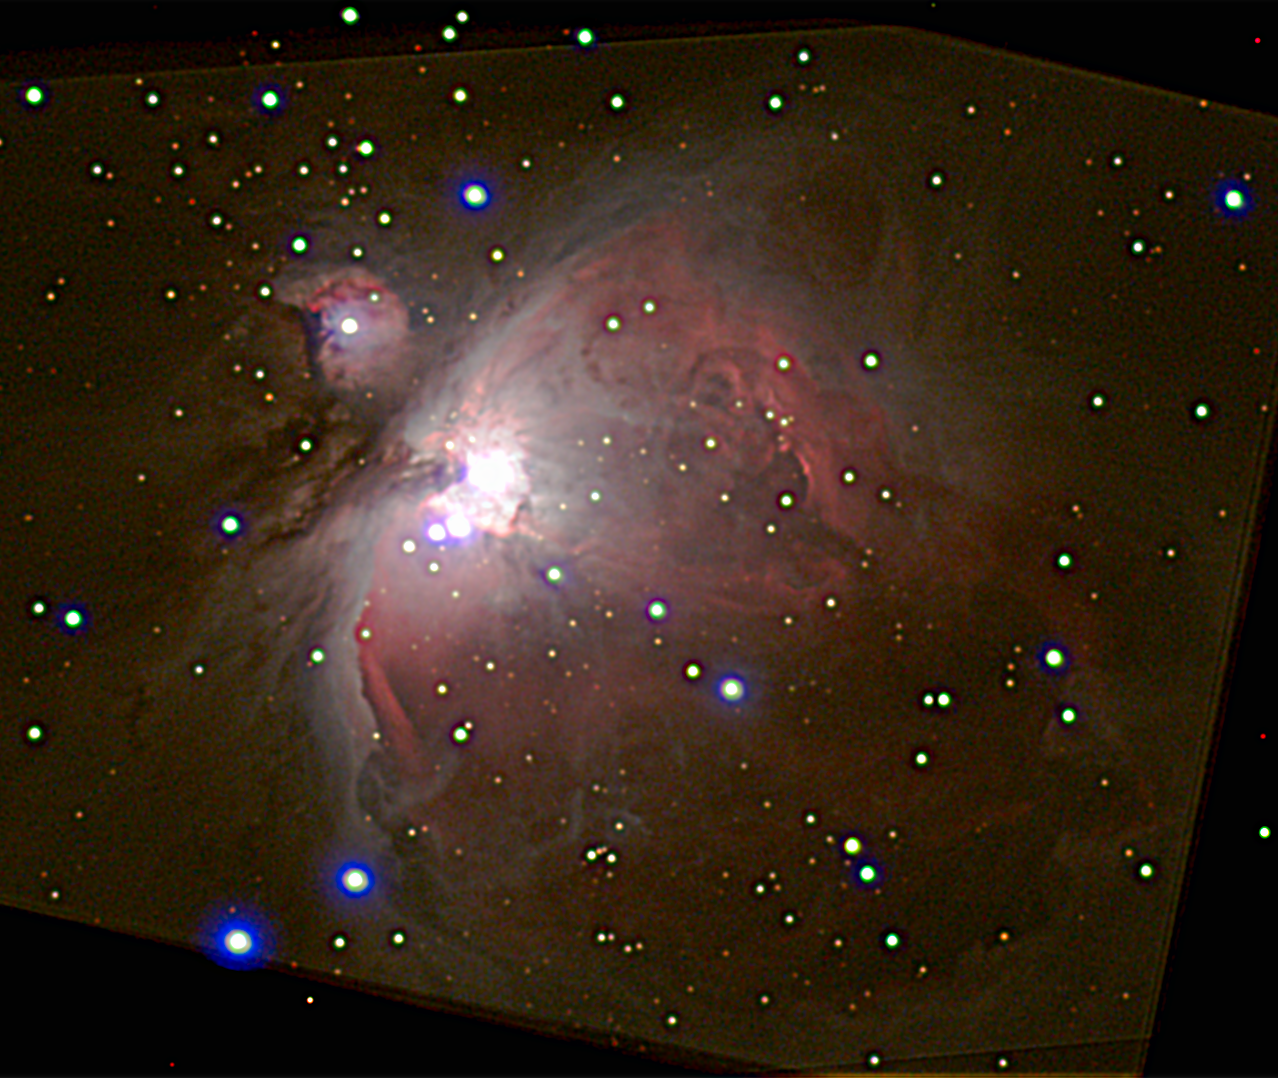
The next one offers a level of detail far better that I could dream with an achromat, 6 cm aperture telescope:
Finally, we want to see the Nebula's core:
If we analyze the RGB components of each image, we realize that the Green component is well focused, but the Red and Blue are not. This is because the residual chromatic aberration still present in any achromatic doublet. In some other images, the opposite will happen, we shall have the red and blue better focused than the green. This is a limiting factor we shall try to overcome a bit later on.
Taking into account that it was the first time, I feel fully satisfied.
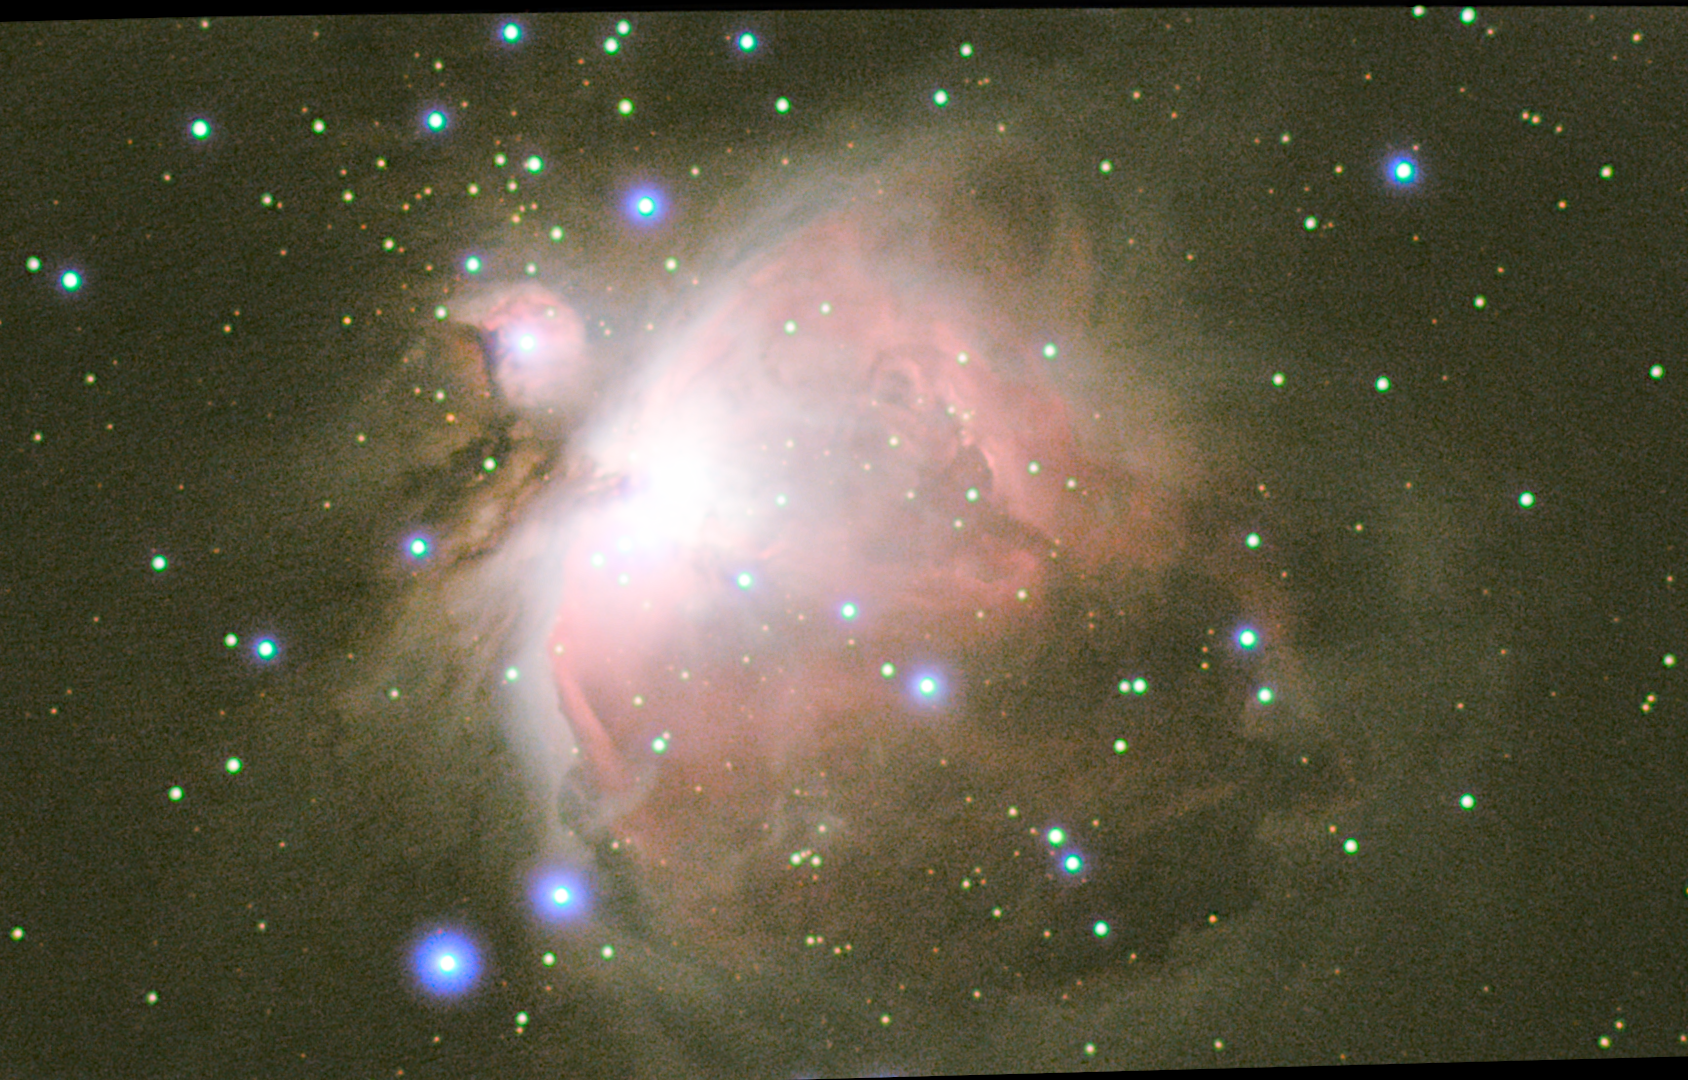
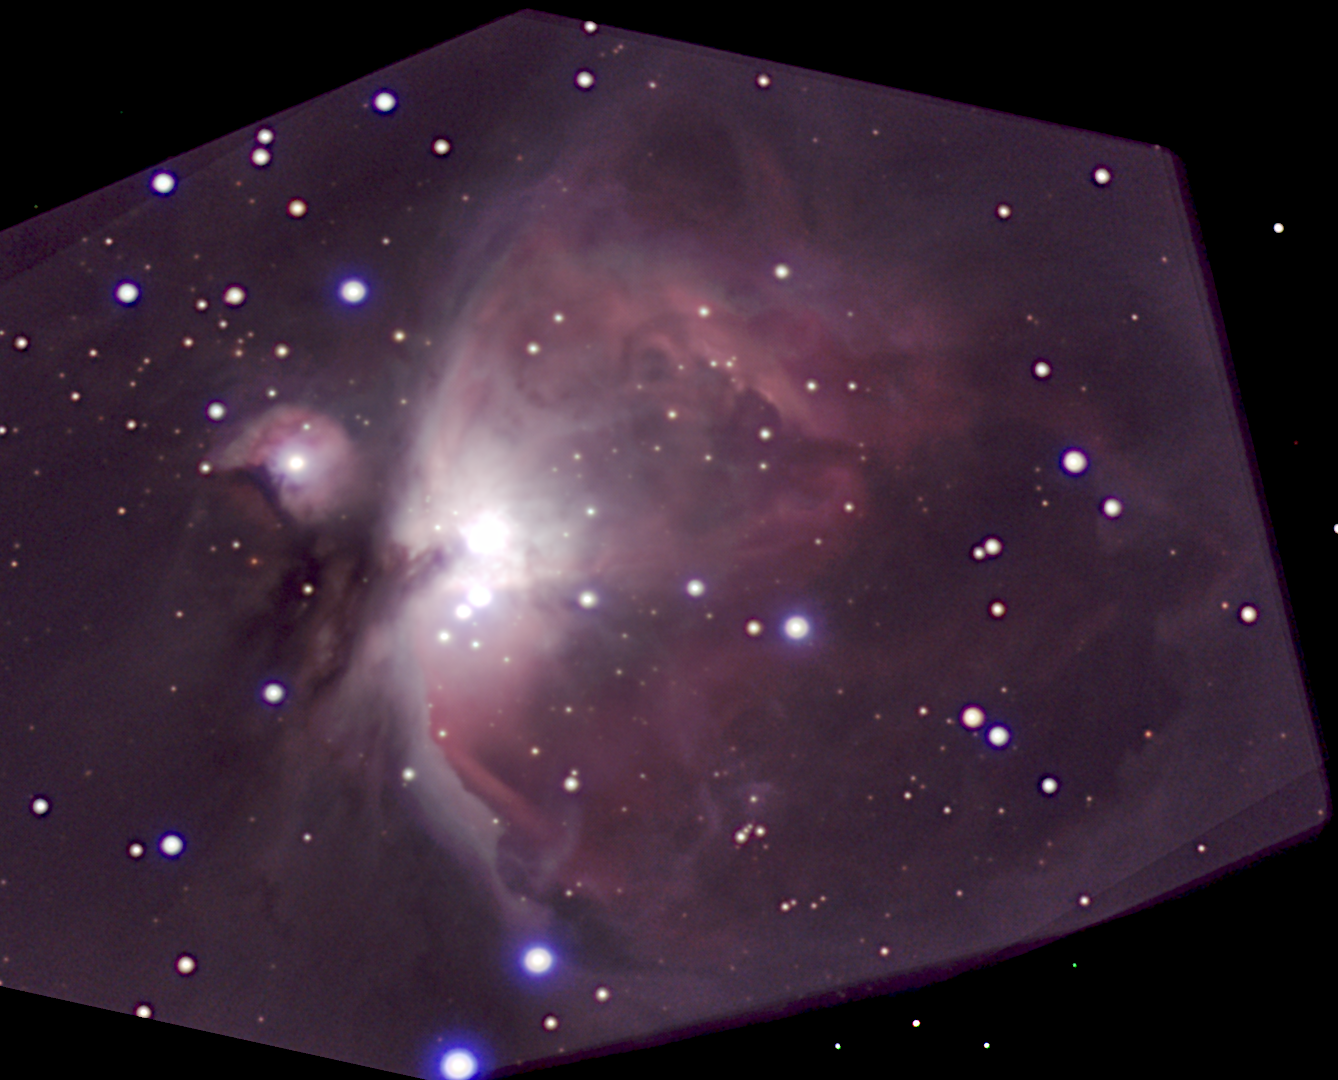
Well, weather in Autumn it's not so good, but finally there was a happy, very cold and very humit night and I took my best pictures of Orion Nebula. I got a bigger dovetail plate so I attached the SV106 directly to the telescope mount and the results are quite better. Also, Orion got higher in the sky now, so results are very much improved. I got a cold taking the following pictures... I took series of 100 images in different settings.
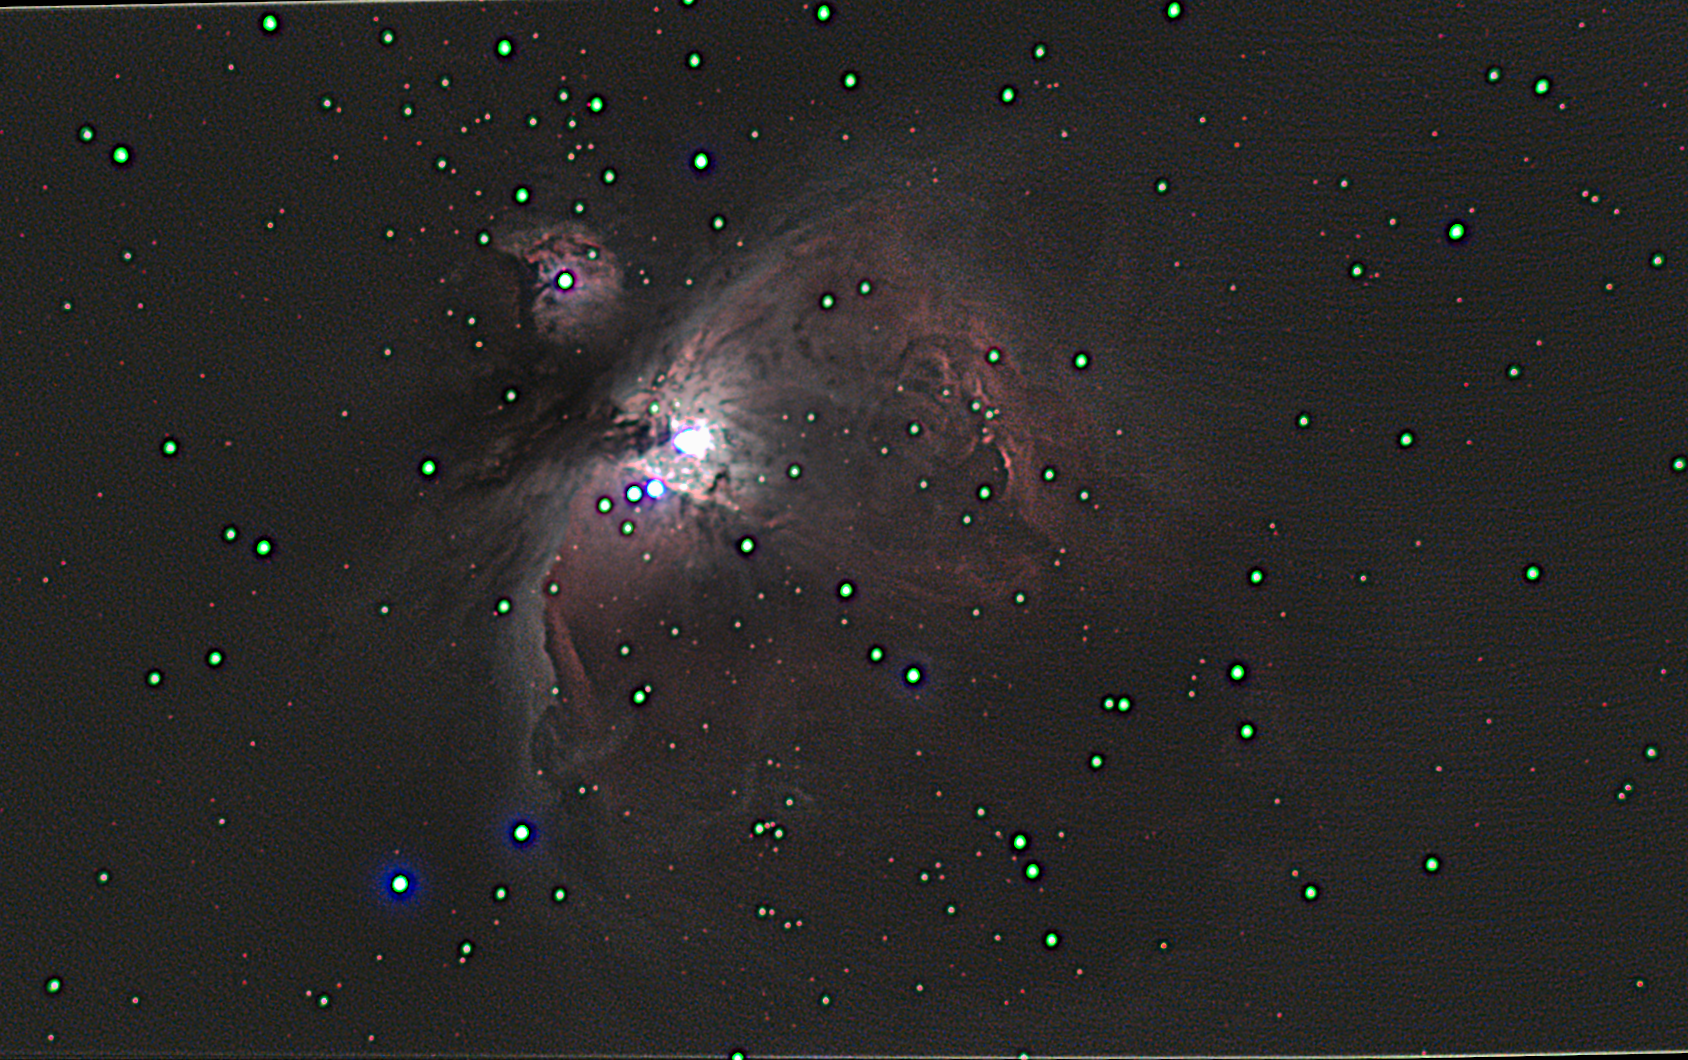
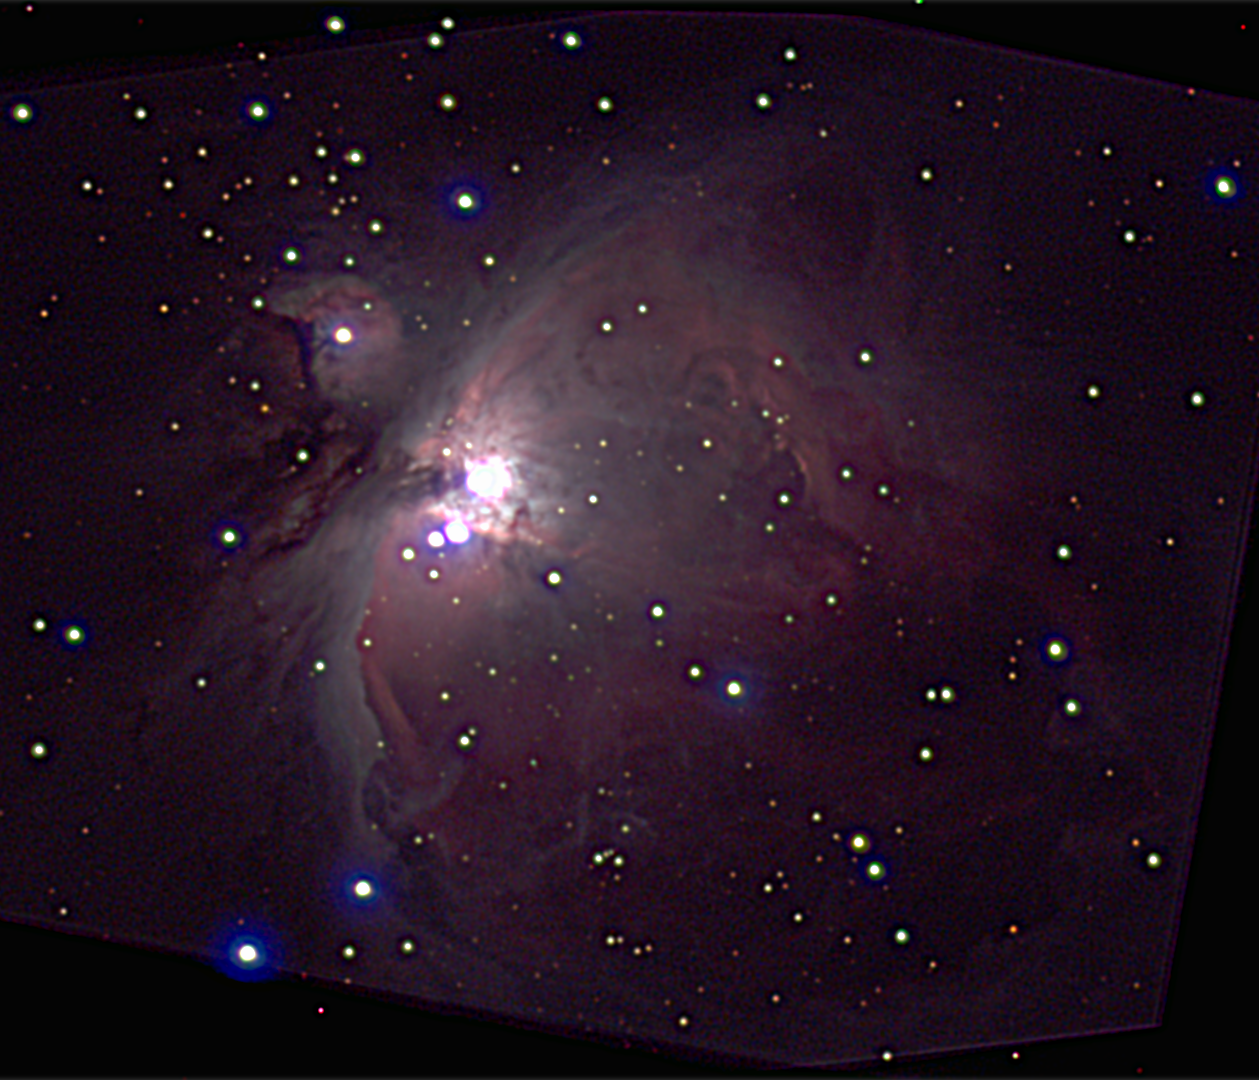
First we try to get images showing the maximum extension of Orion Nebula. This is a challenge because low values are usually noisy, and they become ugly when trying to enhance the image. Anyway, please enjoy three different images.
The first image from video, 5 seconds exposure, with quite a lot of gain, trying to show brightest and darker regions at the same time.
The second image from a series of images, 12 seconds exposure, gain at level 12. Nebula's core becomes overexposed, but it is the price to pay to get better images of the darkest parts of the Nebula.
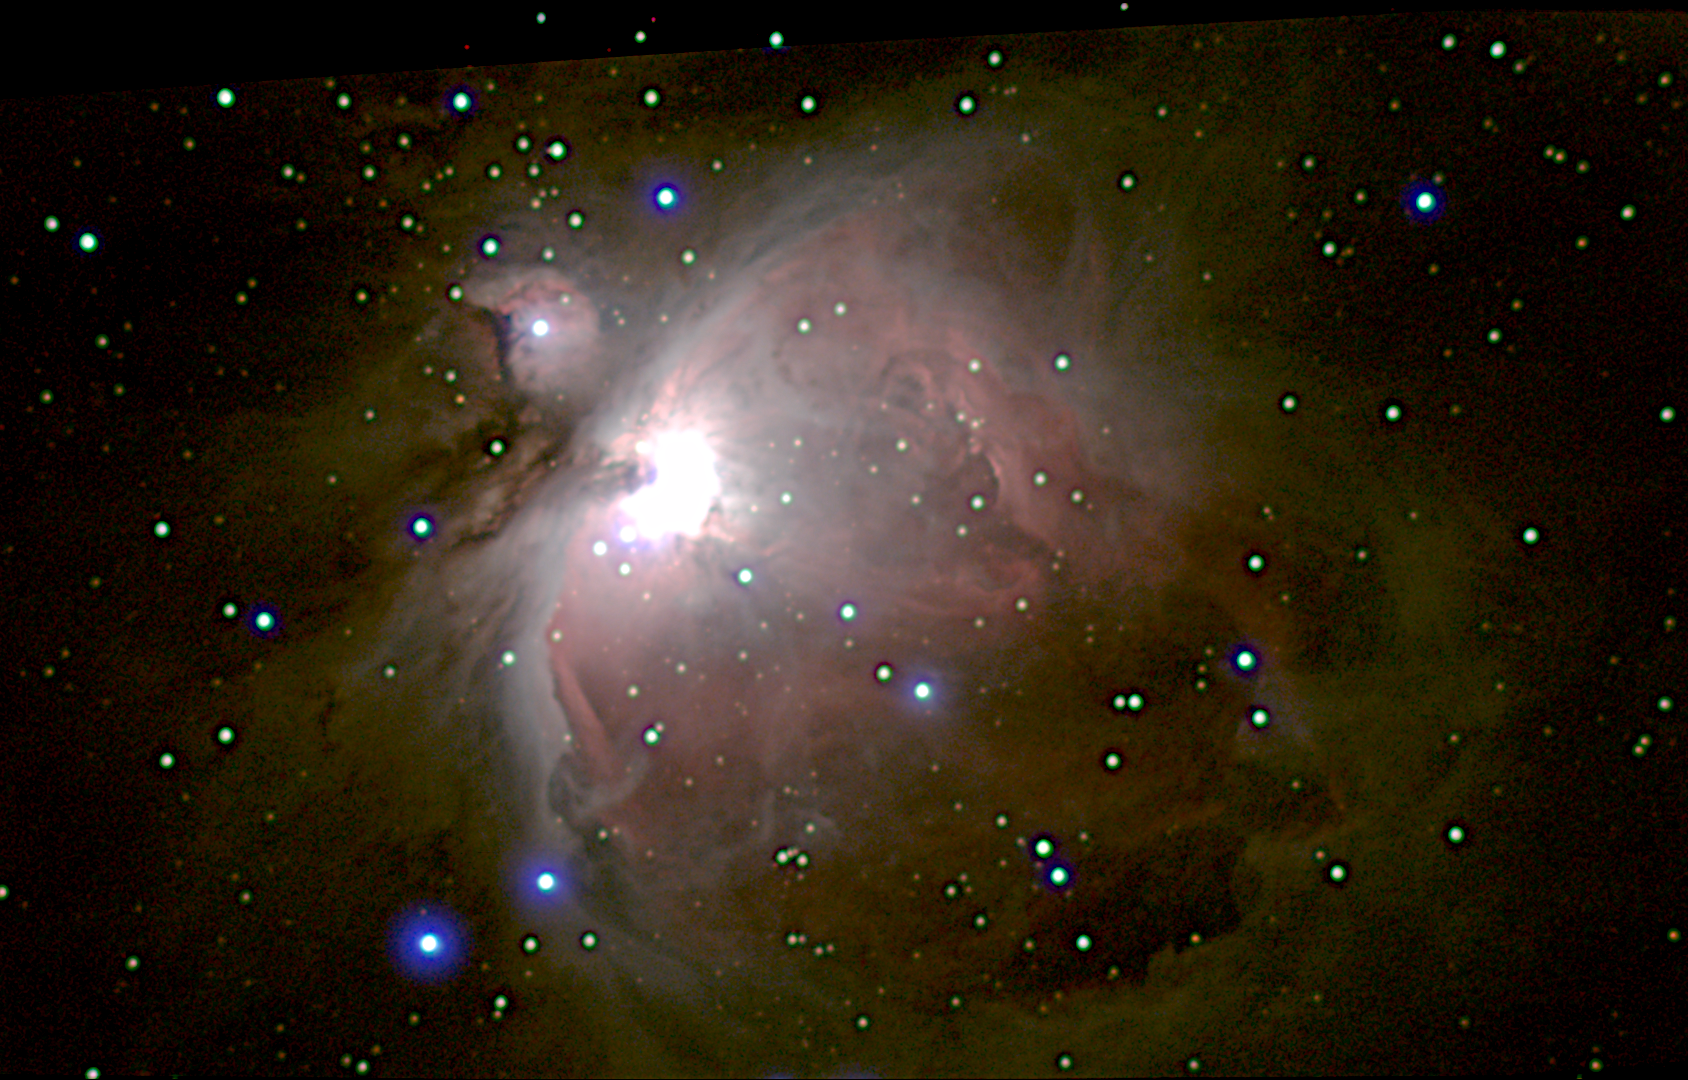
Stacking 5 seconds frames with 12 seconds frames we get this overall wonderful image clearly showing filaments of gas far from the core.
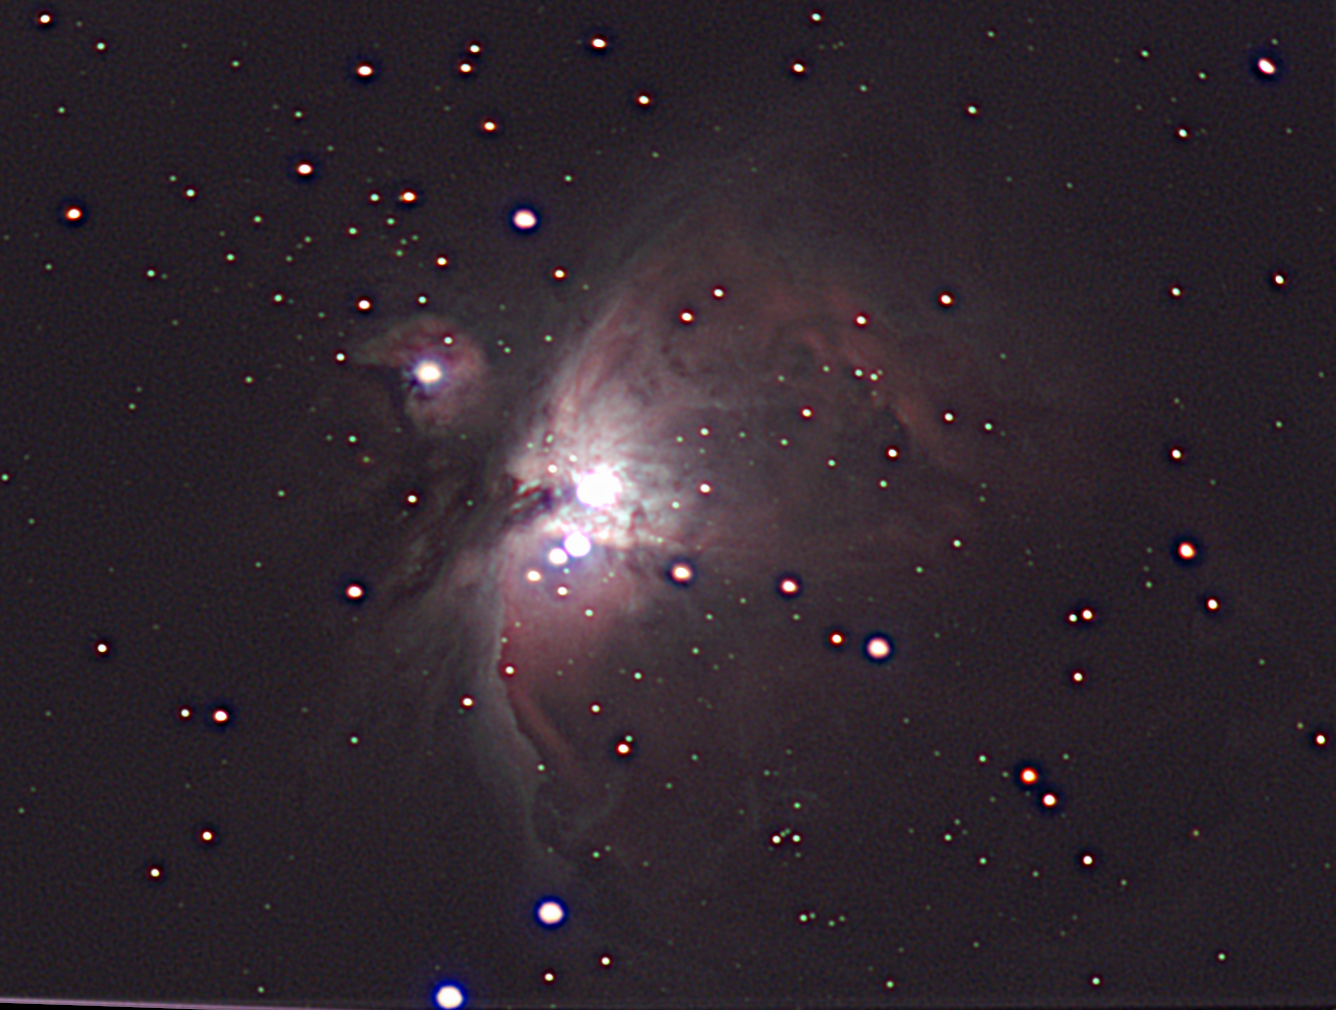
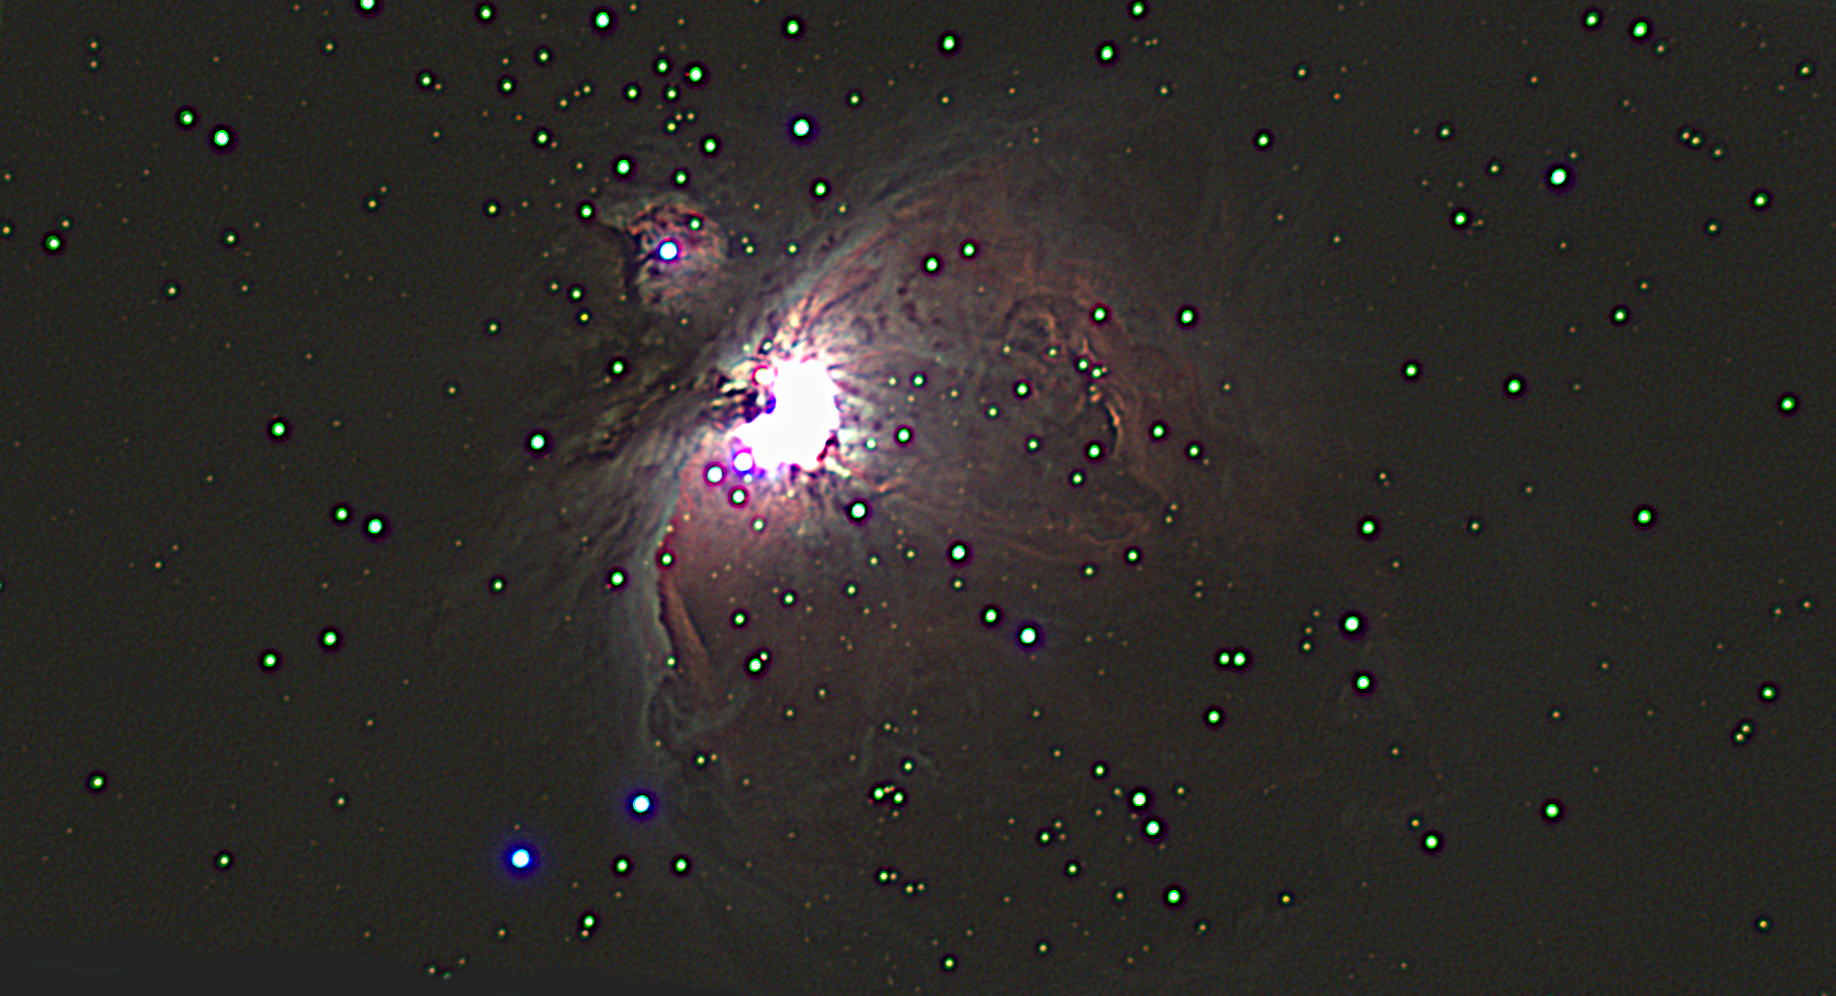
Let's pay attention now to Nebula's core. A video with 5 seconds exposure and low gain was taken to that purpose. We show two images.
The first image comes from video, 5 seconds exposure per frame, with low gain. Only small changes in gamma so we can see only the core with detail.
The second image comes from the first one, after extensive processing and enhancement. The noise distribution is beautiful. I do not know why it become like that. It seems there was some sand over the image and some one dragged a comb.
Two images with high level of detail follow. From this point of view, those two images are probably the best I was able to get.
The first image from movie, with higher gain, after deep processing. Level of detail is so incredible.
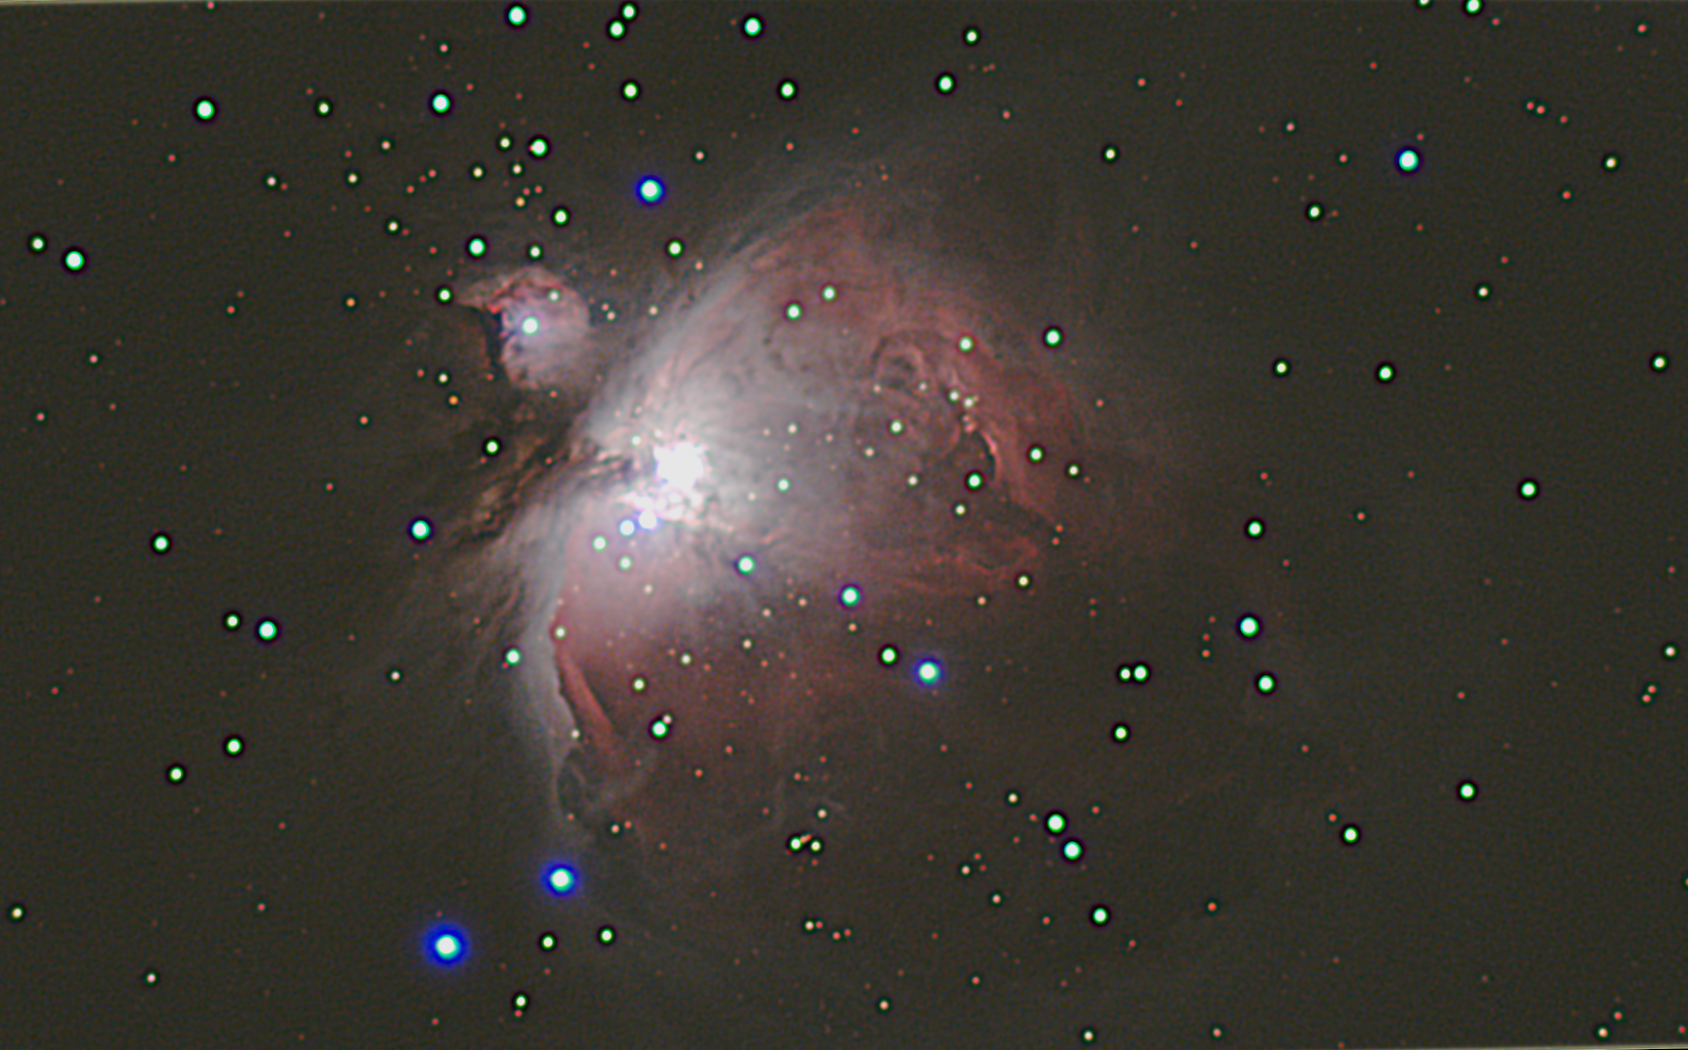
The second image from 12 seconds exposure per frame, with gain at 12, with the core overexposed. This image show the best details, tiny filaments of gas are visible. Unbelievable.
Watching the stars in the image, you can see its spectral content, thanks to chromatic aberration. Taking into account that we are working with RGB images, it can be a good idea to decompose the images and analyze them. Before doing that, let's check which is the spectral content of each component. Please check the following graphic:
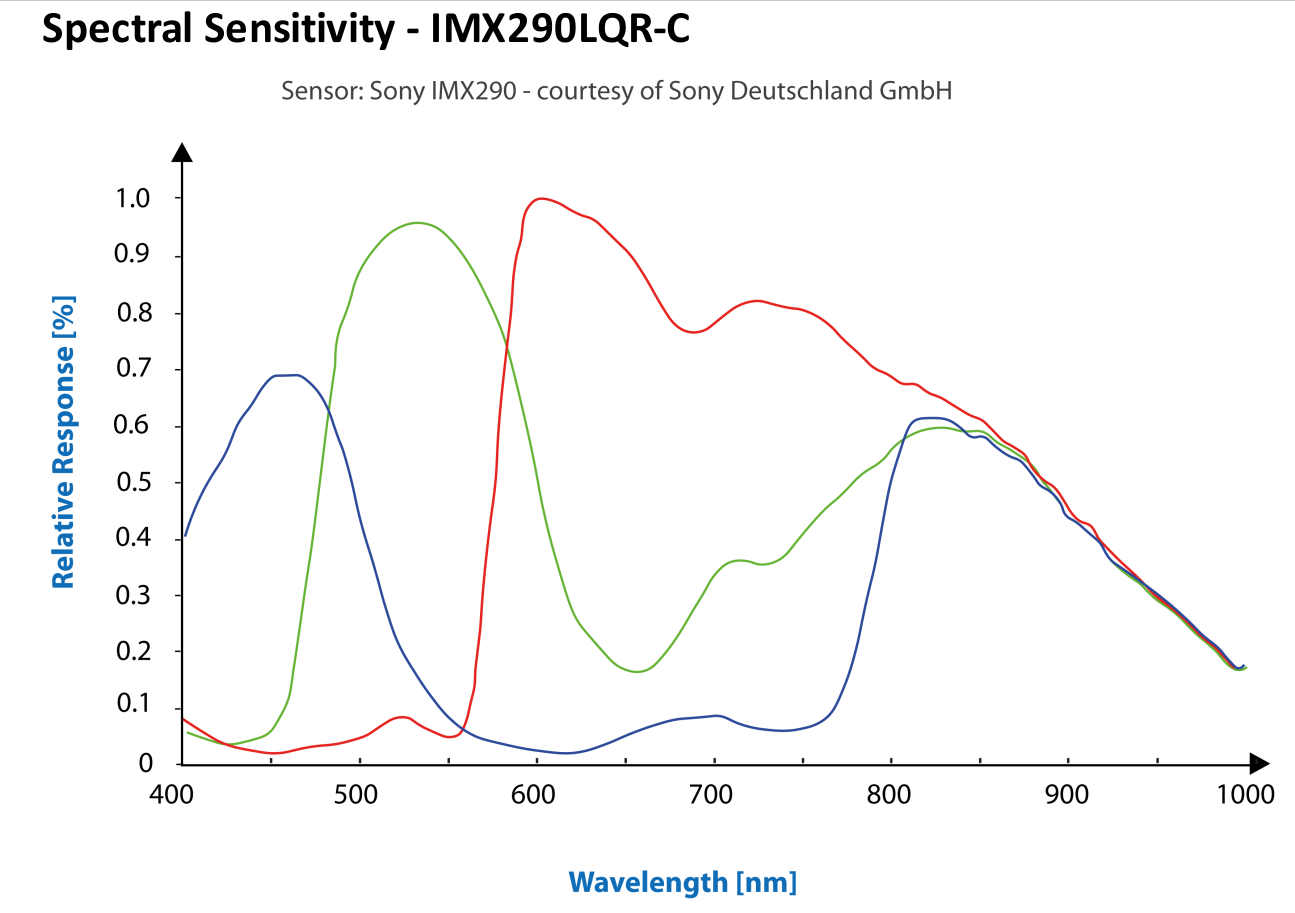
My camera has an IR-Cut filter with a window of 405-690nm. Each RGB component comes from a wide spectral window affected by the IR-Cut filter.
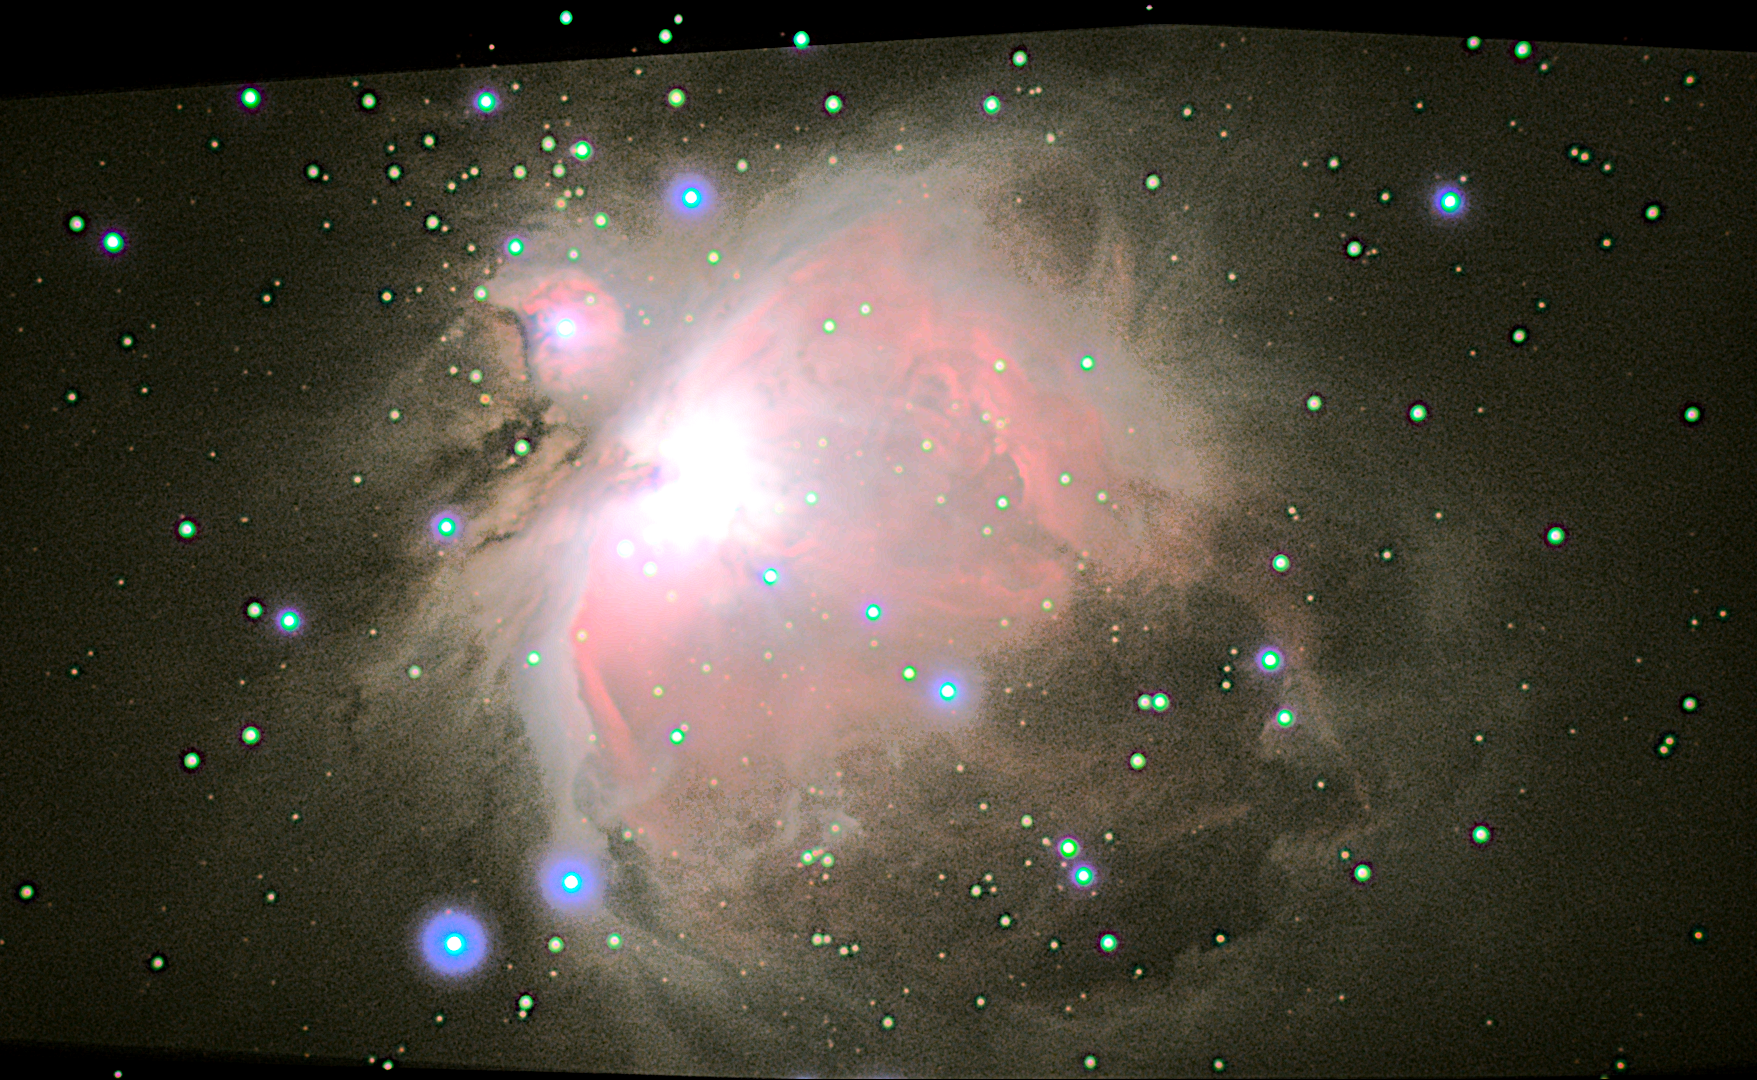
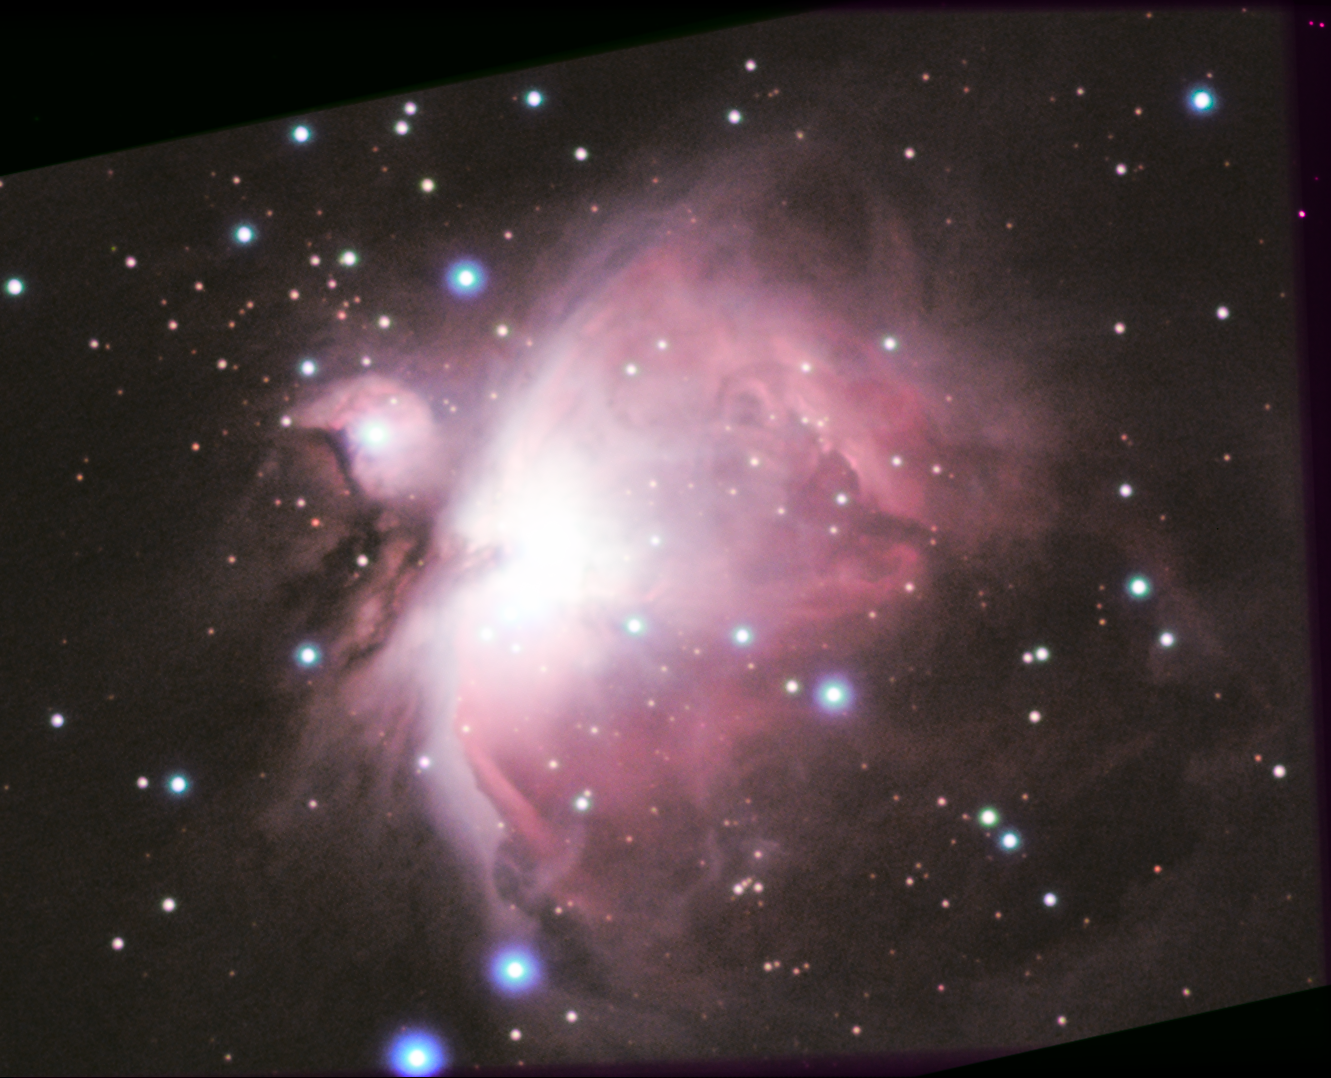
If we analyze each RGB component separately, we realize we have astonishing details in the RED image, the green one is quite out of focus (check the green ring of some stars), and the blue one is well focused. This problem is caused by chromatic aberration in combination with a short focal length. Focus of red and blue seems the same but then the green is out of focus. The opposite happened in the first session. To get an even better resulting image, it can be a good idea to decompose RGB components from the beginning, then compose again after processing. The idea is to get the maximum amount of detail from each component, then each component needs a different degree of enhancement. Green channel needs further processing because it is a bit out of focus. Blue channel need a bit more work than the red one. Composing the images again the result is absolutly spectacular:
You can see so many filaments of gas. Those images are far, very far beyond my expectations.
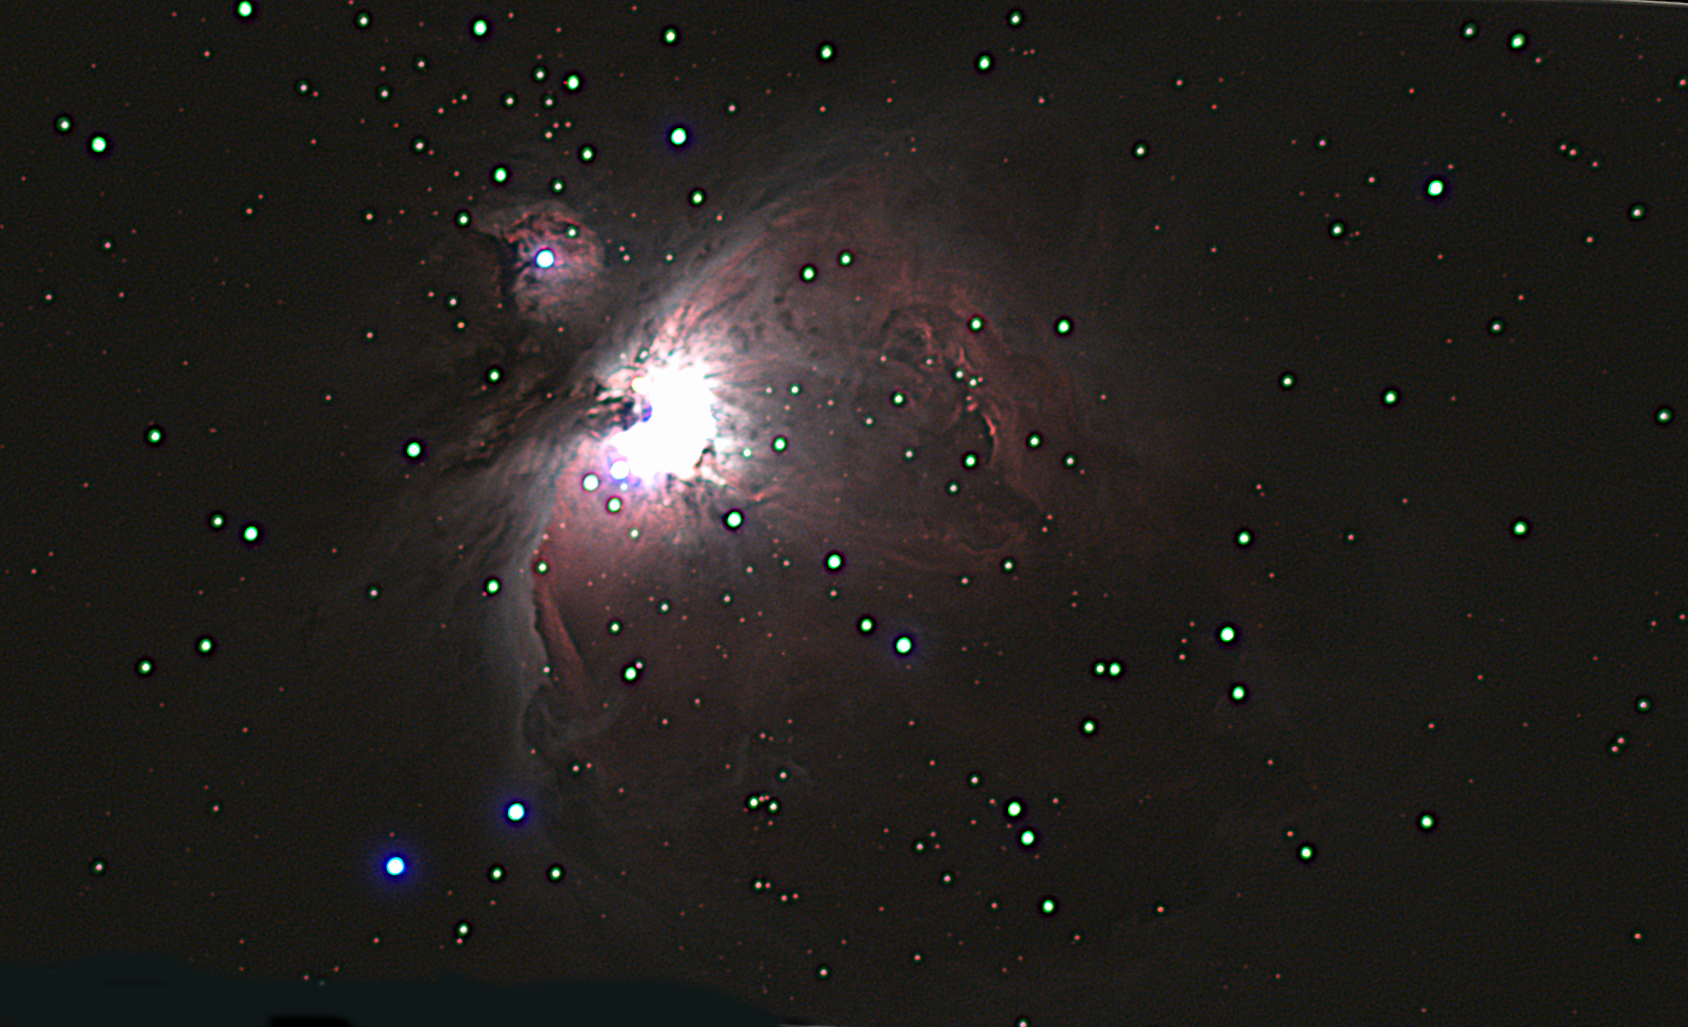
A final idea came to my mind to fight chromatic aberration, and it works pretty well. In the first two sessions I got red and blue better focused than green. In the last session I got green better focused than red and blue. What if I stack all those images together to get a single one? The result is an image quite more achromatic. Super!
Stacking a total of 569 images:
Stacking a total of 598 images (one more series of images added with the core overexposed):
Stacking a total of 669 images (all available images stacked):
Differences between the images are small. If we check the RGB components, all three components look well focused now!. And images look more pleasant to the eye. This is a very promising way to fight the chromatic aberration of SV106.
With different processing, this "achromatic" picture showing the overall Nebula follows (obtained by stacking only two different sessions):
It could be possible to fight chromatic aberration by taking the green channel from a picture where the green is well focused, and then combining with red and blue channels from an image where both are well focused as well. Easy to say but not so easy to do unless capture was done in the same conditions, which is not in this case. Anyway, the result is interesting:
So much for Orion Nebula. I learned so much stuff by processing those images. With everything I have learned, it is time to go for a galaxy.
Charles Messier elaborated his famous catalog using a 100m aperture refracting telescope. What can be do with a similar telescope and a planetary camera? Are we able to visualize every Messier object and get a good idea on how they look like? This is the challenge!
So I got a new telescope, a Skywatcher SkyHawk Newtonian. Aperture 114mm, focal length 500mm, F4.4, parabolic mirror, and a plastic focuser which is a real shame! This telescope is a real gem, but the focuser makes things difficult. I can't understand such a lame focuser on a good telescope (all telescopes of this kind have exactly the same lame focuser!). They do so you buy more expensive telescopes for astrophotography. It's a lame strategy! Because of this, some previous work has to be done to get the telescope ready for action.
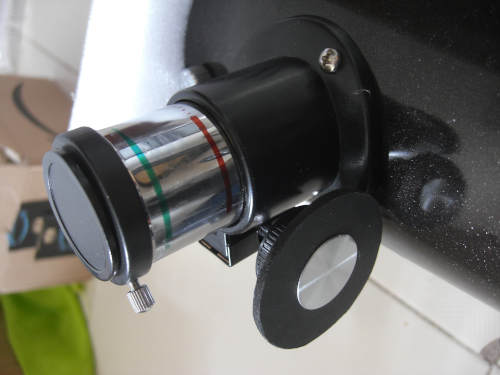
First thing to do with this telescope is to modify the focuser, so we are able to focus. Attaching a bigger wheel (double diameter) really helps a lot and makes a real difference (see the picture). I did a wood circular piece and glued with superglue. With this, and a Bahtinov mask, focusing becomes fairly easy. Then I also changed internal strips of nylon and replaced thicker ones, so the focuser play reduces. Checking with a laser collimator (SvBony makes cheapest and reliable ones), things get nearly perfect when I focus in upward motion of the focuser. This a key point to make the telescope work with my small and light planetary camera.
See the red line on the focuser? It indicates the position of the focuser when the planetary camera is on focus. It is very useful to draw that line, because when you are doing observation, you will get the camera nearly on focus very easily. Also, it is better to check collimation in the same position we are going to use the camera. Draw the red line!
About the collimation, things were nearly perfect on arrival. Because of the focuser play, you have to be careful on checking the collimation. Collimation should be checked after the focuser has been moved upward. Then I only had to slightly modify one or two screws of the secondary mirror. It took less than 10 minutes. The primary mirror was completely fine.
For the observations, I use my alt-az SynScan GoTo from my Maksutov telescope.
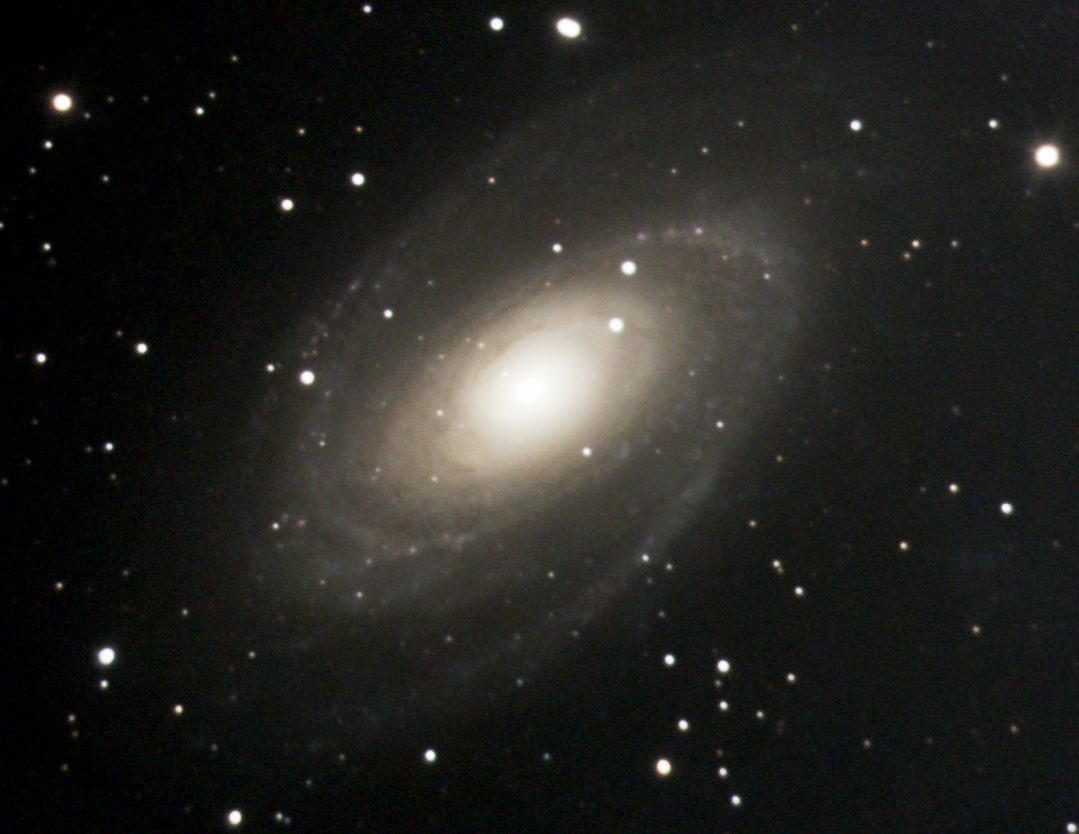
First target: M81, Bode's Galaxy
The first target was M81, also known as the Bode's galaxy. Located near the Big Dipper, at midnight, on 16th March 2021 it was located near the zenith, which facilitated its observation. Magnitude 6.9.
Located 12 million light-years from Earth, this spiral galaxy is 90,000 light-years in diameter. It is the right size for my setup and quite bright, so it is a good target to start with.
The images were taken on March 16. Gain was set to maximum. I did exposures of 5, 10, 20 and 30 seconds. The 20s exposures I did without IR/UV filter, and I believe it was the best choice. One of the advantages of working with a Newtonian is that you have NO CHROMATIC ABERRATION AT ALL!. Then, you can take advantage of the good sensitivity to infrared the IMX290 sensor offers.
A total of 531 images were obtained, processed using Deep Space Stacker (DSS), GIMP and Registax (wavelets).
The first image with a lighter processing:
The second one after processing the first one with Registax wavelets:
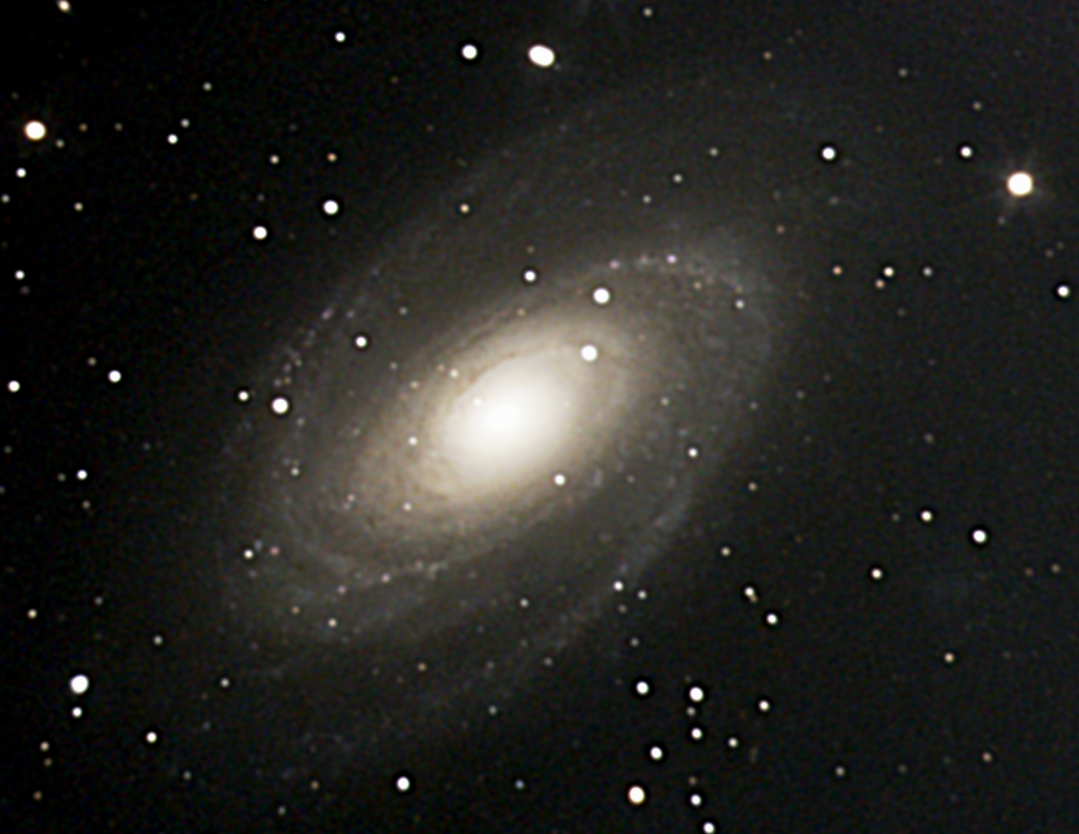
This one is the best one. Every little detail of this image can be found in the corresponding image of M81 taken by the HST (you can see in Wikipedia). I feel satisfied!
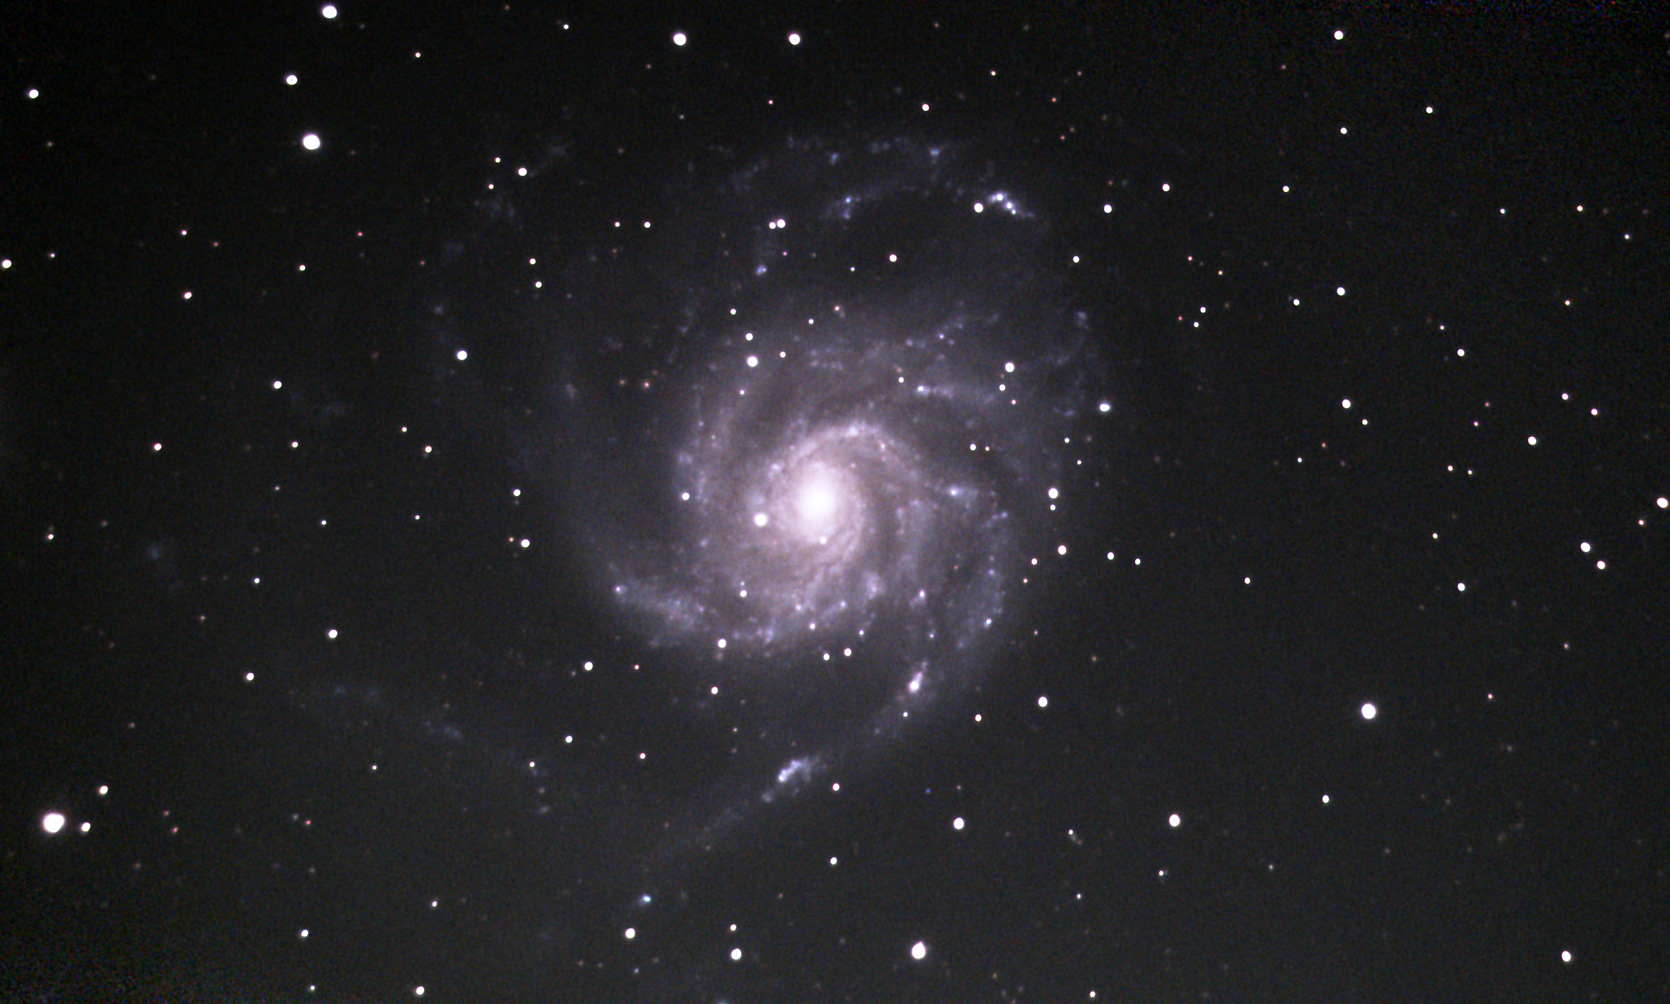
Second target: M101,
My second Galaxy, M101, also known as the Pinwheel Galaxy. Located near the Big Dipper, after midnight it is near the zenith, which facilitates its observation.
Magnitude 7.86
Located 27 million light-years from Earth, this spiral Galaxy has a diameter of 170,000 light-years, so it is quite large, larger than our Milky Way.
To obtain this image I used no filter. The light hits the sensor directly after bouncing off the two mirrors of the telescope.
The images were taken the night of April 4 2021, with the gain at maximum, with exposures of 30 seconds. These images were therefore obtained at the limit of the capacity of the camera (maximum gain) and of the mount itself, which is not equatorial, thus limiting the exposure time to a maximum of 30 seconds.
Night without moon or clouds, but with quite poor visibility due to the haze and humidity.
In total 386 images were obtained (3 hours of exposure).
223 were manually selected.
The images have been processed using Deep Space Stacker (DSS), GIMP and Registax (wavelets).
The final result, given the poor visibility and the equipment used, has very pleasantly surprised me.
The first image after a lighter processing:
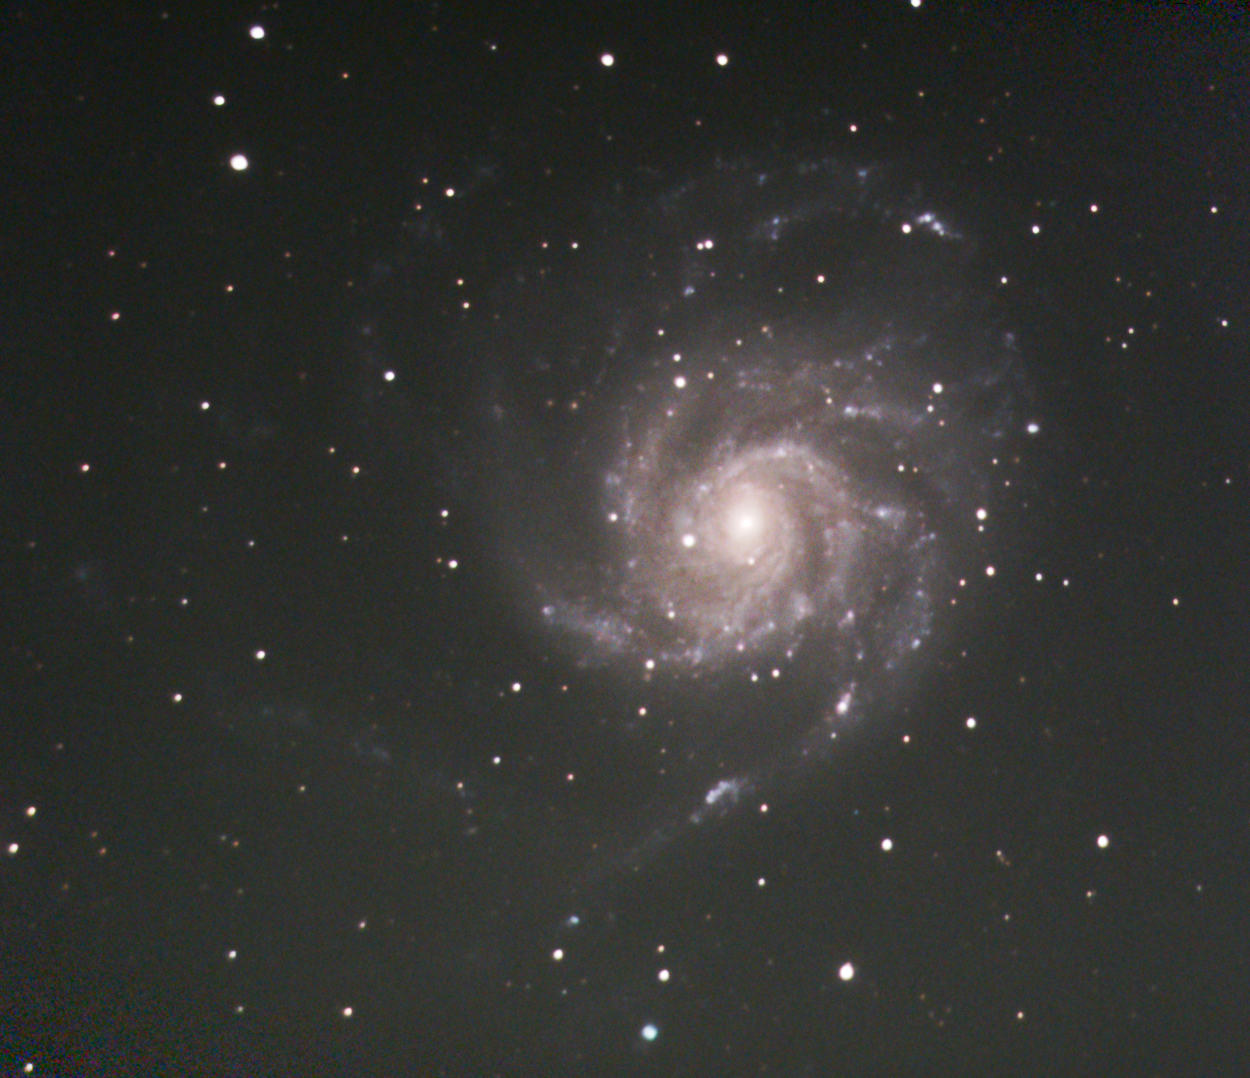
The second image after a heavier processing:
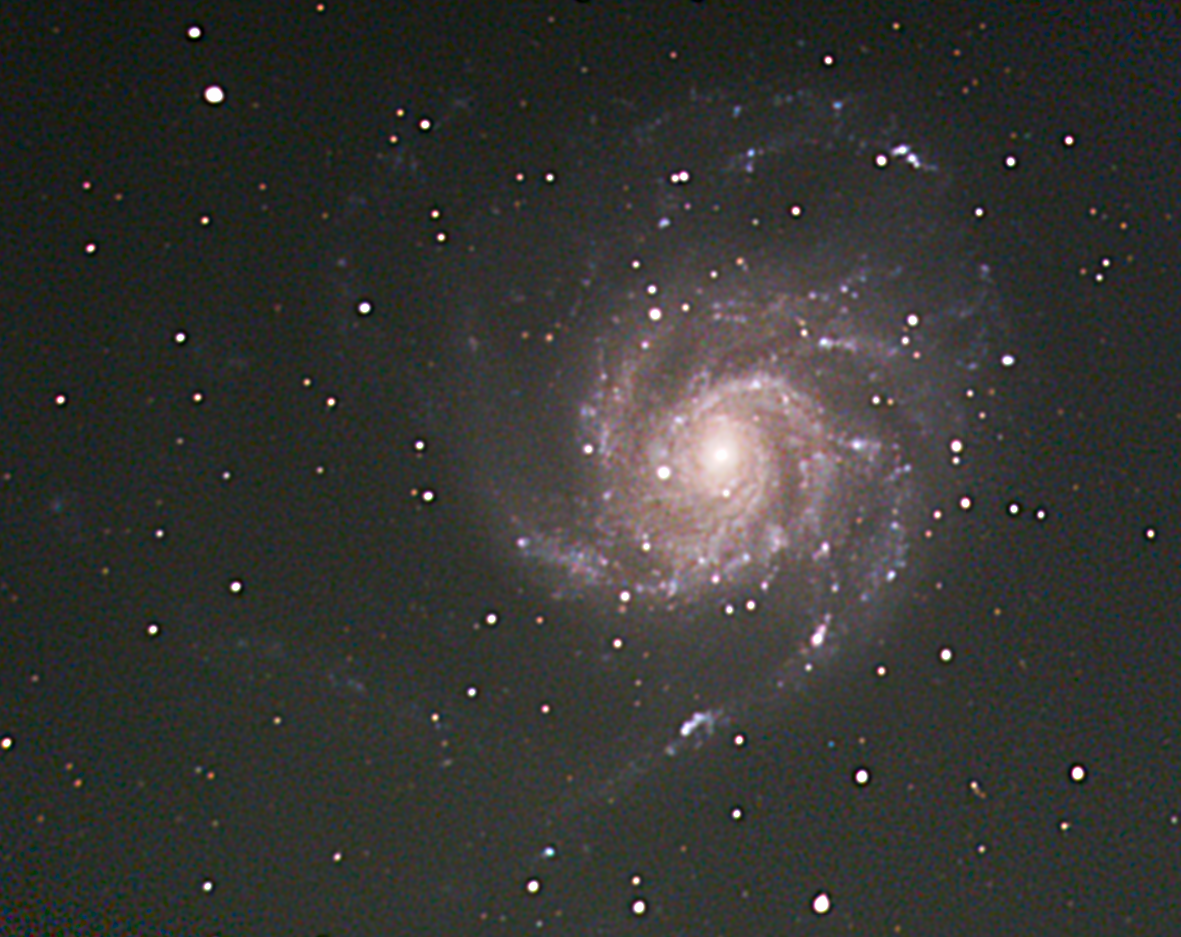
In the final images we can see some noise and even some "amp-glow". No dark frames were used in the processing. Well, I took some dark frames quite later on, with the camera at room temperature (hotter than original exposures). Anyway, after using dark frames in the processing with DSS, the SNR improves quite a lot. Then the contrast can be pushed a bit further and the final image looks cleaner and more beautiful:
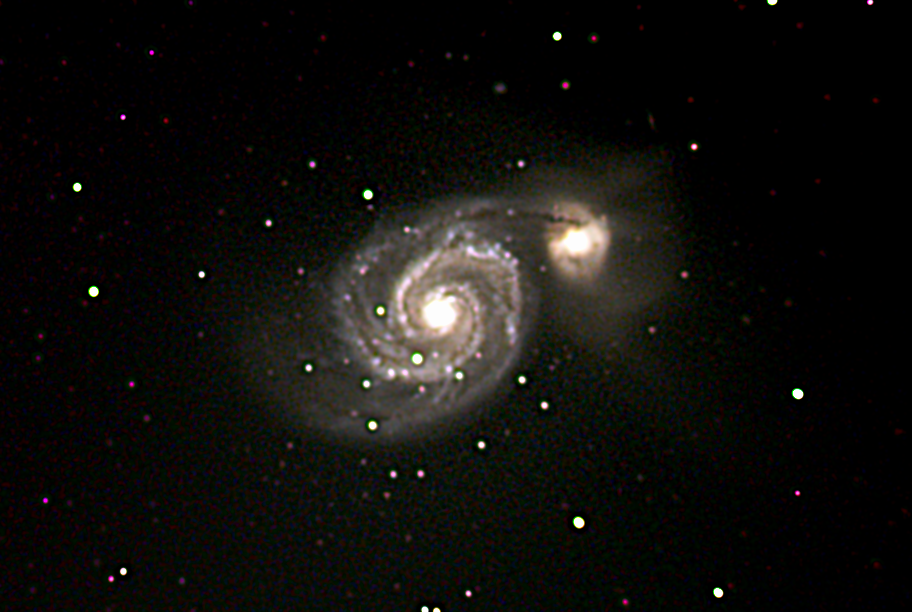
Third target: M51 + NGC 5195
My third Galaxy, M51, also known as the Whirlpool Galaxy. Actually there are two galaxies interacting, the smaller one known as NGC 5195. Located in Canes Venatici, about midnight it is near the zenith, which facilitates its observation, unless you are using and an Alt-Az mount and the telescope hits the mount... whops!
Magnitude 8.1
Located 31 million light-years from Earth, this spiral Galaxy has a diameter of 76,000 light-years, less than half the size of the Milky Way. To obtain this image I used no filter. The light hits the sensor directly after bouncing off the two mirrors of the telescope.
I used my new camera RisingTech G3M385C, which offers some more sensitivity and lower levels of noise compared with G3M290C. Pixels are 30% bigger. The images were taken the night of May 5 2021, with the gain at maximum, with exposures of 30 seconds. These images were therefore obtained at the limit of the capacity of the camera (maximum gain) and of the mount itself, which is not equatorial, thus limiting the exposure time to a maximum of 30 seconds.
Night without moon or clouds, but with quite poor visibility due to haze and humidity. Also, there were winds somewhere in the upper atmosphere, and stars were dancing in the dark...
Few useful images were obtained, about 40 images, manually selected from a set of 75 images. The images have been processed using Deep Space Stacker (DSS), GIMP and Fitswork.
The final result... well, the Whirlpool Galaxy can be seen!
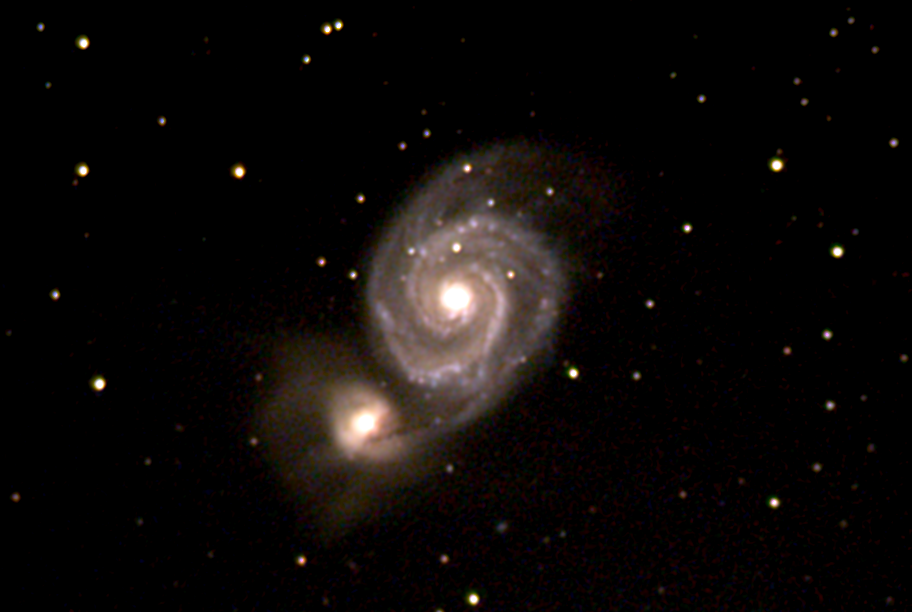
Later on, on June 7th 2021, I took 500 new images, 15 seconds exposure with gain at maximum, with the camera RisingTech G3M385C. No moon, no clouds, almost no wind, finally! 10 Darks were taken and used during the exposures. The final result is much better:
Next year, in 2022, I took new images. The images were taken on the night of May 26, with maximum gain, with 15-second exposures. 10 Darks were taken and used during the exposures. In total, some 380 images were obtained (1.6 hours of exposure). I have selected 313 and processed them using Deep Space Stacker (DSS), GIMP and Registax (wavelets). The final result is the best I got so far for M51:
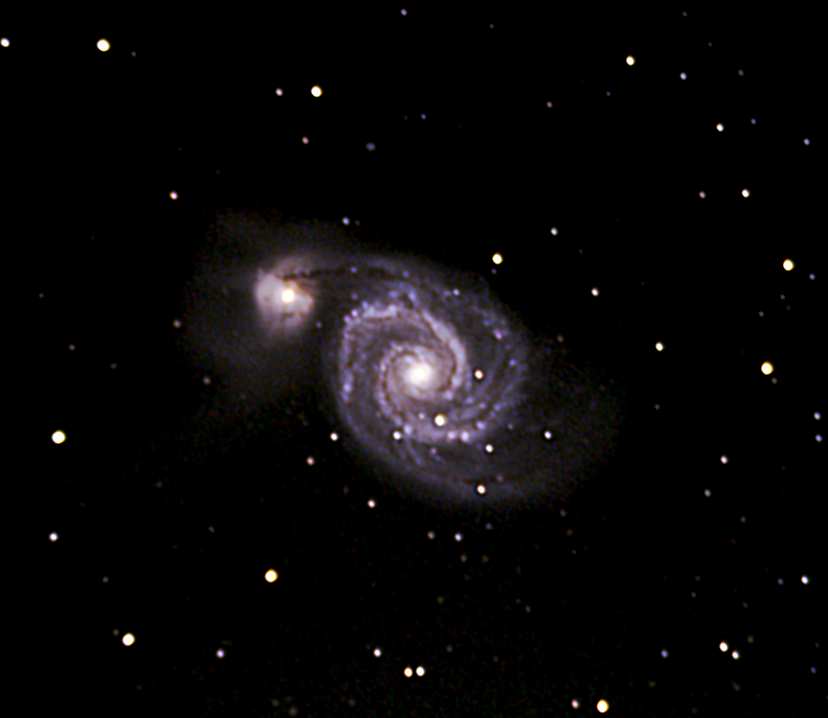
This time I used the IR/UV filter. And the color of the galaxy has changed quite significantly. Images taken without filter are reddish and the ones taken with the filter are bluish. This means that a great deal of near infrared is emitted by the galaxy. In the whole picture, a 15 magnitude, faint galaxy, can be seen in the lower right of the image.
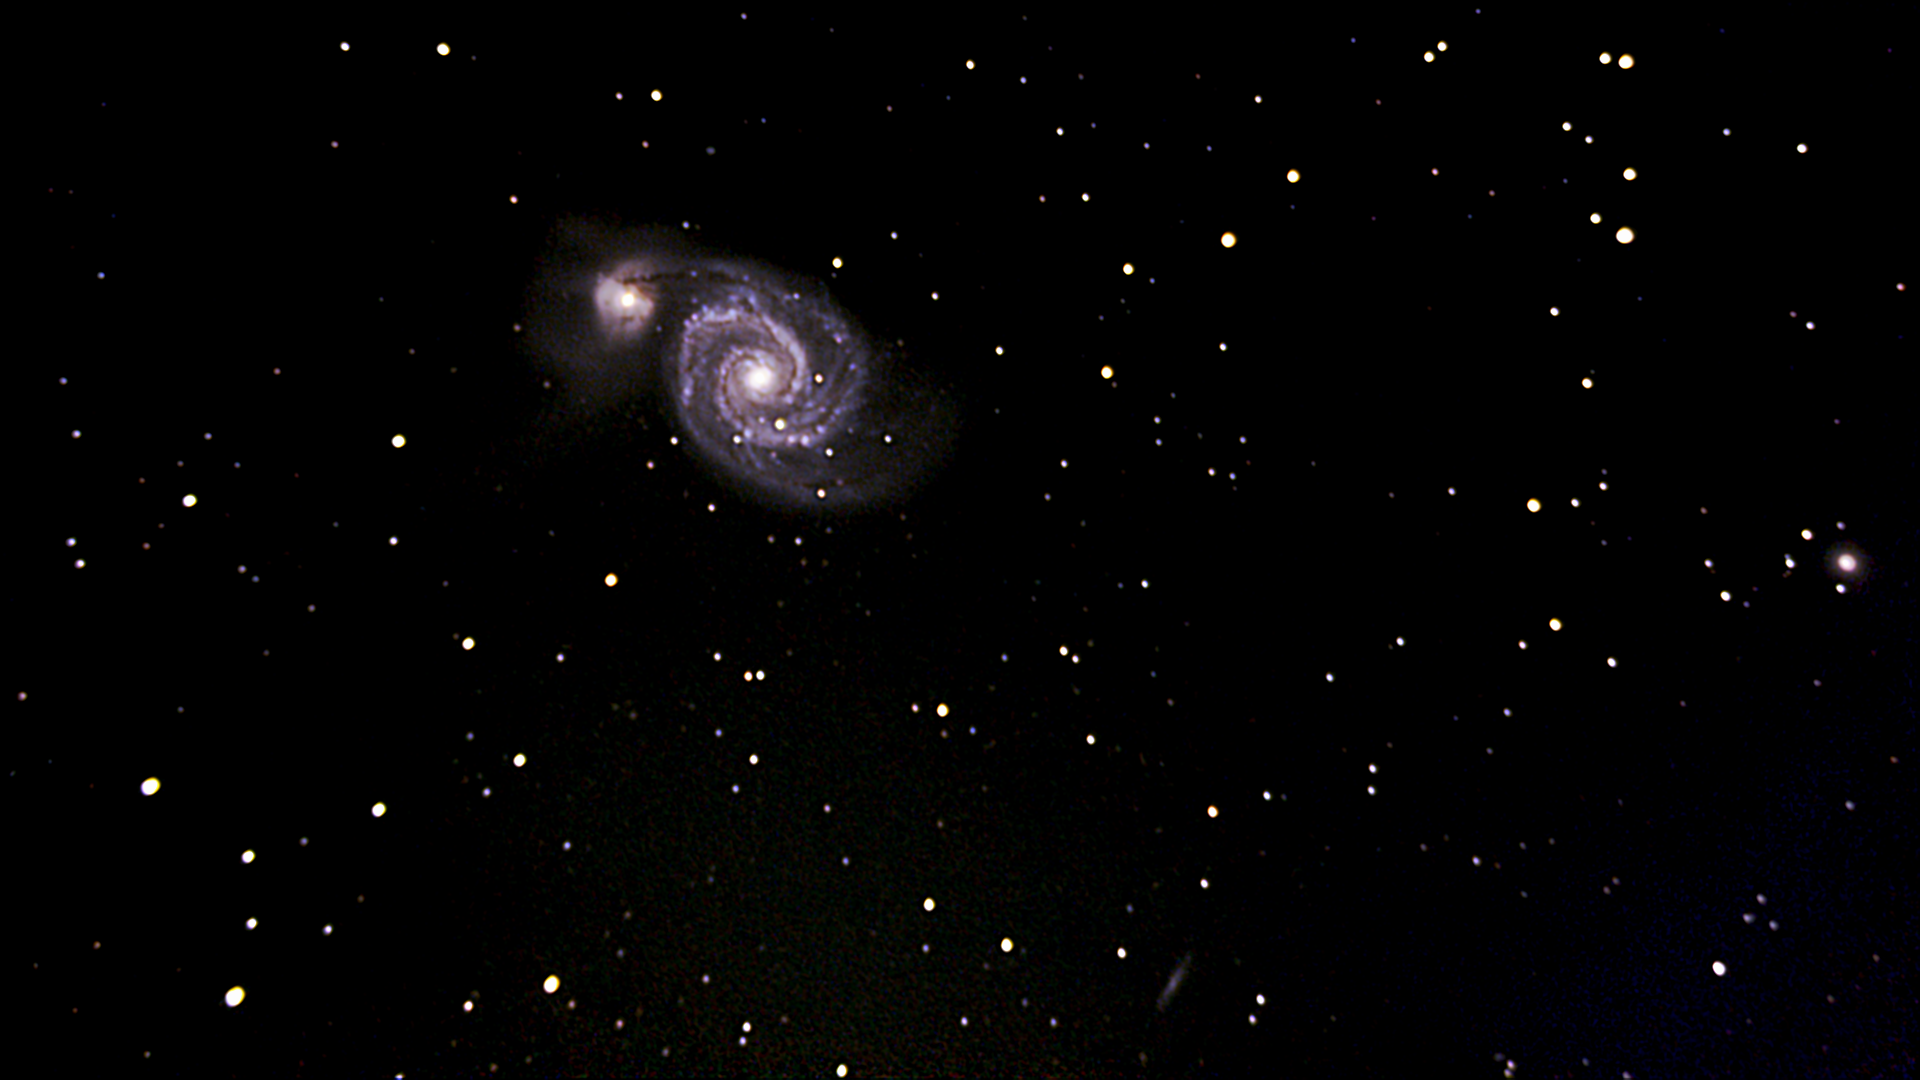
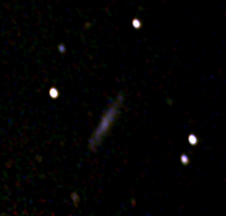
This galaxy is IC 4263. It seems incredible to me to be able to see galaxies of that magnitude, even if it only appears as a faint gray line. It is located at about 130M light years from earth. An enlargement follows:
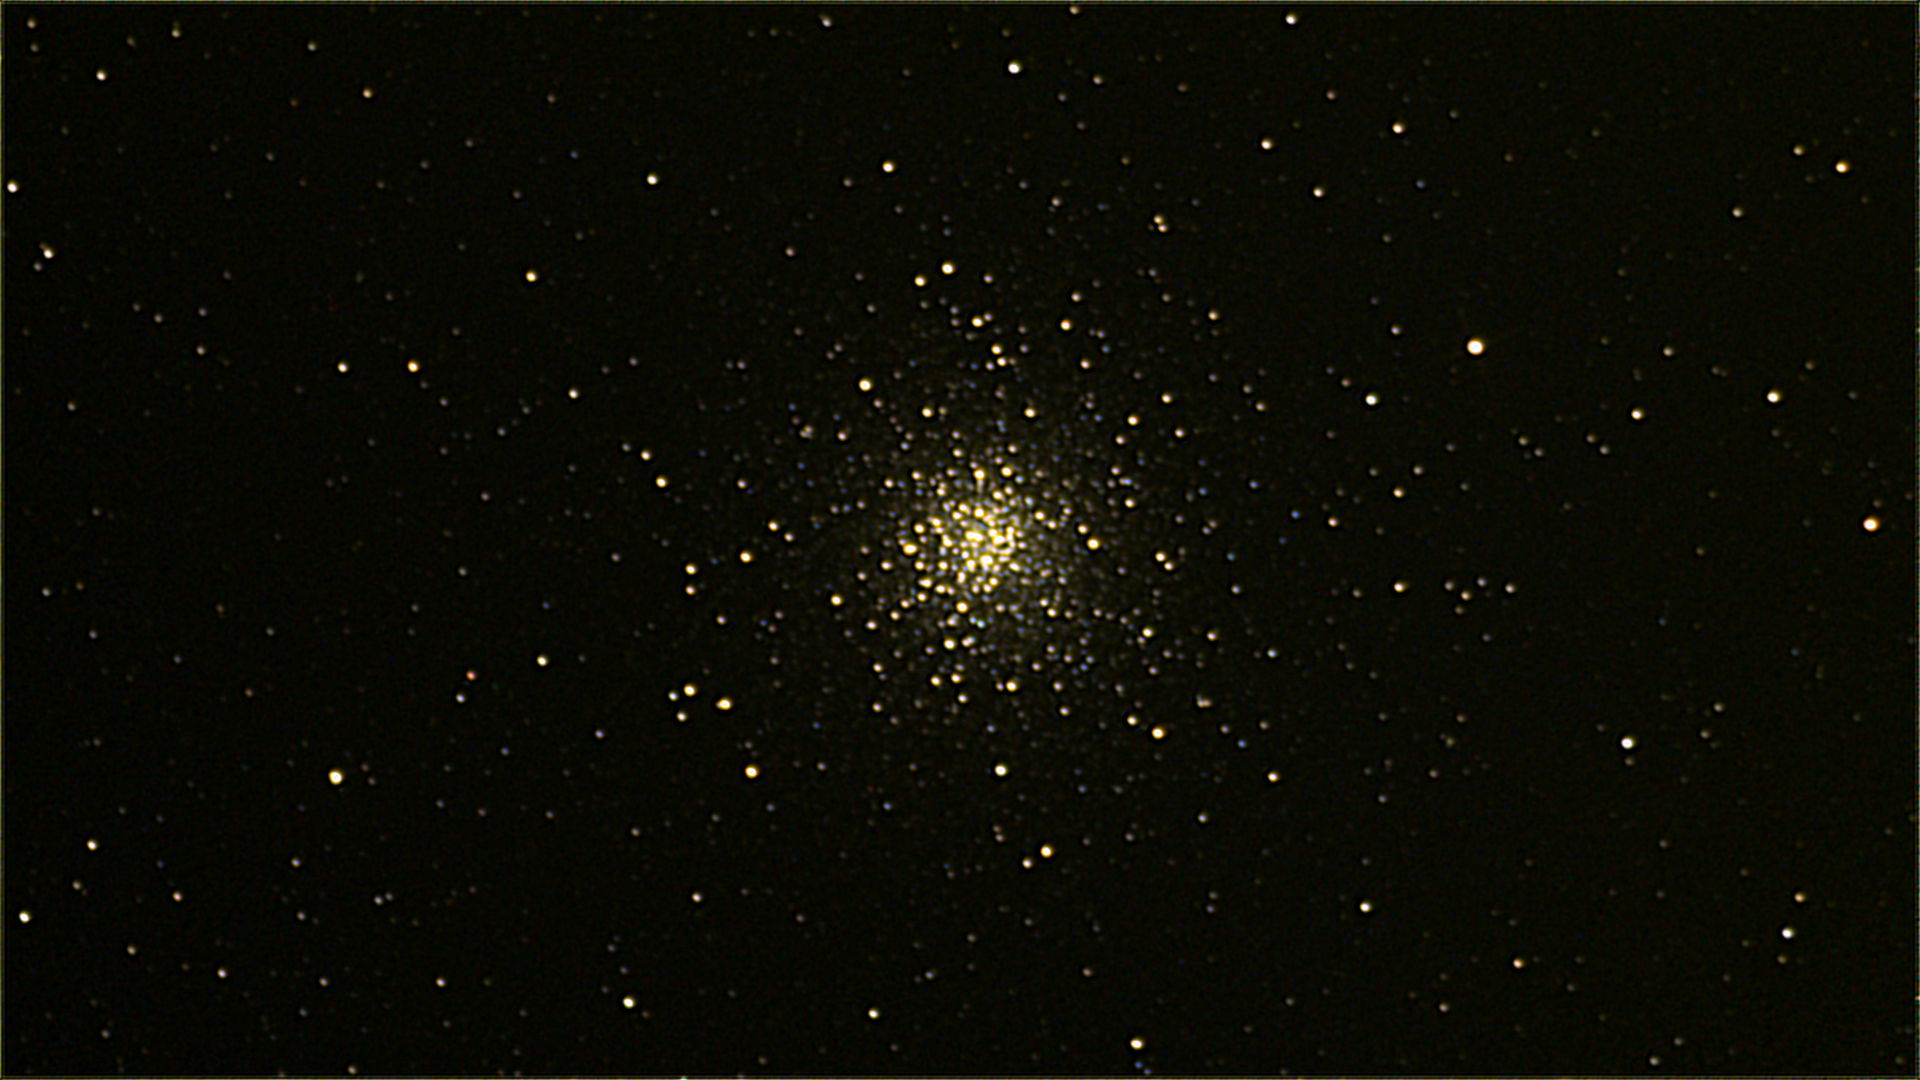
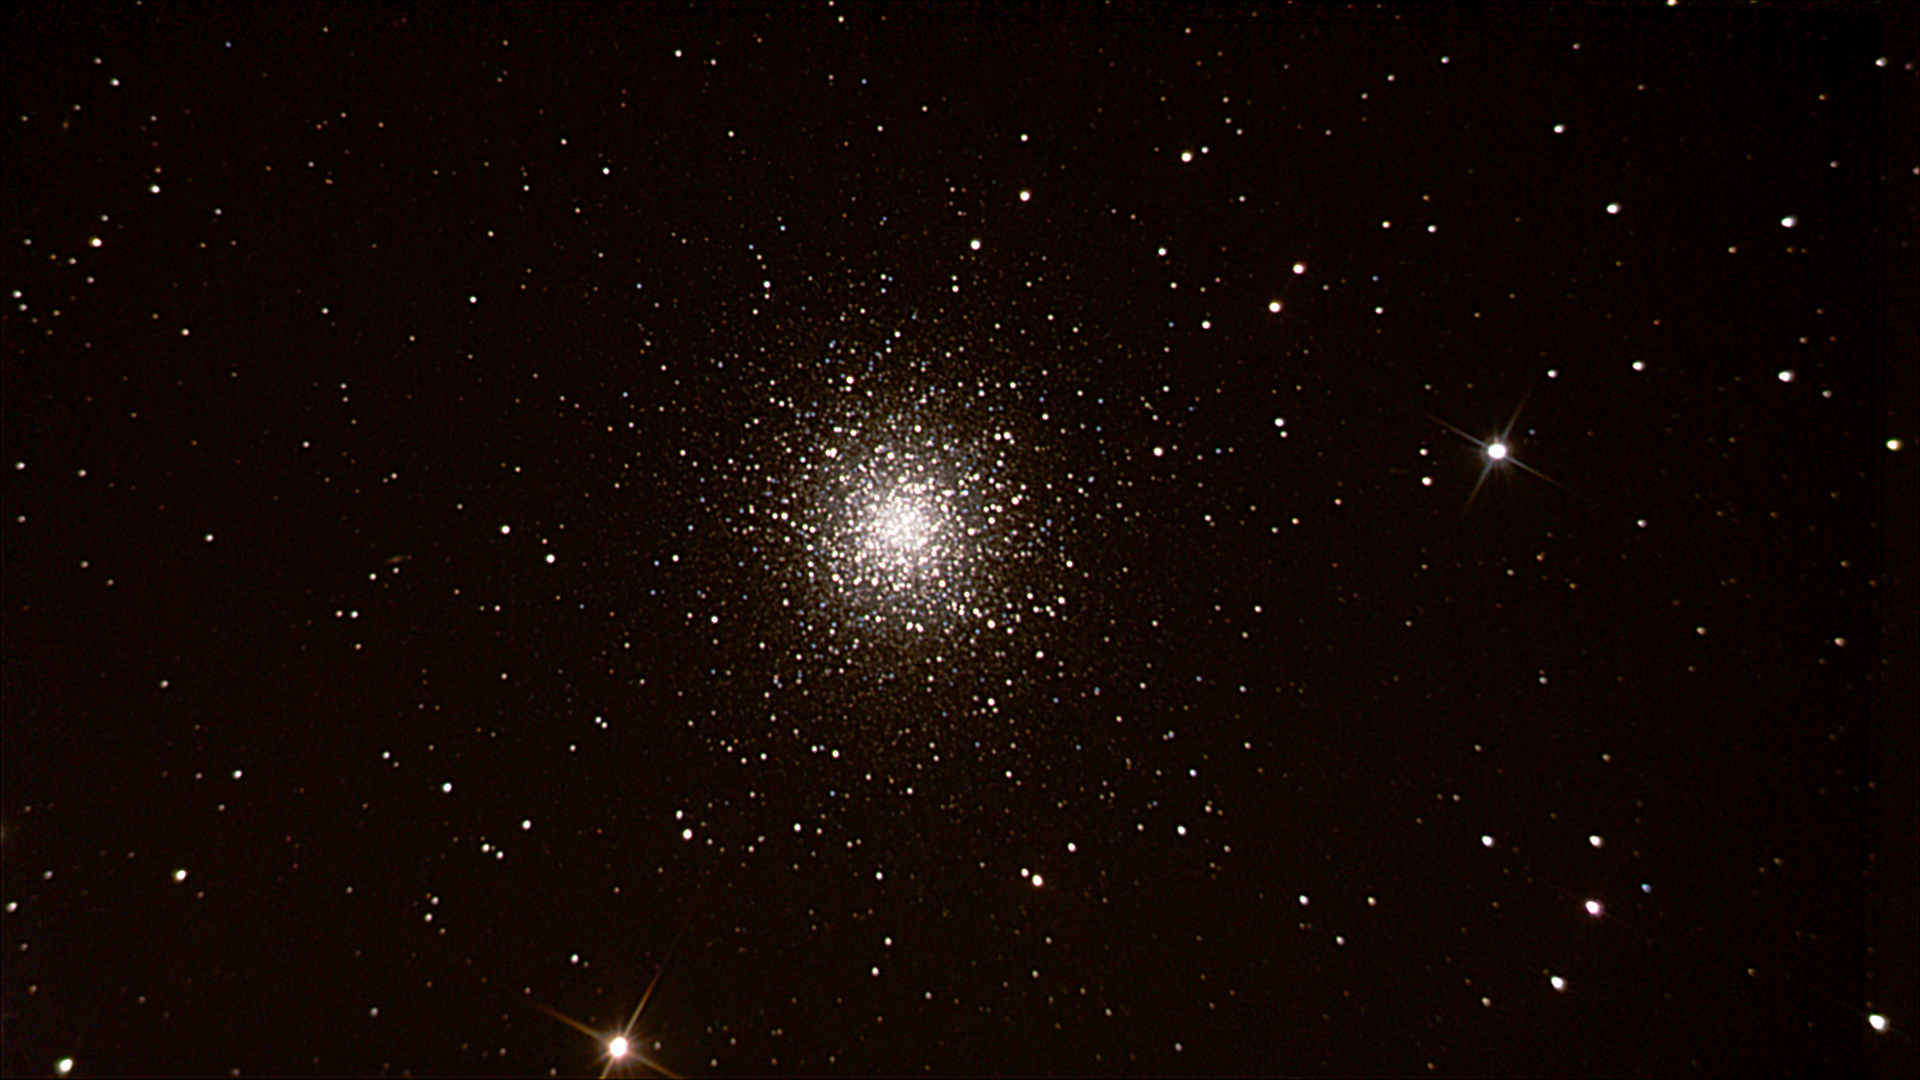
First globular cluster: M13
My first star cluster. M13 is a globular cluster in the constellation of Hercules. M13 is located 25.000 light-years from Earth with an apparent magnitude of 5.8. The cluster contain over 100.000 stars very densely packed together inside a diameter of about 145 light-years.
To get a good image with the maximum as possible number of stars, I took images with different exposures: 1s, 2s, 5s, 10s. A total number of 500 images were taken and stacked with DSS, then processed with GIMP and Registax. It was my first time with a globular cluster, and I feel quite satisfied about the result.
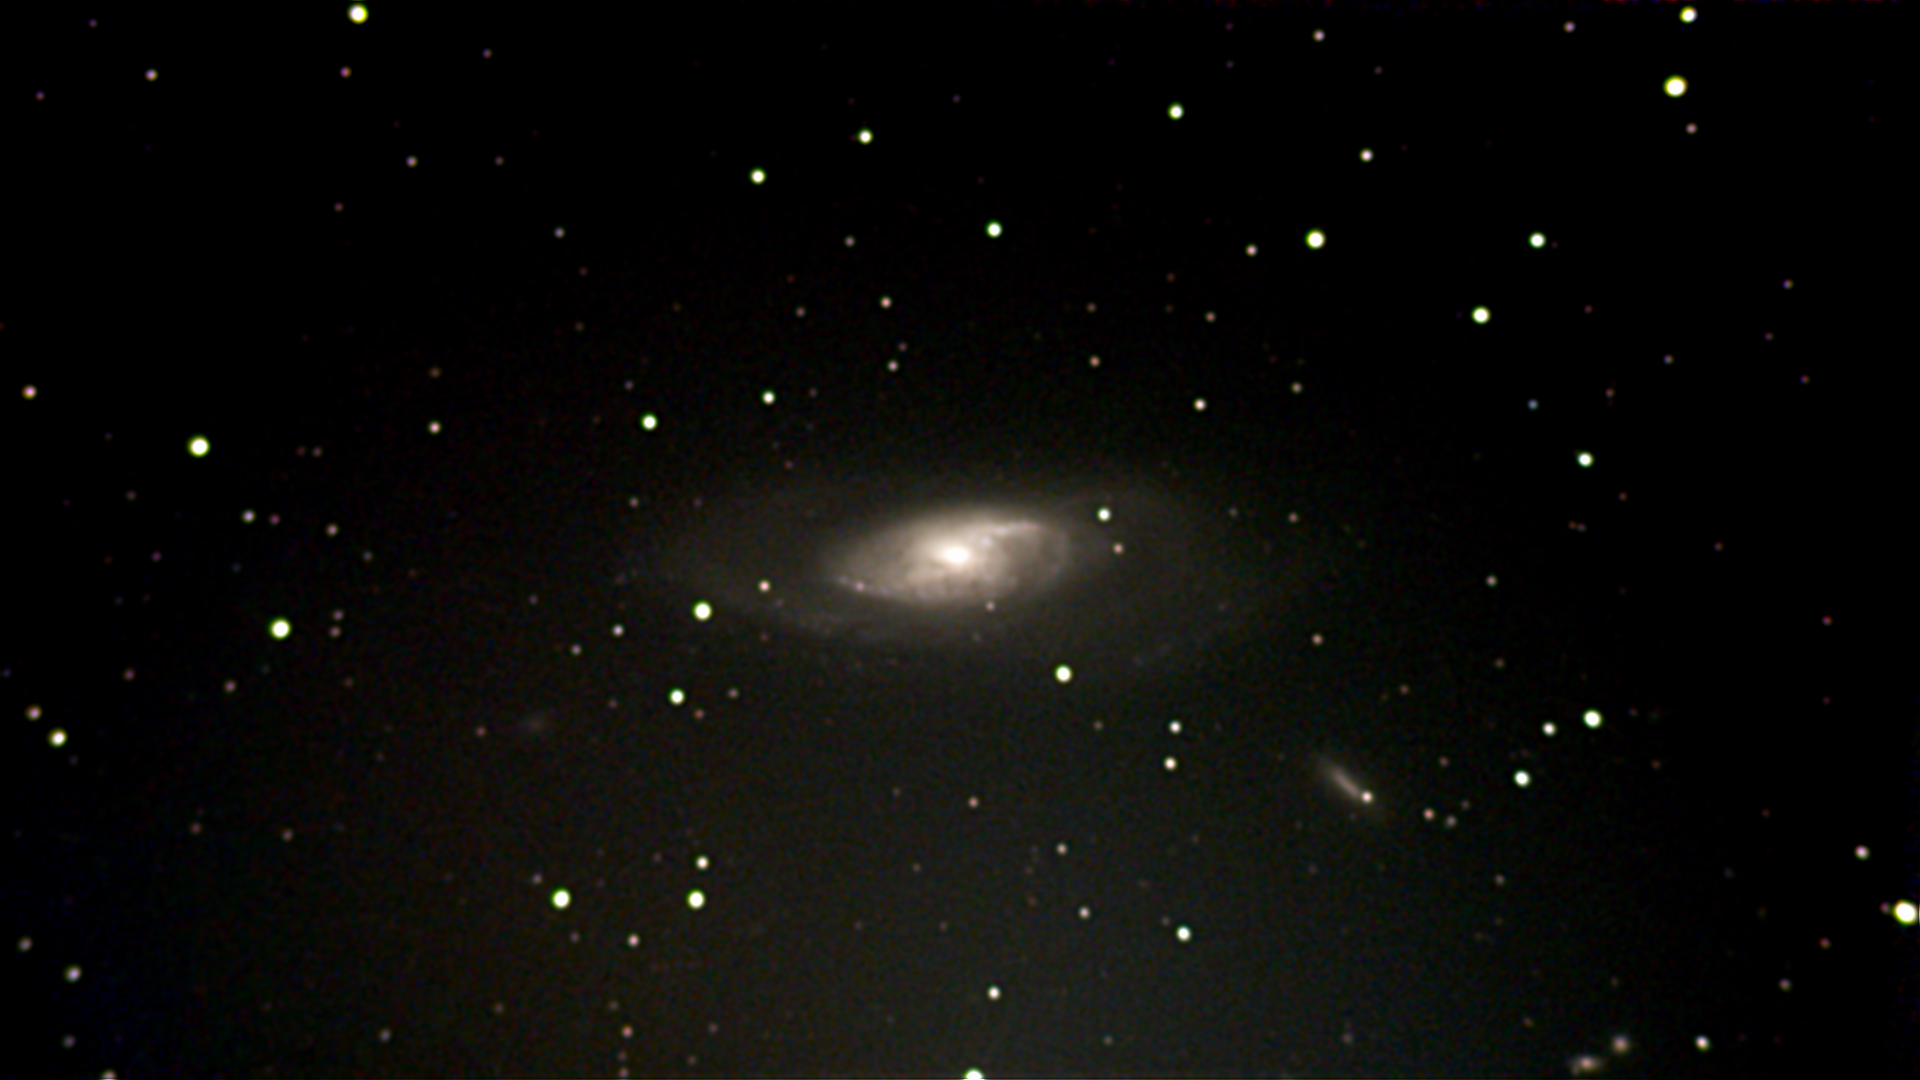
Fourth Galaxy : M106
Messier 106, a spiral galaxy in the Canes Venatici constellation. The size of M106 is approximately 135,000 light-years in diameter! It is 22 - 25 million light-years from Earth! You can also see two dwarf galaxies in the image; NGC 4248 in the lower right and UGC 7358 in the lower left.
Magnitude 8.4
To obtain this image I used no filter. The light hits the sensor directly after bouncing off the two mirrors of the telescope.
The images were taken the night of June 6 2021, with the camera G3M385C, with the gain at maximum, with exposures of 15 seconds.
Night without moon or clouds, but some haze and humidity.
About 200 images have been processed using Deep Space Stacker (DSS), GIMP and Fitswork.
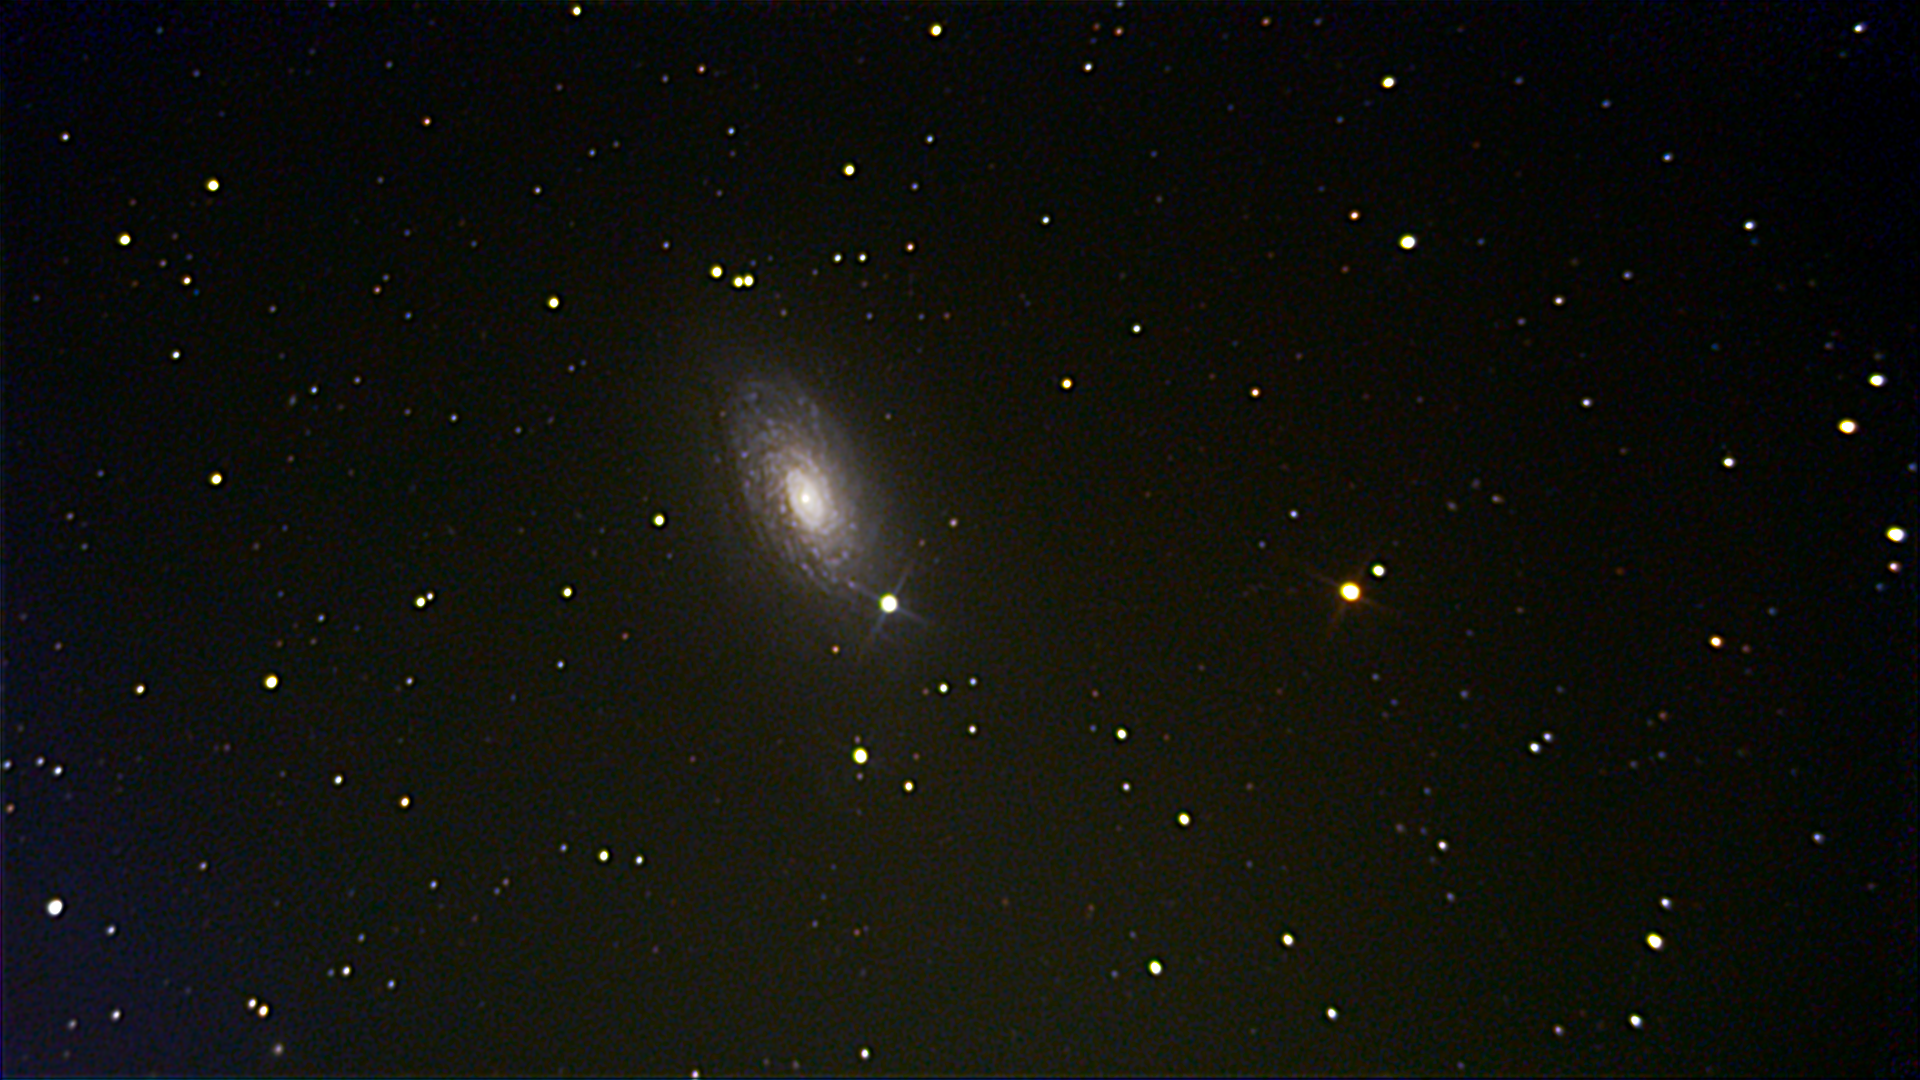
Messier 63
Messier 63, also known as the Sunflower Galaxy, is a spiral galaxy in the northern constellation of Canes Venatici with approximately 400 billion stars. Diameter is 98000 light-years. Located at 29 milions light-years from Earth.
Magnitude 8.6.
To obtain this image I used IR-UV filter.
The images were taken the night of June 12 2021, with the camera G3M385C, with the gain at maximum, with exposures of 15 seconds.
Night without moon or clouds, but some haze and humidity.
About 500 images have been processed (2 hours total exposure) using Deep Space Stacker (DSS), GIMP and Registax (wavelets).
Messier 82
Messier 82, also known as the Cigar Galaxy, is an irregular galaxy located in the constellation Ursa Major. It is approximately 12 million light-years away and has a diameter of 37,000 light-years.
Magnitude 8.4.
To obtain this image I used IR-UV filter.
The images were taken the night of June 12 2021, with the camera G3M385C, with the gain at maximum, with exposures of 15 seconds.
Night without moon or clouds, but some haze and humidity.
About 200 images have been processed (about 1 hour total exposure) using Deep Space Stacker (DSS), GIMP and Registax (wavelets).

Messier 104
Galaxy M104, also known as the Sombrero Galaxy due to its particular appearance. It is a Galaxy that I have wanted for a long time, because it seems particularly beautiful to me. Where I live it always appears quite low on the horizon, in the constellation of Virgo, which makes it difficult to get quality images.
Magnitude 8.0
Located 31 million light-years from Earth, this spiral galaxy is 49,000 light-years in diameter, one-third the size of the Milky Way. I used the RisingTech G3M385 planetary camera, with UV/IR filter. The images were taken on the night of May 26 2022, with maximum gain, with 15-second exposures. Night without moon or clouds, but with limited visibility due to humidity. In total, some 368 images were obtained (1.6 hours of exposure) of which 239 have been useful. The images have been processed using Deep Space Stacker (DSS), GIMP and Registax (wavelets). The final result follows:

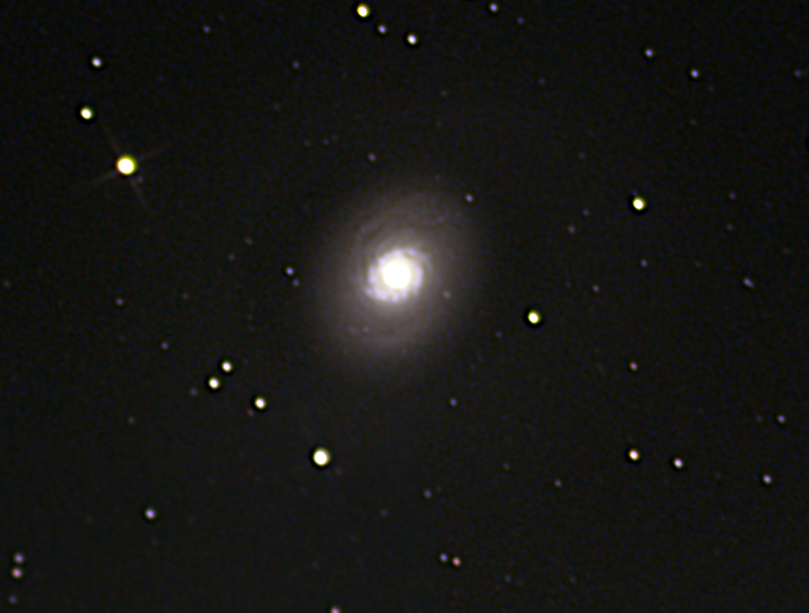
Messier 94
Messier 94 is a barred spiral galaxy in the constellation Canes Venatici. It is also known as the Cat's Eye Galaxy due to its bright core.
Magnitude 8.2
It is located about 16 million light years from Earth and has a diameter of about 45,000 light years. It has an extremely bright inner region surrounded by a bluish ring of young star clusters, around it is a dimmer region of older stars also surrounded by trails of young stars, and further out an outer ring much dimmer than just barely. It can be seen in the photo. I used the RisingTech G3M385 planetary camera, with UV/IR filter. The images were taken on the night of May 27 2022, with maximum gain, with 15-second exposures. Moonless night, few clouds, but with limited visibility due to humidity. In total, some 394 images were obtained (1.6 hours of exposure) of which 300 have been useful. The images have been processed using Deep Space Stacker (DSS), GIMP and Registax (wavelets).
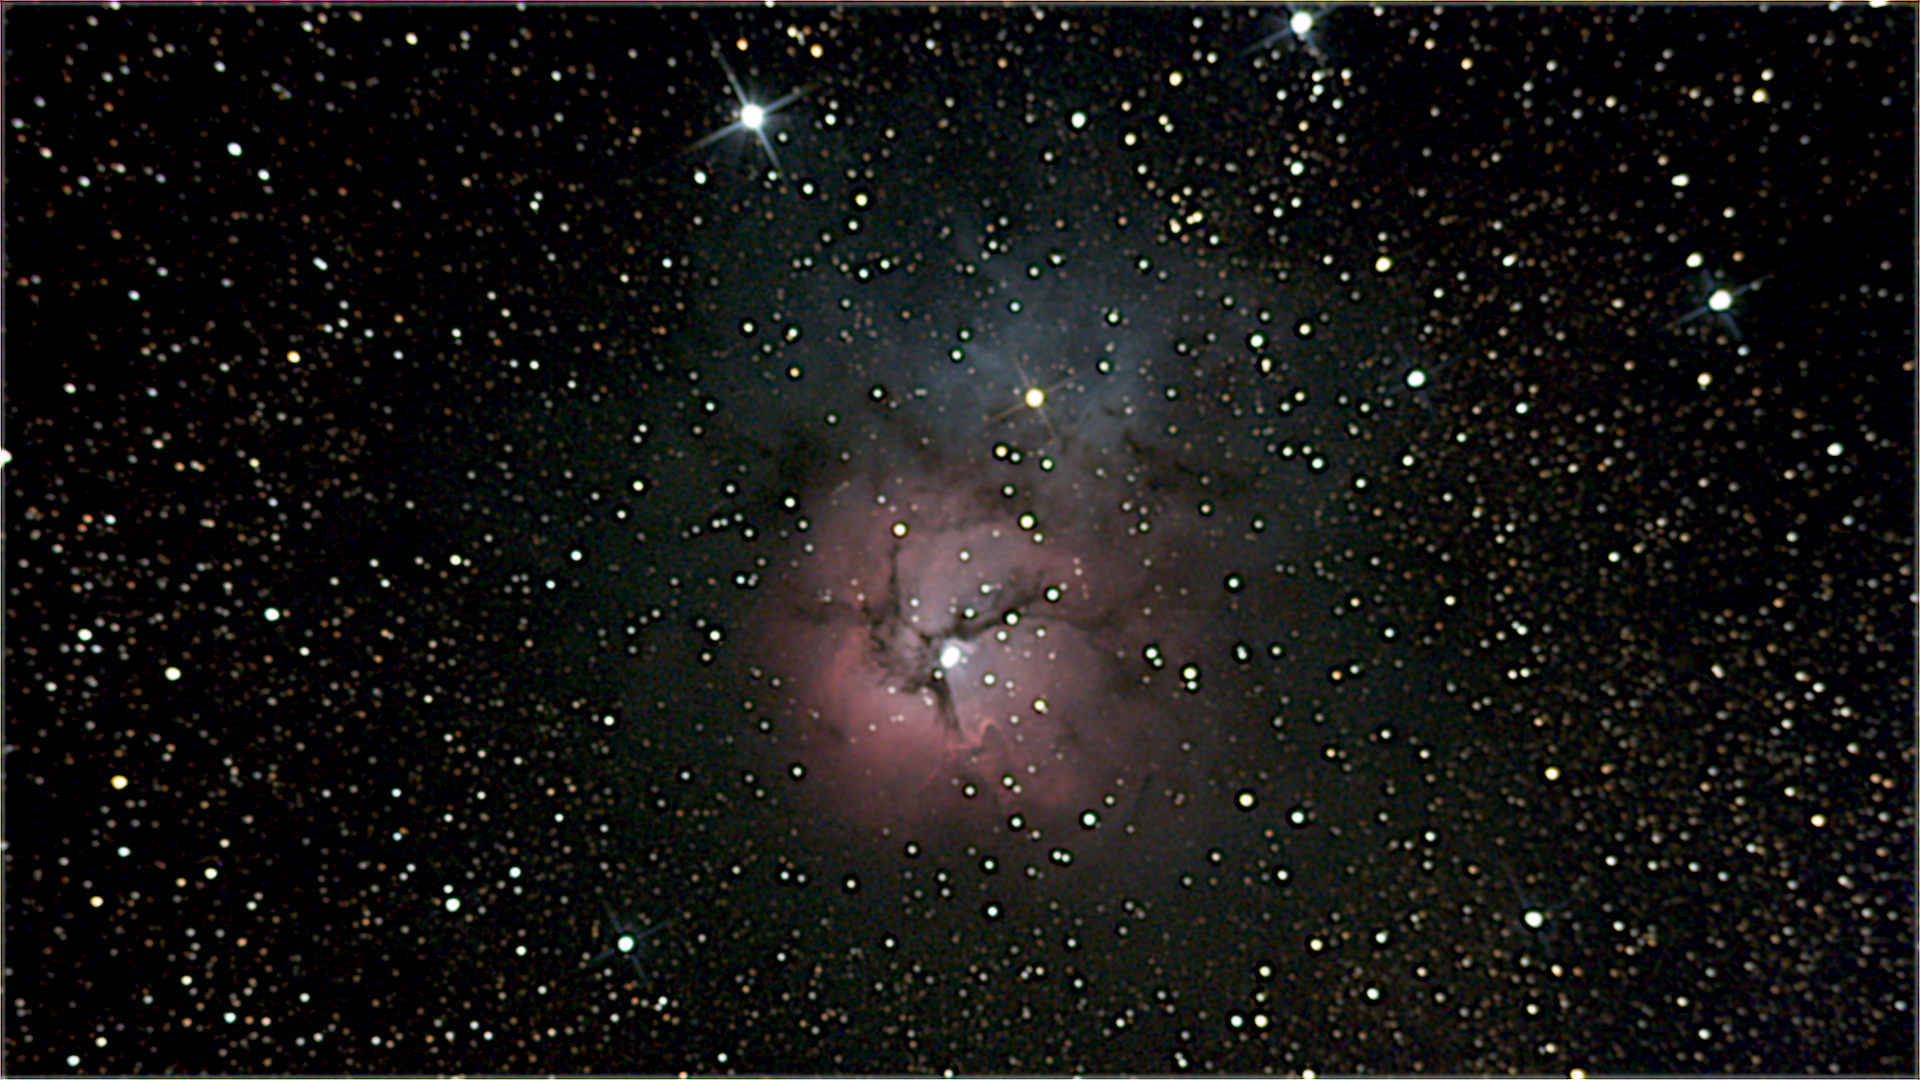
Messier 20
Night of June 22, 2022, finally the sky was clear, pleasant temperature and almost no wind.
The Trifid Nebula M20 is an excellent example of an emission (red part) and reflection (blue part) nebula. The red emission nebula contains a bright blue star cluster near its center. It emits red light because ultraviolet light from stars ionizes hydrogen gas, and hydrogen gas recombines, emitting the characteristic red hydrogen-alpha light. When the radiation from these hot young stars becomes too weak to ionize the hydrogen, the gas and dust reflect the original blue light.
The Trifid nebula, located in Sagittarius, has an extension of about 50 light years. It is located at a distance of approximately 4120 light years from Earth.
Magnitude 6.3
I used the RisingTech G3M385 planetary camera, with Sony IMX385 sensor and UV/IR filter.
Moonless night, few clouds, but with limited visibility due to humidity. This nebula is always quite low, about 25 degrees above the horizon at most, so light pollution complicates things. This time I took 300 images with 12 second exposures, of which I was only able to save 83. Even so, the final result allows us to see the Nebula in some detail.
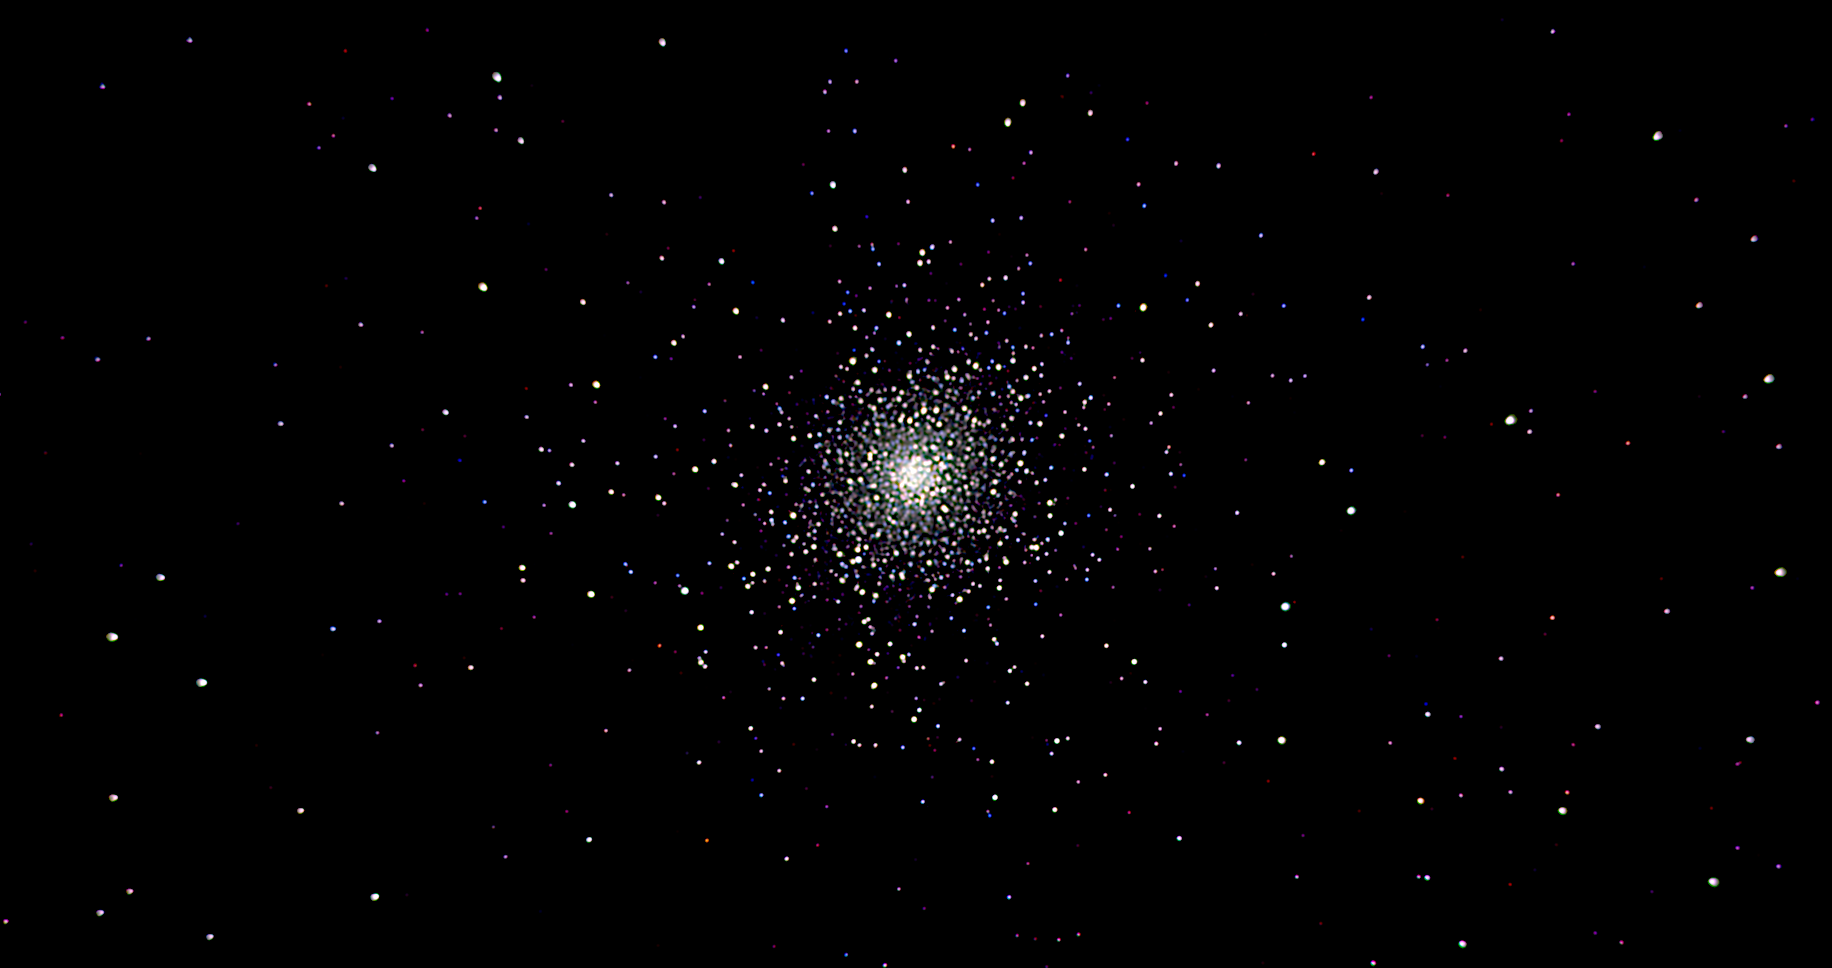
Messier 5
On the night of June 22 2022 I also took images of Messier 5, a globular cluster located in the constellation of the Serpent.
M5 is one of the oldest globular clusters in the Milky Way (about 14 billion years old) and contains about 500,000 stars. It is located at a distance of 24,500 light years from Earth, in the galactic halo of the Milky Way. M5 is one of the largest known globular clusters, with a diameter of about 165 light years.
Magnitude 6.7
I used the RisingTech G3M385 planetary camera with UV/IR filter. Moonless night, few clouds, but with limited visibility due to humidity. I took about 300 images with 2, 4, 8 and 16 second exposures, stacked using DSS and post processed using GIMP and Registax (wavelets).
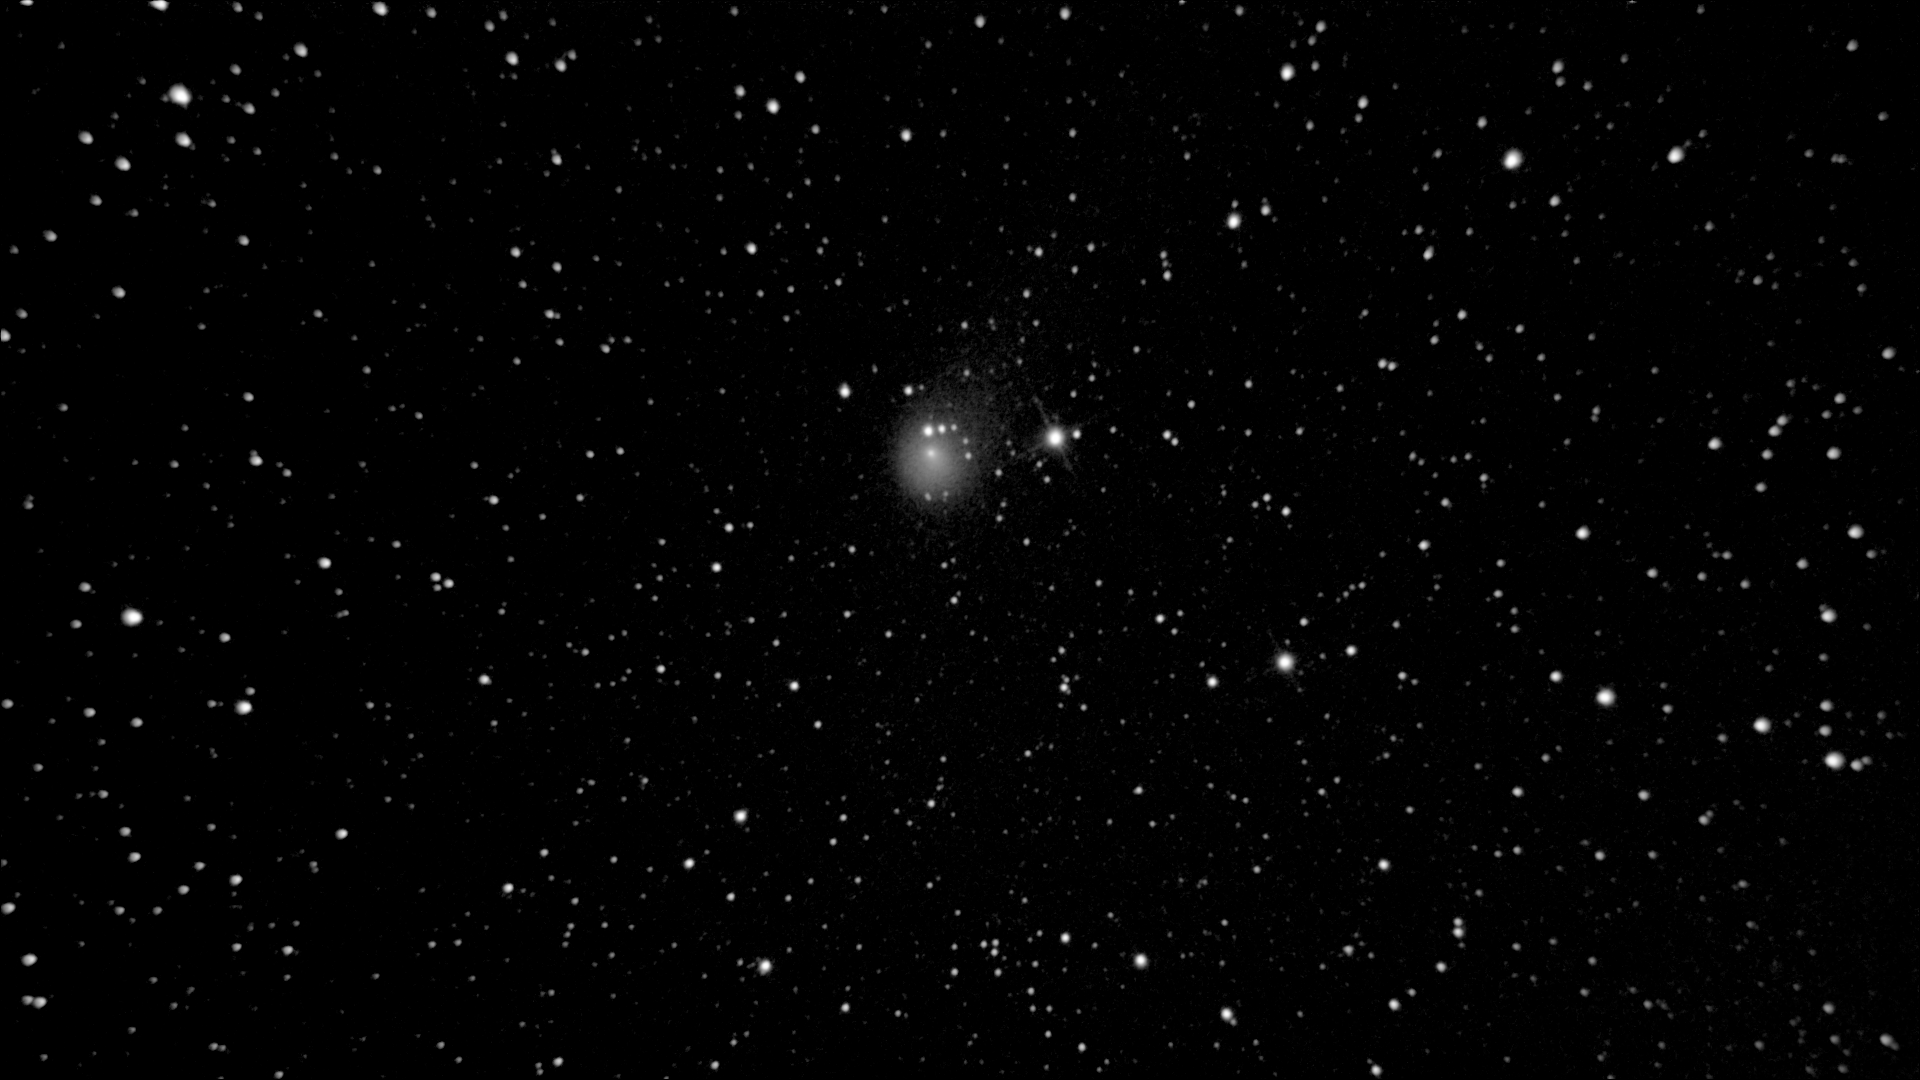
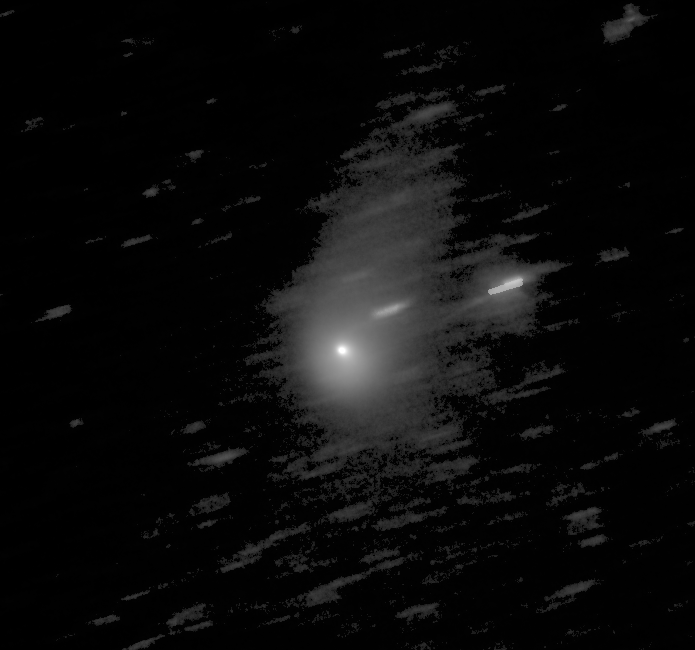
Comet C/2017 K2 PanSTARRS
Last night, June 26 2022, I was taking images for the first time of a comet and observing its movement in the sky.
C/2017 K2 (PanSTARRS) is a comet from the Oort cloud and follows a hyperbolic orbit. It was discovered in May 2017 when it was beyond the orbit of Saturn. Right now it is about 280 million km from Earth and has a magnitude between 8-9. It is more or less close to Cebalrai (Beta Ophiuchi) on a background full of stars at the edge of the Milky Way.
This comet will reach perihelion on December 19. Time to time. Hopefully it will be very bright.
Two images are shown that correspond to the start and end of the session (1.5 hours interval). 25 images with 5-second exposures have been superimposed on the first image and 10 images with 10-second exposures on the second image. Unfortunately, with the light pollution and the humidity here, the tail is not visible.
I used the RisingTech G3M385 planetary camera, with Sony IMX385 sensor and UV/IR filter. Moonless night, few clouds.
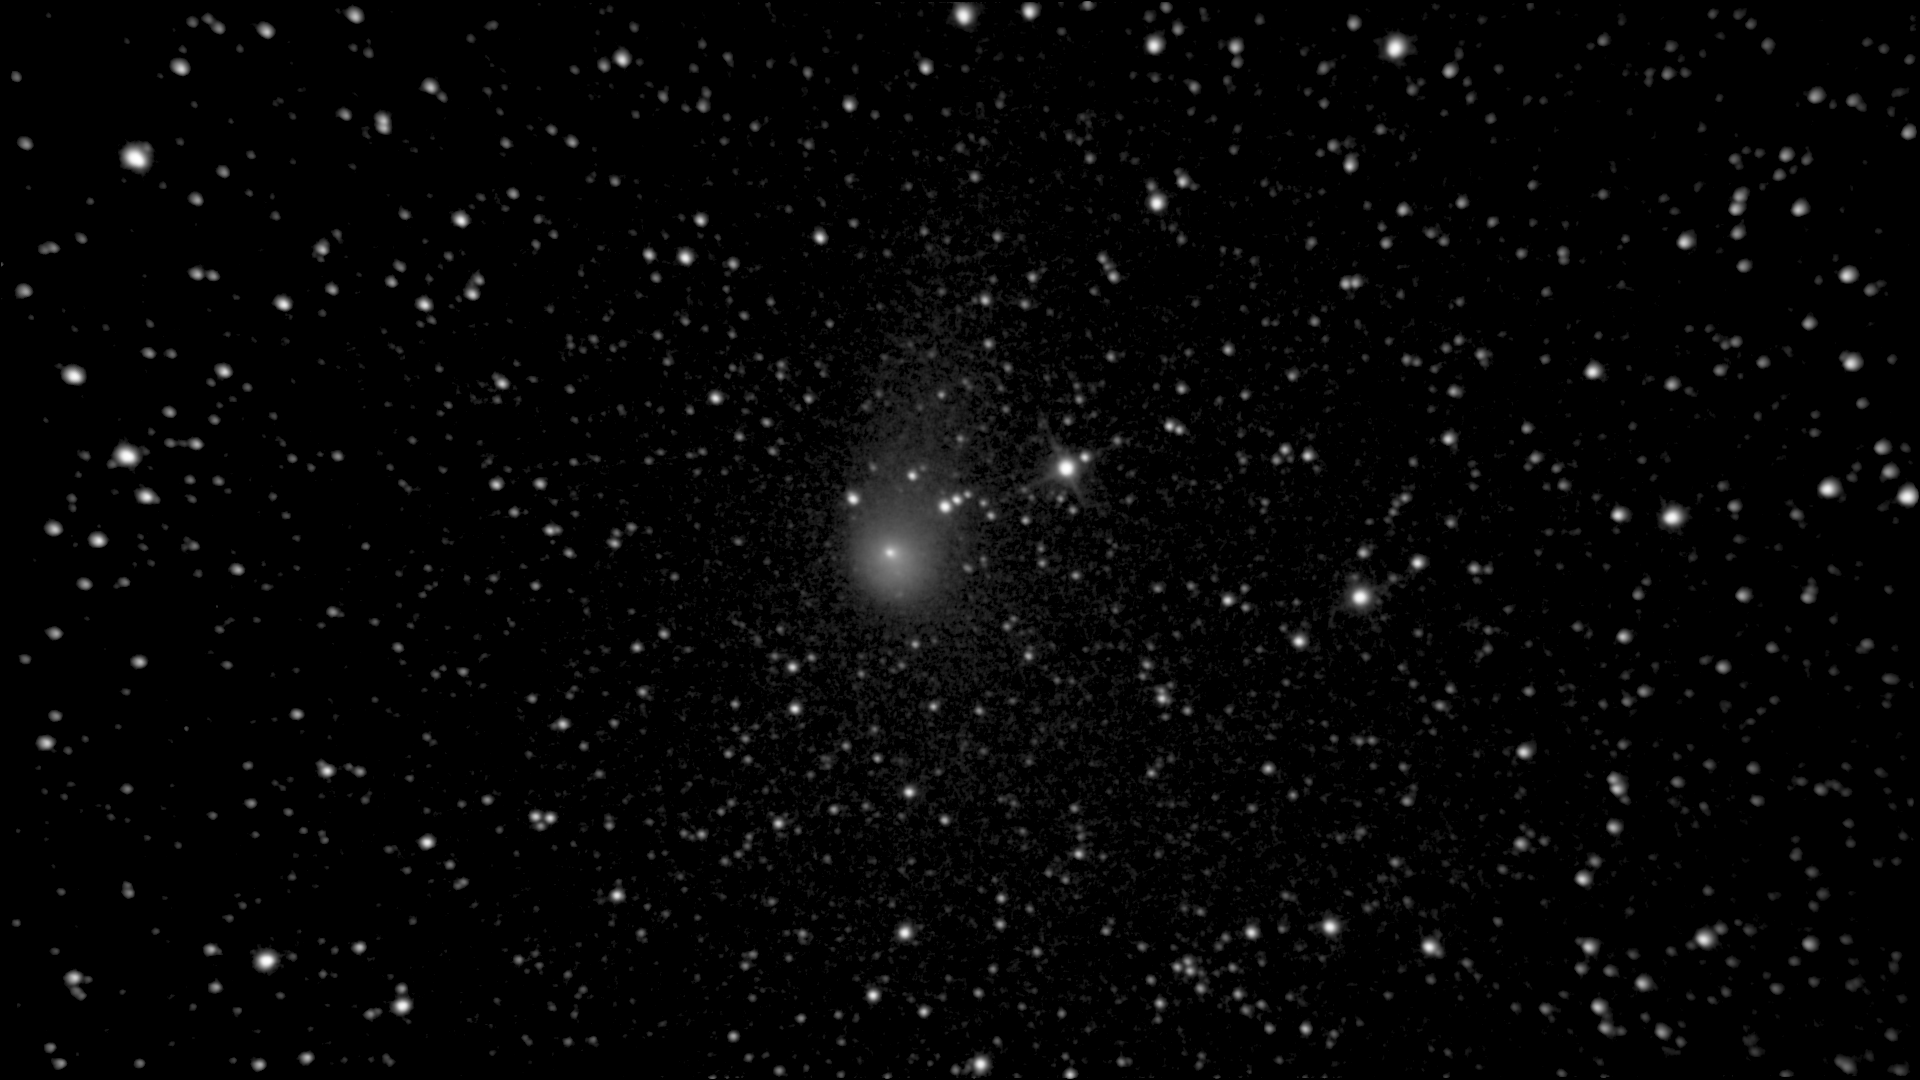
I know now how to use DSS to stack images from comets properly. So I stacked the 280 images of 10 seconds exposure that I got to try to get the tail of the comet. And the comet certainly has a tail:
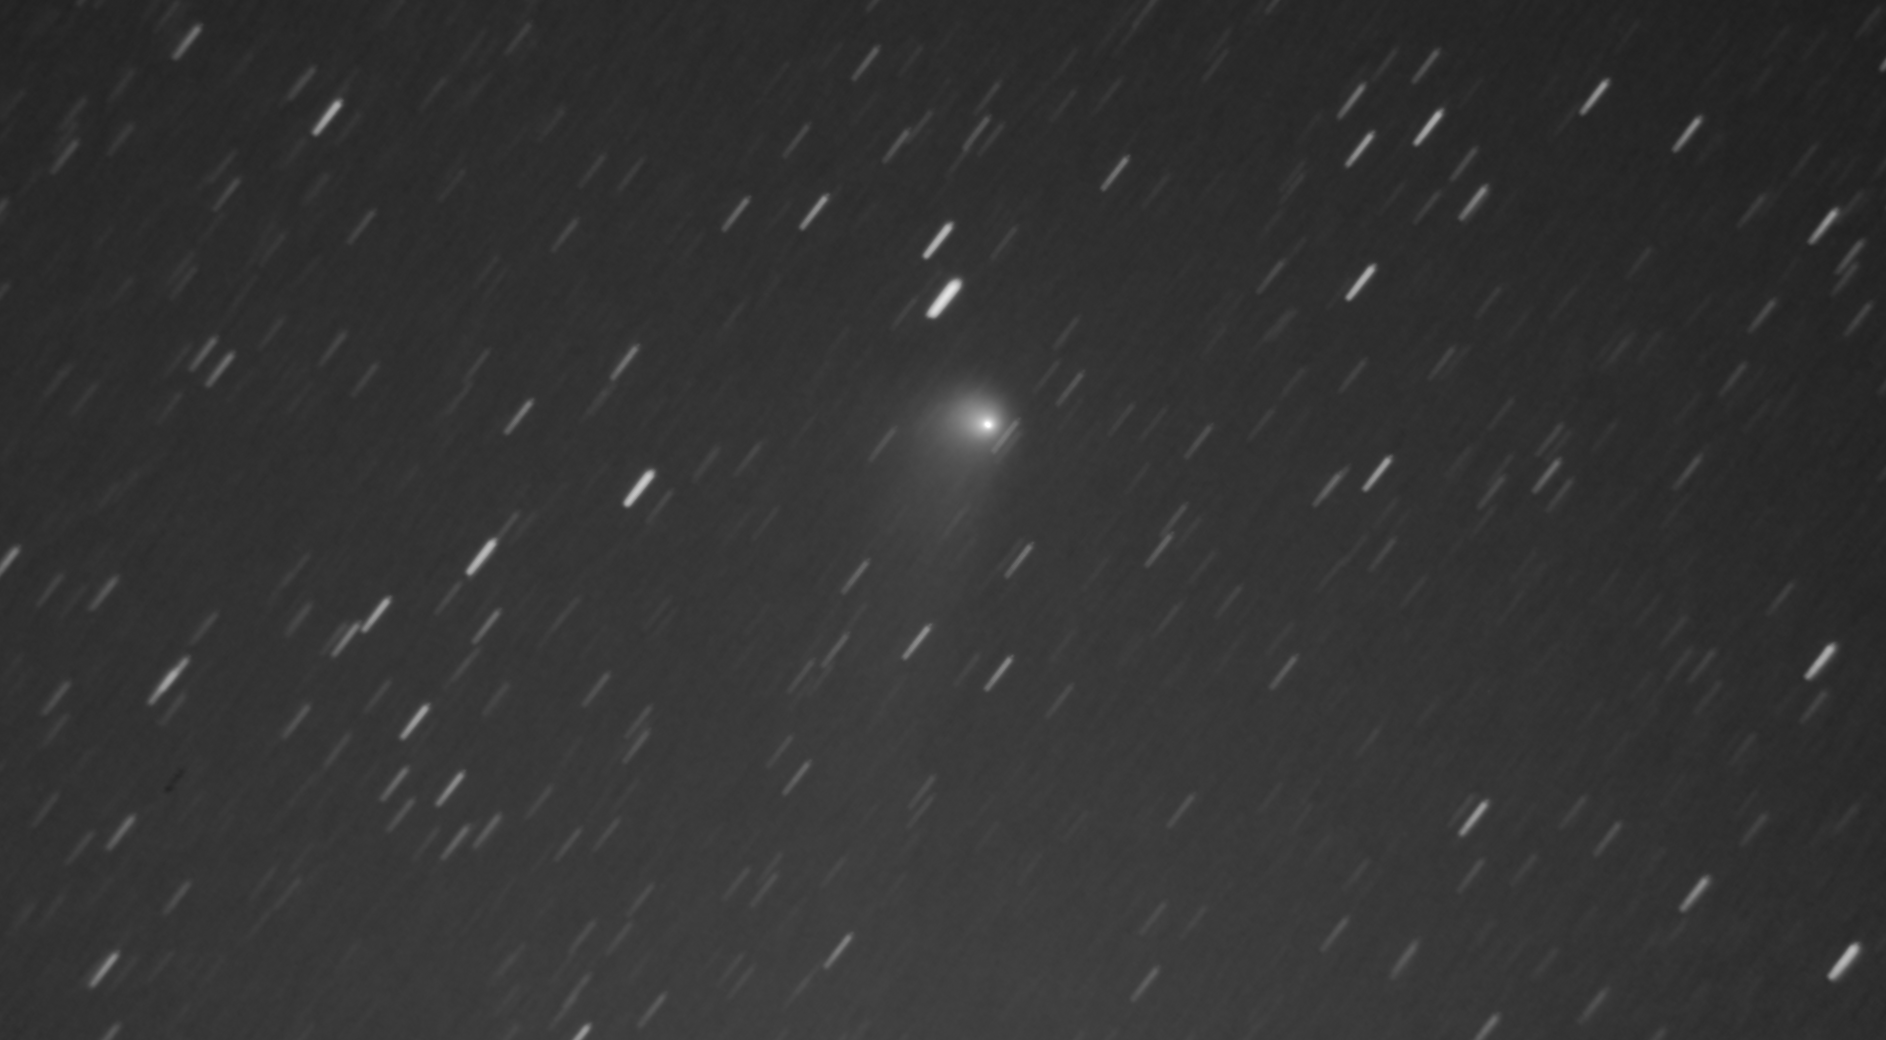
Comet K2 has passed through the constellation of Ophiuchus and is lower on the horizon every day. Photo taken on August 1, from 300 images with exposures of 10 seconds with the telescope Skywatcher Skyhawk-1145p
Messier 17
The night of June 26 was also for M17, the Omega nebula.
The Omega Nebula is an H II region in the constellation of Sagittarius and has magnitude 6. It is located at a distance of between 5,000 and 6,000 light years and is about 15 light years in diameter. It is considered one of the brightest and most massive star-forming regions in our galaxy.
I used the RisingTech G3M385 planetary camera, with Sony IMX385 sensor and UV/IR filter. Moonless night, few clouds.
10 second exposures. Took 300 images, of which 200 were useful. The final result of processing with GIMP and Registax is shown in the image.

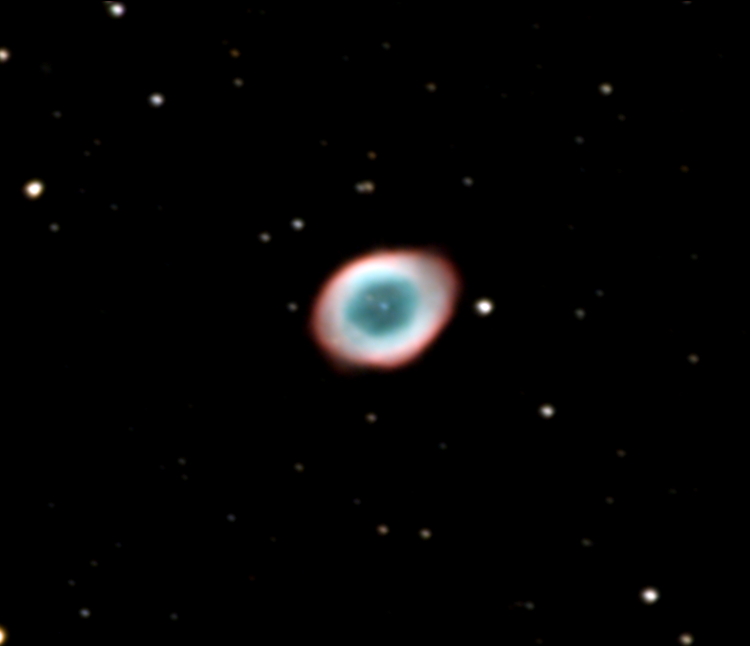
Messier 57
It had been a long time since I took my friend Mak out for a walk, so taking advantage of the fact that I had the constellation Lyra at the zenith, I went for M57, the small but very famous Ring Nebula of Lyra.
M57 is a planetary nebula. It is located 2,300 light years from Earth and is observed at magnitude +8.80. The central star is a white dwarf slightly larger than the Sun. It is a very hot star, reaches 100,000K and has a magnitude of 15.8. This star is the one that originated the nebula. The degree of ionization of the matter in the ring decreases as the distance from the central star increases. The innermost region is rich in helium and is darker because it basically emits ultraviolet rays. In the visible part of the ring, the predominant color is green, corresponding to the forbidden transition of ionized oxygen and nitrogen. In the external part only the red radiation produced by hydrogen is observed.
On a clear, cloudless but humit night on July 10th, I used the Skywatcher Maksutov 127/1500 F12 telescope, Skywatcher Eq5 pro synscan goto mount, and the RisingTech G3M385 planetary camera, with Sony IMX385 sensor and UV/IR filter. About 60 useful 30-second exposures were taken. The images have been processed using DSS and Fitswork.
This is the first time I've used the Mak to photograph a deep space object, and I was surprised that despite working at F12, the image was bright enough to work with relatively short exposures.

Messier 16
M16, the Eagle Nebula. M16 is made up of a nebula and an open star cluster. It is located in the constellation Serpens (the Serpent). It is observed with magnitude 6.2 and is one of the brightest nebulae in the sky. This facilitates its observation even though in our latitudes it is quite low on the horizon.
The nebula emits a large amount of red light (HII region). The entire complex is about 7,000 light years away. The famous name given to the pillars of this nebula ("The Pillars of Creation") is because they are a breeding ground for stars.
There was a lot of humidity in the air, and although there was no Moon for most of the time, light pollution greatly affected the observation. Even near the zenith, a nebula of magnitude 7.2 was not well observed. Still, the nebula can be seen in all its splendor.
The PHD2 guidance system was used for the first time with the Skywatcher Eq5 Pro SynscanGoto mount. I used the Skywatcher Skyhawk-1145p telescope, Newton type, 450mm focal length, 114mm aperture, F4. RisingTech G3M385 planetary camera, with Sony IMX385 sensor and UV/IR filter. 200 images were obtained using 35-second exposures. The images were processed using DSS, Registax and Gimp. The end result is shown in the photo.

Messier 22
Messier 22 is a globular cluster located in the constellation of Sagittarius. It is one of the brightest globular clusters visible in the night sky, and has an apparent magnitude of 5.5, making it the brightest globular cluster at our latitudes. The brightest stars are magnitude 11.
Located about 10,400 light-years from our Solar System, M22 occupies a volume of about 200 light-years in diameter. It consists of at least 70,000 individual stars. Most of them are about the same age: about 12 billion years old and contain few metals.
The Skywatcher Eq5 Pro SynscanGoto mount was used with the Skywatcher Skyhawk-1145p telescope, Newton type, 450mm focal length, 114mm aperture, F4. RisingTech G3M385 planetary camera, with Sony IMX385 sensor and UV/IR filter. In August 1st, 200 images with 10-second exposures were obtained, which were processed using Deep Space Stacker (DSS) and GIMP. The end result is tremendous. According to DSS in the image there are 439 visible stars, although there are surely more.

Messier 10
Messier 10 is a globular star cluster located in the constellation Ophiuchus. It is located at a distance of 14,300 light years from Earth and has an apparent magnitude of 6.4. It contains about 100,000 stars and has a spatial diameter of 83 light-years, but the central region spans about 35 light-years. Unlike other clusters, the central region of M10 contains many blue stars, stars formed 2-5 billion years ago that appear younger because they are bluer and more luminous than their neighbors.
The Skywatcher Explorer 130PDS telescope was used for the first time, Newton F5 type with 130mm aperture and 650mm focal length, mounted on a Skywatcher Eq5 Pro SynscanGoto. RisingTech G3M385 planetary camera, with Sony IMX385 sensor and UV/IR filter. In August 3rd, 50 images with 20 second exposures were obtained, which were processed using Deep Space Stacker (DSS), Fitswork, Registax and GIMP. Curious the high number of blue stars observed.